Yamaha PF-1000 Owner's Manual - Page 16
Setting Up the PF-1000, Connect the power cable., About the pedal unit, About the music rest
 |
View all Yamaha PF-1000 manuals
Add to My Manuals
Save this manual to your list of manuals |
Page 16 highlights
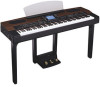
Setting Up the PF-1000 You do not need to install the stand to play the PF-1000. However, if you wish to assemble the stand, refer to page 150. About the pedal unit Insert the plug of the pedal unit, with the arrow in the plug facing upward. Turning the Power On and Off Connect the power cable. 1 First insert the plug of the power cable into the [AC INLET] on the left side panel, then plug the other end of the cable into the proper AC outlet on the wall. VIDEO OUT L/L+RAUX IN R AC INLET L/L+R AUX R OUT PEDAL AUX PEDAL L LEVEL FIXED R MIDI IN OUT PHONES THRU POONWER OFF MIHDIOPSCT-2SEPCLE-1CMTac TO HOST AC INLET PEDAL VIDEO OUT L/L+RAUX IN R AC INLET L/L+R AUX R OUT PEDAL AUX PEDAL L LEVEL FIXED R MIDI IN OUT PHONES THRU POONWER OFF MIHDIOPSCT-2SEPCLE-1CMTac TO HOST 220V 130V 240V VOLTAGE SELECTOR 110V About the music rest The PF-1000 is supplied with a music rest that can be attached to the instrument by inserting it into the holes at the rear of the control panel. (The shape of plug differs depending on locale.) WARNING Make sure your PF-1000 is rated for the AC voltage supplied in the area in which it is to be used (voltage rating appears on the name plate on the bottom panel). In some areas, a voltage selector may be provided on the bottom panel of the main keyboard unit. Make sure that the voltage selector is set for the voltage in your area. Connecting the unit to the wrong AC supply can cause serious damage to the internal circuitry and may even pose a shock hazard! Use only the AC power cord supplied with the PF-1000. If the supplied cord is lost or damaged and needs to be replaced, contact your Yamaha dealer. The use of an inappropriate replacement can pose a fire and shock hazard! The type of AC power cord provided with the PF-1000 may be different depending on the country in which it is purchased. (In some areas a plug adaptor may be provided to match the pin configuration of the AC wall outlets in your area.) DO NOT modify the plug provided with the PF-1000. If the plug will not fit the outlet, have a proper outlet installed by a qualified electrician. 16 PF-1000
-
 1
1 -
2
-
3
-
4
-
5
-
6
-
7
-
8
-
9
-
10
-
 11
11 -
 12
12 -
 13
13 -
 14
14 -
 15
15 -
 16
16 -
 17
17 -
 18
18 -
 19
19 -
 20
20 -
 21
21 -
22
-
23
-
24
-
25
-
26
-
27
-
28
-
29
-
30
-
31
-
32
-
33
-
34
-
35
-
36
-
37
-
38
-
39
-
40
-
41
-
42
-
43
-
44
-
45
-
46
-
47
-
48
-
49
-
50
-
51
-
52
-
53
-
54
-
55
-
56
-
57
-
58
-
59
-
60
-
61
-
62
-
63
-
64
-
65
-
66
-
67
-
68
-
69
-
70
-
71
-
72
-
73
-
74
-
75
-
76
-
77
-
78
-
79
-
80
-
81
-
82
-
83
-
84
-
85
-
86
-
87
-
88
-
89
-
90
-
91
-
92
-
93
-
94
-
95
-
96
-
97
-
98
-
99
-
100
-
101
-
102
-
103
-
104
-
105
-
106
-
107
-
108
-
109
-
110
-
111
-
112
-
113
-
114
-
115
-
116
-
117
-
118
-
119
-
120
-
121
-
122
-
123
-
124
-
125
-
126
-
127
-
128
-
129
-
130
-
131
-
132
-
133
-
134
-
135
-
136
-
137
-
138
-
139
-
140
-
141
-
142
-
143
-
144
-
145
-
146
-
147
-
148
-
149
-
150
-
151
-
152
-
153
-
154
-
155
-
156
-
157
-
158
-
159
-
160
-
161
-
162
-
163
-
164
 |
 |
