Yamaha POCKETRAK Reference Manual - Page 9
Basic Operation, Recording/stopping/playing back/setting the recording and playback levels - pr7 playback volume
 |
View all Yamaha POCKETRAK manuals
Add to My Manuals
Save this manual to your list of manuals |
Page 9 highlights
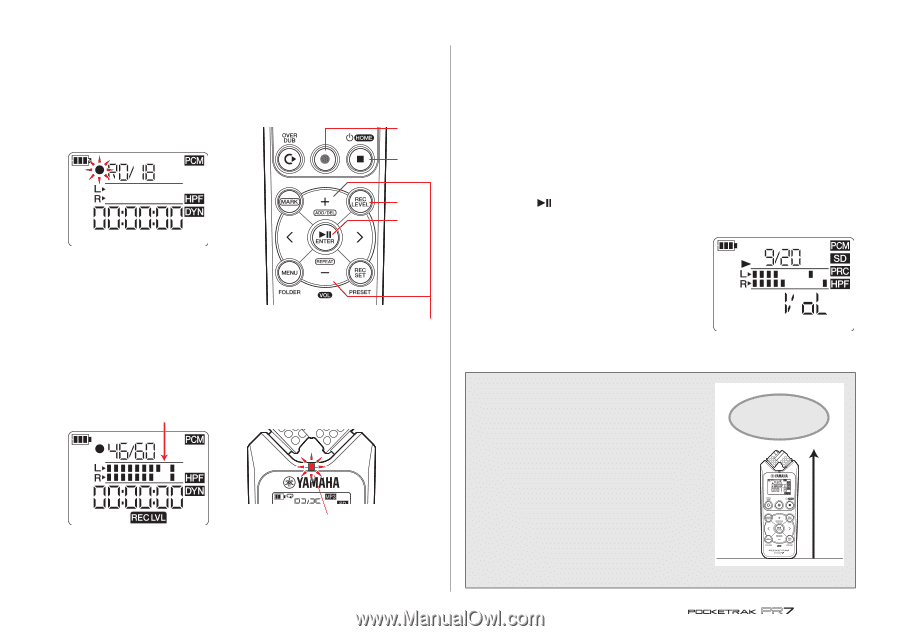
Basic Operation Basic Operation Recording/stopping/playing back/setting the recording and playback levels 1. Press the [●] (Record) button. The PR7 enters recording standby mode. 1, 5 6, 9 2, 4 7 2. To set the recording level, press the [REC LEVEL] button. If you already set the recording level or if the ALC HI or ALC LO (Auto Level Control) (➔ page 14) was activated as the dynamics control, proceed to Step 5. 3, 8 3. While observing the level meter, press the [+] or [-] button to adjust the recording level. Set the recording level so that the level meter does not deflect all the way to the right. The REC LED will flash rapidly if the meter deflects all the way. Guideline for the maximum volume If the level is too high: Flash rapidly NOTE You can set different recording levels for the built-in microphones, external microphone, and external input. While you are setting these levels, the screen will indicate "MIC" or "LInE", depending on the recording source. 4. After you finish setting the recording level, press the [REC LEVEL] button again. The PR7 displays the recording standby screen. 5. Press the [●] (Record) button again. The PR7 starts recording. You can also press the [REC LEVEL] button to adjust the recording level. 6. After recording is complete, press the [■] (Stop) button. Recording is complete and an audio file is created. The playback position will automatically return to the beginning of the recorded audio file. 7. Press the [ ] (Play) button. The audio that was just recorded will play back. 8. While the audio file is playing, press the [+] or [-] button to adjust the playback level. The PR7 displays the screen shown on the right. 9. To stop playback, press the [■] (Stop) button. The playback position will automatically return to the top of the original file. Developer's column: Tips for recording with the built-in microphones You might wonder how to best orient and position the recorder when recording with the built-in microphones. One rule of thumb is to point the device straight ahead (from the built-in microphones) to the center of the recorded sound stage. Ideally, you should place the PR7 on a stable surface that will not be affected by noise from the floor. If you place the PR7 on top of a desk, place a soft cloth underneath it so that it will not pick up unnecessary noise. You should also take advantage of the PR7's excellent ability to reduce noise (page 14) and prevent excessive level of input (page 14). Center of the sound 9 Reference Manual
-
 1
1 -
2
-
3
-
 4
4 -
 5
5 -
 6
6 -
 7
7 -
 8
8 -
 9
9 -
 10
10 -
 11
11 -
 12
12 -
 13
13 -
 14
14 -
15
-
16
-
17
-
18
-
19
-
20
-
21
-
22
-
23
-
24
-
25
-
26
-
27
-
28
-
29
-
30
-
31
-
32
-
33
-
34
-
35
-
36
-
37
-
38
-
39
-
40
-
41
 |
 |