Yamaha PSR-E433 Owner's Manual - Page 43
Setting the Split Point, Playing Chords Without Style Playback, SplitPnt, PopBossa
 |
View all Yamaha PSR-E433 manuals
Add to My Manuals
Save this manual to your list of manuals |
Page 43 highlights
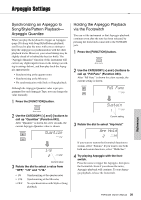
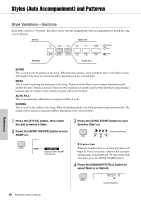
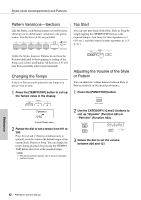
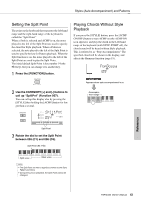
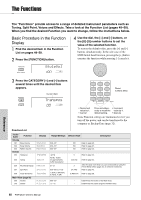
Styles (Auto Accompaniment) and Patterns Setting the Split Point The point on the keyboard that separates the left-hand range and the right-hand range of the keyboard is called the "Split Point." When a Style is selected and ACMP is on, the notes played to the left of the Split Point are used to specify the chord for Style playback. When a Pattern is selected, the note played to the left of the Split Point is used to specify the key for Pattern playback. When the Split function is on, the notes played to the left of the Split Point are used to play the Split Voice. The initial default Split Point is key number 54 (the F#2 key), but you can change it to another key. 1 Press the [FUNCTION] button. Playing Chords Without Style Playback If you press the [STYLE] button, press the [ACMP ON/OFF] button to turn ACMP on (the ACMP ON icon appears), and play the chord in the Left hand range of the keyboard (with SYNC START off), the chord sound will be heard without Style playback. This is referred to as "Stop Accompaniment." The specified chord will be shown in the display, and affects the Harmony function (page 19). PopBossa 109 Appears when auto accompaniment is on 2 Use the CATEGORY [+] and [-] buttons to call up "SplitPnt" (Function 007). You can call up this display also by pressing the [STYLE] then holding the [ACMP] button for longer than a second. SplitPnt 054 007 Accompaniment range Split Point 3 Rotate the dial to set the Split Point between 036 (C1) and 096 (C6). Split Point (54: F#2) Split voice Main voice NOTE • The Split Point set here is applied common to the Style, Pattern and Voice. • During the Lesson playback, the Split Point cannot be changed. Reference PSR-E433 Owner's Manual 43
-
 1
1 -
2
-
3
-
4
-
5
-
6
-
7
-
8
-
9
-
10
-
11
-
12
-
13
-
14
-
15
-
16
-
17
-
18
-
19
-
20
-
21
-
22
-
23
-
24
-
25
-
26
-
27
-
28
-
29
-
30
-
31
-
32
-
33
-
34
-
35
-
36
-
37
-
 38
38 -
 39
39 -
 40
40 -
 41
41 -
 42
42 -
 43
43 -
 44
44 -
 45
45 -
 46
46 -
 47
47 -
 48
48 -
49
-
50
-
51
-
52
-
53
-
54
-
55
-
56
-
57
-
58
-
59
-
60
-
61
-
62
-
63
-
64
-
65
-
66
-
67
-
68
 |
 |