Yamaha RX V365 Owner's Manual - Page 15
Connecting video components, Information on jacks and cable plugs, Information on HDMI™ - digital optics
 |
UPC - 027108933047
View all Yamaha RX V365 manuals
Add to My Manuals
Save this manual to your list of manuals |
Page 15 highlights
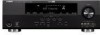
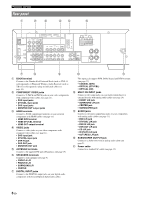
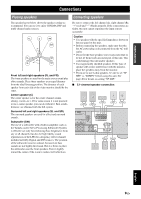
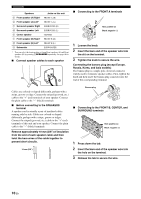
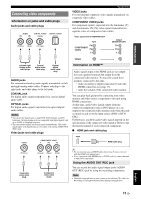
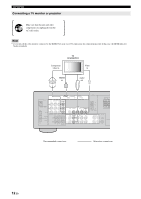
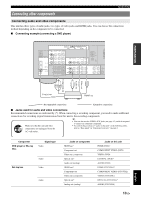
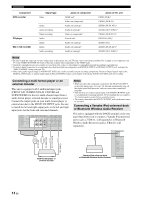
INTRODUCTION PREPARATION BASIC OPERATION ADVANCED OPERATION Connecting video components Information on jacks and cable plugs Audio jacks and cable plugs AUDIO L R DIGITAL AUDIO COAXIAL DIGITAL AUDIO OPTICAL (White) (Red) (Orange) L R C O Connections VIDEO jacks For conventional composite video signals transmitted via composite video cables. COMPONENT VIDEO jacks For component signals, separated into the luminance (Y) and chrominance (PB, PR) video signals transmitted on separate wires of component video cables. Video signal flow for MONITOR OUT Input PR COMPONENT VIDEO PB Y Output (MONITOR OUT) PR PB Y VIDEO Left and right analog audio cable plugs Coaxial digital audio cable plug Optical digital audio cable plug AUDIO jacks For conventional analog audio signals transmitted via left and right analog audio cables. Connect red plugs to the right jacks and white plugs to the left jacks. COAXIAL jack For digital audio signals transmitted via coaxial digital audio cable. OPTICAL jacks For digital audio signals transmitted via optical digital audio cables. Notes • You can use the digital jacks to input PCM, Dolby Digital, and DTS bitstreams. All digital input jacks are compatible with digital signals with up to 96 kHz of sampling frequency. • This unit handles digital and analog signals independently. Thus audio signals input at the digital jacks are not output at the analog AUDIO OUT (REC) jack. Video jacks and cable plugs VIDEO COMPONENT VIDEO Y PB PR Information on HDMI™ Audio signals input at the HDMI jack are not output from any speaker terminals but output from the connected video monitor. To enjoy the sound from speakers connected to this unit, - make an analog or digital connection besides the HDMI connection (see page 13). - mute the volume of the connected video monitor. You can play back pictures by connecting your video monitor and video source component to this unit using HDMI connections. At that time, audio/video signals output from the connected component (such as DVD player etc.) are output to the connected video monitor only when this unit is turned on and set to the input source (DVD or DTV/ CBL). Furthermore, available audio/video signals depend on the specification of the connected video monitor. Refer to the instruction manual of each connected component. ■ HDMI jack and cable plug HDMI HDMI cable plug (Yellow) (Green) (Blue) (Red) V Composite video cable plug Y PB PR Component video cable plugs y • We recommend using an HDMI cable shorter than 5 meters (16 feet) with the HDMI logo printed on it. • Use a conversion cable (HDMI jack ↔ DVI-D jack) to connect this unit to other DVI components. Using the AUDIO OUT REC jack You can record the audio signal output at the AUDIO OUT (REC) jack by using the recording components. Note • Check the copyright laws in your country to record from CDs, radio, etc. Recording of copyrighted material may infringe copyright laws. ADDITIONAL INFORMATION APPENDIX English 11 En
-
 1
1 -
2
-
3
-
4
-
5
-
6
-
7
-
8
-
9
-
 10
10 -
 11
11 -
 12
12 -
 13
13 -
 14
14 -
 15
15 -
 16
16 -
 17
17 -
 18
18 -
 19
19 -
 20
20 -
21
-
22
-
23
-
24
-
25
-
26
-
27
-
28
-
29
-
30
-
31
-
32
-
33
-
34
-
35
-
36
-
37
-
38
-
39
-
40
-
41
-
42
-
43
-
44
-
45
-
46
-
47
-
48
-
49
-
50
-
51
-
52
-
53
-
54
-
55
-
56
-
57
-
58
-
59
-
60
-
61
-
62
 |
 |
