Yamaha RX-V590 Owner's Manual - Page 14
U.S.A., Canada and, Canada - remote control
 |
View all Yamaha RX-V590 manuals
Add to My Manuals
Save this manual to your list of manuals |
Page 14 highlights
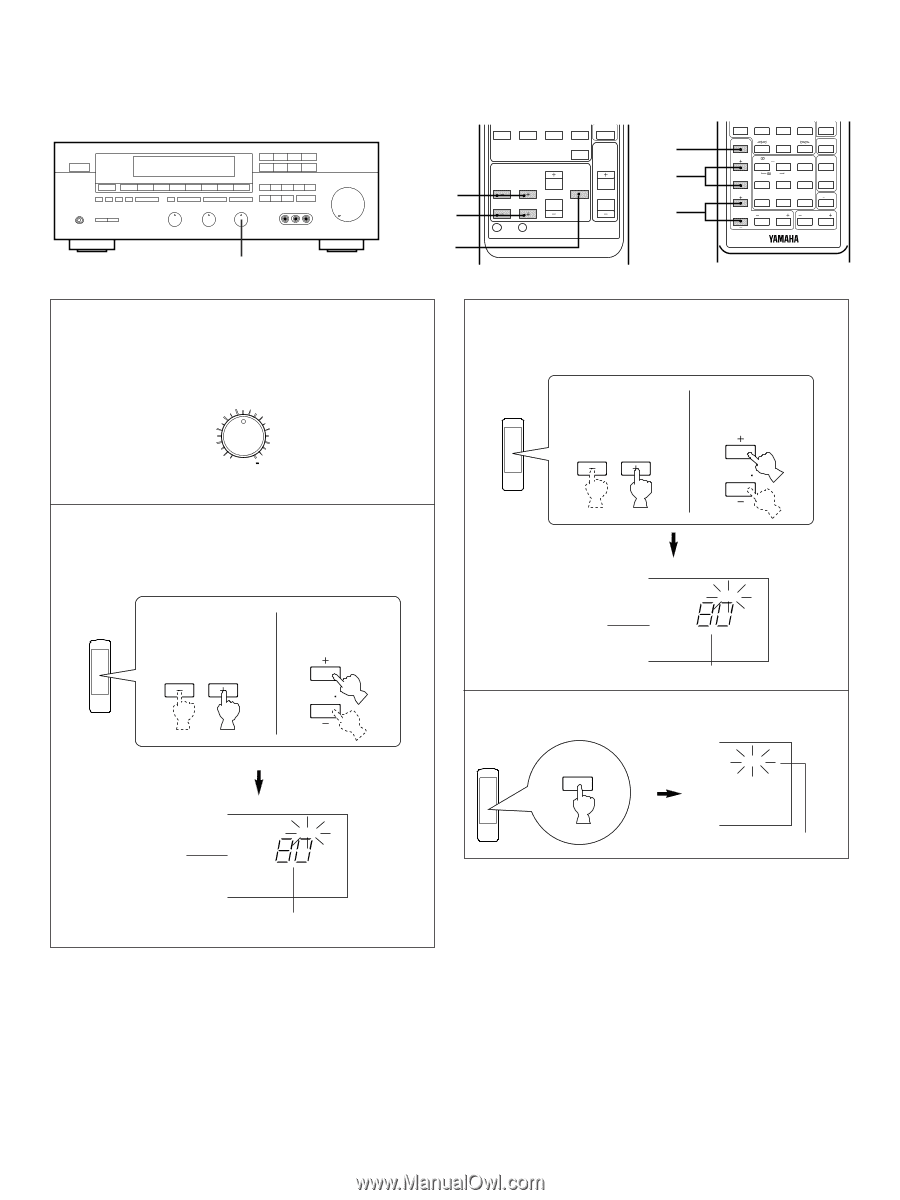
9 10 1 12 PRO LOGIC ENHANCED CONCERT VIDEO MONO MOVIE VCR 2 1 2 3 4 SURROUND STADIUM DISCO ROCK HALL V-AUX 5 6 7 8 DSP EFFECT ON/OFF MASTER VOLUME CENTER LEVEL REAR LEVEL DELAY TIME TEST RESET CLEAR 12 10 11 REC PAUSE DIR A PLAY DIR B TAPE MON TEST STOP LD/TV PRO LOGIC ENHANCED CNCT VIDEO VCR 1 CENTER SUR. LEVEL MONO MOVIE STADIUM DISCO VCR 2 ROCK HALL EFFECT ON/OFF V AUX REAR LEVEL DELAY TIME VOLUME 9 Adjust the BALANCE control so that the effect sound output level of the left front speaker and the right front speaker are the same. BALANCE 0 l l 2 2 3 3 4 L5 4 5R 11 Adjust the sound output level of the rear speakers to be at the same level as that of the front speakers with the REAR LEVEL keys. REAR LEVEL REAR LEVEL 10 Adjust the sound output level of the center speaker to be at the same level as that of the front speakers with the CENTER LEVEL keys. CENTER LEVEL CENTER LEVEL TEST Lights up. 0 REAR 12 Cancel the test tone. Adjustable TEST TEST R TEST Lights up. CENTER 00 Adjustable 14 Stops flashing and disappears Notes q Once you have completed these adjustments, you can adjust whole sound level on your audio system by using the VOLUME control (or the VOLUME keys on the remote control transmitter). q If you use external power amplifiers, their volume controls may also be adjusted to achieve proper balance. q In step 10, if the center channel mode is in the "PHANTOM" position, the sound output level of the center speaker cannot be adjusted. This is because in this mode, the center sound is automatically output from the left and right front speakers. q If there is insufficient sound output from the center and rear speakers, you may decrease the front speaker output level by setting the FRONT LEVEL switch on the rear panel to "-10 dB".
-
 1
1 -
2
-
3
-
4
-
5
-
6
-
7
-
8
-
 9
9 -
 10
10 -
 11
11 -
 12
12 -
 13
13 -
 14
14 -
 15
15 -
 16
16 -
 17
17 -
 18
18 -
 19
19 -
20
-
21
-
22
-
23
-
24
-
25
-
26
-
27
-
28
-
29
-
30
-
31
-
32
-
33
-
34
-
35
 |
 |