Yamaha RX-V595aRDS Owner's Manual - Page 8
Controls And Their Functions, Front Panel - manuale
 |
View all Yamaha RX-V595aRDS manuals
Add to My Manuals
Save this manual to your list of manuals |
Page 8 highlights
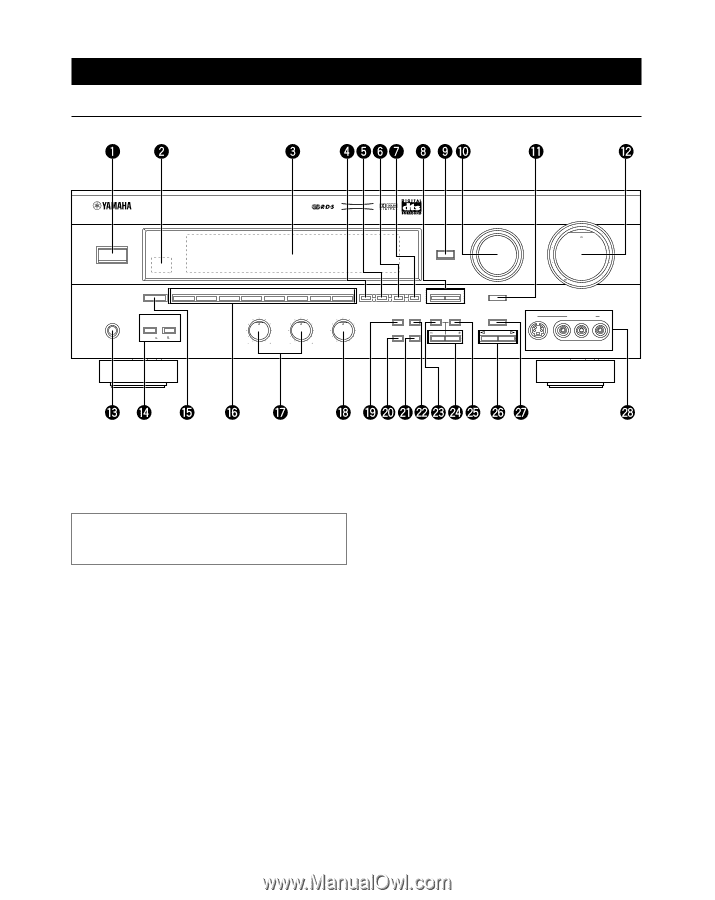
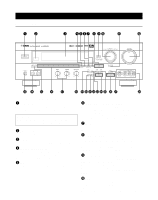
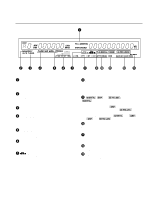
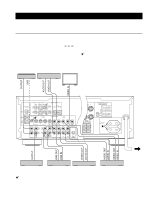
CONTROLS AND THEIR FUNCTIONS FRONT PANEL STANDBY/ON PHONES NATURAL SOUND AV RECEIVER A/B/C/D/E 1 2 3 SPEAKERS A B ON OFF CINEMA DSP INPUT VCR • V-AUX • TV/DBS • DVD/LD • CD • TUNER • PHONO VOLUME 18 20 12 22 8 TAPE/MD MON /EXT. DECODER TUNING 4 5 6 7 8 MEMORY EDIT MODE FM/AM DOWN TUNING UP BASS 0 1 1 2 2 3 3 4 5 4 5 TREBLE 0 1 1 2 2 3 3 4 5 4 5 MAN'L/AUTO FM BALANCE 0 1 1 2 2 3 4 L 5 3 4 5 R AUTO/MAN'L MONO RDS MODE EON TIME/ LEVEL SET MENU PTY SEEK MODE START INPUT MODE EFFECT PROGRAM 40 80 4 2 0 -dB VIDEO AUX 8 VIDEO VIDEO L AUDIO R Refer to pages 44 to 49 for the remote control. 1 STANDBY/ON Press this switch to turn on the power of this unit. Press it again to set this unit in the standby mode. Standby mode In this state, this unit consumes a very small quantity of power to receive infrared-signals from the remote control. 2 Remote control sensor This receives signals from the remote control. 3 Display This shows various information. (Refer to page 10 for details.) 4 MEMORY (MAN'L/AUTO FM) Press this button to store the broadcasting stations. When this button is pressed and held for more than three seconds, automatic preset tuning begins. 5 EDIT This button is used to exchange the assigment of two preset stations with each other. 8 6 TUNING MODE (AUTO/MAN'L MONO) Press this button to switch the tuning mode to automatic or manual. To select the automatic tuning mode, press this button so that the "AUTO TUNING" indicator lights up on the display. To select the manual tuning mode, press this button so that the "AUTO TUNING" indicator goes off. 7 FM/AM Press this button to switch the reception band between FM and AM. 8 TUNING UP/DOWN This button is used for tuning. Press the UP side to tune in to higher frequencies, and press the DOWN side to tune in to lower frequencies. When this unit is in the PTY SEEK mode, press this button to change the currently selected program type. 9 TAPE/MD MON / EXT. DECODER Press this button to play a tape or an MD. The "TAPE/MD MON" indicator lights up on the display. When you press the button next, the "TAPE/MD MON" indicator goes off, "EXT. DECDR" appears on the display and you can play the signal connected to the EXTERNAL DECODER INPUT terminals. 0 INPUT Turn this selector to select the input source (VCR, VIDEO AUX, TV/DBS, DVD/LD, CD, TUNER, PHONO) that you want to listen to or watch. The name of the selected input source appears on the display.
-
 1
1 -
2
-
 3
3 -
 4
4 -
 5
5 -
 6
6 -
 7
7 -
 8
8 -
 9
9 -
 10
10 -
 11
11 -
 12
12 -
 13
13 -
14
-
15
-
16
-
17
-
18
-
19
-
20
-
21
-
22
-
23
-
24
-
25
-
26
-
27
-
28
-
29
-
30
-
31
-
32
-
33
-
34
-
35
-
36
-
37
-
38
-
39
-
40
-
41
-
42
-
43
-
44
-
45
-
46
-
47
-
48
-
49
-
50
-
51
-
52
-
53
-
54
-
55
-
56
-
57
-
58
-
59
-
60
 |
 |