Yamaha RX-V863 Owner's Manual - Page 116
SIRIUS Satellite Radio Parental Lock, Monitor check - receiver reset with no remote
 |
View all Yamaha RX-V863 manuals
Add to My Manuals
Save this manual to your list of manuals |
Page 116 highlights
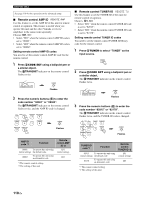
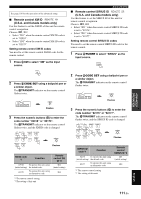
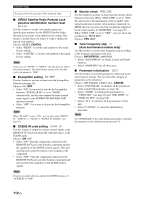
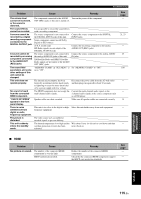
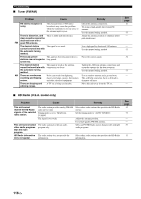
Advanced setup See page 109 for the operation of the advanced setup. ■ SIRIUS Satellite Radio Parental Lock personal identification number reset SR PIN Use this feature to set the code number (personal identification number) for the SIRIUS Satellite Radio Parental Lock feature to the initial factory setting. This feature is useful when you forget or want to change the current code number. Choices: RESET, CANCEL • Select "RESET" to set the code number to the initial factory setting. • Select "CANCEL" to set the code number to the initial factory setting. Note Even if you set "SR PIN" to "RESET", this unit does not unlock the locked channels. The initial factory setting of the Parental Lock code number is "0000". ■ Bi-amplifier setting BI-AMP Use this feature to activate or deactivate the bi-amplifier function (see page 16). Choices: ON, OFF • Select "ON" if you want to activate the bi-amplifier function. "SUR.B L/R SP" is set to "NONE" automatically, and this unit outputs the front channel audio signals at the SURROUND BACK/BI-AMP speaker terminals. • Select "OFF" if you want to deactivate the bi-amplifier function. Note When "BI-AMP" is set to "ON", you can only select "FRONT B", "ZONE B", or "NONE" in "EXTRA SP ASSIGN" (see page 87). ■ SCENE IR code setting SCENE IR Use this feature to output the remote control signals at the REMOTE OUT jack automatically when this unit is in the SCENE mode. Choices: ON, OFF • Select "ON" when the component connected to the REMOTE OUT jack is the Yamaha component and has the capability of the SCENE control signals. This unit automatically sends the remote control signals to the component. • Select "OFF" when the component connected to the REMOTE OUT jack is not the Yamaha component and does not have the capability of the SCENE control signals. Note If noises are output when you operate the SCENE function, set "SCENE IR" to "OFF". ■ Monitor check MON.CHK Use this feature to activate or deactivate the monitor check function of this unit. When "MON. CHK" is set to "YES", this unit receives the information of the available video signal resolutions from the video monitor connected via HDMI and you can only select the resolutions supported by the video monitor in "HDMI RES." (see page 99). When "MON. CHK" is set to "SKIP", you can select any resolution in "HDMI RES.". Choices: YES, SKIP ■ Tuner frequency step TU (Asia and General models only) Use this feature to set the tuner frequency step according to the frequency spacing in your area. Choices: AM10/FM100, AM9/FM50 • Select "AM10/FM100" for North, Central and South America. • Select "AM9/FM50" for all other areas. ■ Parameter initialization INIT Use this feature to reset the parameters of this unit to the initial factory settings. You can select the category of parameters to be initialized. Choices: DSP PARAM, VIDEO, ALL, CANCEL • Select "DSP PARAM" to initialize all the parameters of the sound field programs (see page 74). • Select "VIDEO" to initialize the parameters in "VIDEO SET" (see page 98) and "OSD SHIFT" in "DISPLAY SET" (see page 98). • Select "ALL" to initialize all the parameters of this unit. • Select "CANCEL" to cancel the initialization procedure. Note Use "INITIALIZE" in the sound field program menu to initialize the parameters of the desired program (see page 74). 112 En
-
 1
1 -
2
-
3
-
4
-
5
-
6
-
7
-
8
-
9
-
10
-
11
-
12
-
13
-
14
-
15
-
16
-
17
-
18
-
19
-
20
-
21
-
22
-
23
-
24
-
25
-
26
-
27
-
28
-
29
-
30
-
31
-
32
-
33
-
34
-
35
-
36
-
37
-
38
-
39
-
40
-
41
-
42
-
43
-
44
-
45
-
46
-
47
-
48
-
49
-
50
-
51
-
52
-
53
-
54
-
55
-
56
-
57
-
58
-
59
-
60
-
61
-
62
-
63
-
64
-
65
-
66
-
67
-
68
-
69
-
70
-
71
-
72
-
73
-
74
-
75
-
76
-
77
-
78
-
79
-
80
-
81
-
82
-
83
-
84
-
85
-
86
-
87
-
88
-
89
-
90
-
91
-
92
-
93
-
94
-
95
-
96
-
97
-
98
-
99
-
100
-
101
-
102
-
103
-
104
-
105
-
106
-
107
-
108
-
109
-
110
-
 111
111 -
 112
112 -
 113
113 -
 114
114 -
 115
115 -
 116
116 -
 117
117 -
 118
118 -
 119
119 -
 120
120 -
 121
121 -
122
-
123
-
124
-
125
-
126
-
127
-
128
-
129
-
130
-
131
-
132
-
133
-
134
-
135
-
136
-
137
-
138
-
139
-
140
-
141
-
142
-
143
-
144
-
145
-
146
-
147
-
148
-
149
-
150
-
151
-
152
 |
 |