Yamaha SWR2100P-10G SWR2100P-10G/SWR2100P-5G Owners Manual - Page 17
Attaching the rack mount
 |
View all Yamaha SWR2100P-10G manuals
Add to My Manuals
Save this manual to your list of manuals |
Page 17 highlights
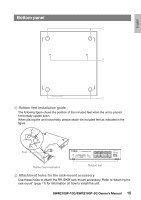
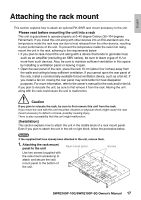
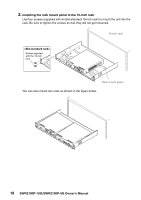
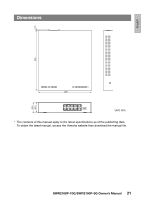
English Attaching the rack mount This section explains how to attach an optional RK-SWR rack mount accessory to the unit. Please read before mounting the unit into a rack This unit is guaranteed to operate properly at 0-40 degree Celsius (32-104 degrees Fahrenheit). If you install this unit along with other devices into an EIA-standard rack, the temperature inside the rack may rise due to heat released from the other devices, resulting in poor performance of the unit. To prevent the temperature inside the rack from rising, mount the unit in the rack, adhering to the requirements below: • If you plan to rack-mount the unit along with a device that tends to generate heat, such as an amplifier (excluding an XMV series), be sure to leave a gap of 1U or more from such devices. Also, be sure to maintain sufficient ventilation in this space by installing a ventilation panel or leaving it open. • Open the rear panel of the rack, place the rack 10 cm (about four inches) away from the walls and ceiling to keep sufficient ventilation. If you cannot open the rear panel of the rack, install a commercially-available forced ventilation device, such as a fan kit. If you install a fan kit, closing the rear panel may work better for heat dissipation purposes. For more information, refer to the owner's manual for the rack and/or fan kit. If you plan to relocate the unit, be sure to first remove it from the rack. Moving the unit along with the rack could cause the unit to malfunction. Caution If you plan to relocate the rack, be sure to first remove this unit from the rack. If you move the rack with this unit mounted, vibration or physical shock might cause the rack mount accessory to deform or break, possibly causing injury. There is also a possibility that this unit might malfunction. [Installation] This section explains how to attach the unit in the middle block of a rack mount panel. Even if you plan to attach the unit in the left or right block, follow the procedure below. Notice If the supplied feet have already been attached to the unit, remove them. 1. Attaching the rack mount panel to the unit Rack mount panel Screws Use two screws (supplied with the rack-mount accessory) to attach and secure the rack mount panel to the bottom of the unit. SWR2100P-10G/SWR2100P-5G Owner's Manual 17
-
 1
1 -
2
-
3
-
4
-
5
-
6
-
7
-
8
-
9
-
10
-
11
-
 12
12 -
 13
13 -
 14
14 -
 15
15 -
 16
16 -
 17
17 -
 18
18 -
 19
19 -
 20
20 -
 21
21 -
 22
22 -
23
-
24
-
25
-
26
-
27
-
28
 |
 |
