Yamaha SWR2100P-10G SWR2100P-10G/SWR2100P-5G Owners Manual - Page 19
Connections
 |
View all Yamaha SWR2100P-10G manuals
Add to My Manuals
Save this manual to your list of manuals |
Page 19 highlights
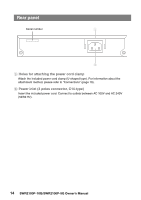
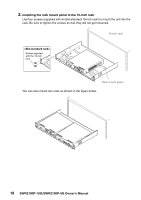
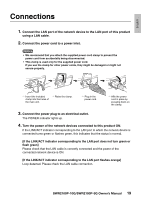
English Connections 1. Connect the LAN port of the network device to the LAN port of this product using a LAN cable. 2. Connect the power cord to a power inlet. Notice • We recommend that you attach the supplied power cord clamp to prevent the power cord from accidentally being disconnected. • This clamp is used only for the supplied power cord. If you use the clamp for other power cords, they might be damaged or might not secure properly. 1 Insert the included clamp into the holes of the main unit. 2 Raise the clamp. 3 Plug in the power cord. 4 Affix the power cord in place by pressing down on the clamp. 3. Connect the power plug to an electrical outlet. The POWER indicator lights up. 4. Turn the power of the network devices connected to this product ON. If the LINK/ACT indicator corresponding to the LAN port to which the network device is connected turns green or flashes green, this indicates that the status is normal. [If the LINK/ACT indicator corresponding to the LAN port does not turn green or flash green] Please check that the LAN cable is correctly connected and the power of the connected network device is ON. [If the LINK/ACT indicator corresponding to the LAN port flashes orange] Loop detected. Please check the LAN cable connection. SWR2100P-10G/SWR2100P-5G Owner's Manual 19
-
 1
1 -
2
-
3
-
4
-
5
-
6
-
7
-
8
-
9
-
10
-
11
-
12
-
13
-
 14
14 -
 15
15 -
 16
16 -
 17
17 -
 18
18 -
 19
19 -
 20
20 -
 21
21 -
 22
22 -
 23
23 -
 24
24 -
25
-
26
-
27
-
28
 |
 |
