Zenith Z23LZ6R Operating Guide - Page 10
Installation - wall mount
 |
UPC - 044642702281
View all Zenith Z23LZ6R manuals
Add to My Manuals
Save this manual to your list of manuals |
Page 10 highlights
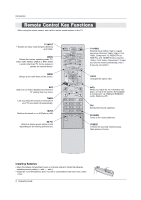
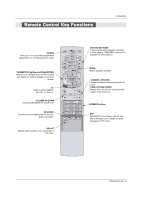
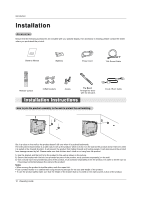
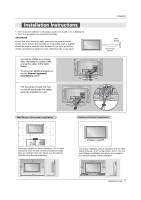
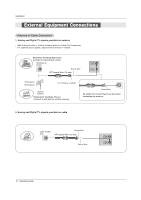
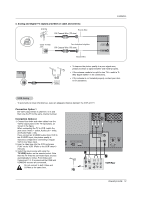
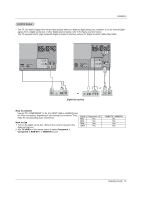
Introduction Installation Accessories Ensure that the following accessories are included with your plasma display. If an accessory is missing, please contact the dealer where you purchased the product. Owner's Manual 1.5V 1.5V Batteries Power Cord 75Ω Round Cable TV INPUT TV/VIDEO MODE DAY - GUIDE DAY + EXIT TIMER CC FLASHBK Remote Control 4-Wall brackets 2-bolts Tie Band Arrange the wires with the tie band. Installation Instructions How to join the product assembly to the wall to protect the set tumbling D-sub 15 pin Cable 1 2 3 Set it up close to the wall so the product doesn't fall over when it is pushed backwards. The instructions shown below is a safer way to set up the product, which is to fix it on the wall so the product doesn't fall over when it is pulled in the forward direction. It will prevent the product from falling forward and hurting people. It will also prevent the product from damage caused by fall. Please make sure that children don't climb on or hang from the product. 1. Use the bracket and the bolt to fix the product to the wall as shown in the picture. 2. Secure the bracket with the bolt (not provided as parts of the product, must purchase separately) on the wall. 3. Use a sturdy rope (not provided as parts of the product, must purchase separately) to tie the product. It is safer to tie the rope so it becomes horizontal between the wall and the product. Notes • When moving the product to another place undo the ropes first. • Use a product holder or a cabinet that is big and strong enough for the size and weight of the product. • To use the product safely make sure that the height of the bracket that is mounted on the wall is same as that of the product. 10 Operating Guide
-
 1
1 -
2
-
3
-
4
-
 5
5 -
 6
6 -
 7
7 -
 8
8 -
 9
9 -
 10
10 -
 11
11 -
 12
12 -
 13
13 -
 14
14 -
 15
15 -
16
-
17
-
18
-
19
-
20
-
21
-
22
-
23
-
24
-
25
-
26
-
27
-
28
-
29
-
30
-
31
-
32
-
33
-
34
-
35
-
36
-
37
-
38
-
39
-
40
-
41
-
42
-
43
-
44
-
45
-
46
-
47
-
48
-
49
-
50
-
51
-
52
-
53
-
54
-
55
-
56
 |
 |
