ZyXEL P-128MH User Guide - Page 106
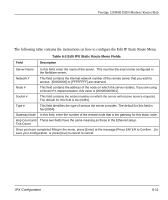
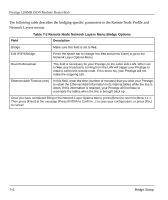
The following table describes the bridging-specific parameters in the Remote Node Profile and,
 |
View all ZyXEL P-128MH manuals
Add to My Manuals
Save this manual to your list of manuals |
Page 106 highlights
Prestige 128IMH ISDN Modem/ Router/Hub The following table describes the bridging-specific parameters in the Remote Node Profile and Network Layers menus. Field Table 7-2 Remote Node Network Layers Menu Bridge Options Description Bridge Make sure this field is set to Yes. Edit IP/IPX/Bridge Press the space bar to change it to Yes and press Enter] to go to the Network Layer Options Menu. Dial-On-Broadcast This field is necessary for your Prestige on the caller side LAN. When set to Yes, any broadcasts coming from the LAN will trigger your Prestige to make a call to this remote node. If it is set to No, your Prestige will not make the outgoing call. Ethernet Addr Timeout (min) In this field, enter the time (number of minutes) that you wish your Prestige to retain the Ethernet Addr information in its internal tables while the line is down. If this information is retained, your Prestige will not have to recompile the tables when the line is brought back up. Once you have completed filling in the Network Layer Options Menu, press [Enter] to return to Menu 11.1. Then press [Enter] at the message [Press ENTER to Confirm...] to save your configuration, or press [Esc] to cancel. 7-4 Bridge Setup
-
 1
1 -
2
-
3
-
4
-
5
-
6
-
7
-
8
-
9
-
10
-
11
-
12
-
13
-
14
-
15
-
16
-
17
-
18
-
19
-
20
-
21
-
22
-
23
-
24
-
25
-
26
-
27
-
28
-
29
-
30
-
31
-
32
-
33
-
34
-
35
-
36
-
37
-
38
-
39
-
40
-
41
-
42
-
43
-
44
-
45
-
46
-
47
-
48
-
49
-
50
-
51
-
52
-
53
-
54
-
55
-
56
-
57
-
58
-
59
-
60
-
61
-
62
-
63
-
64
-
65
-
66
-
67
-
68
-
69
-
70
-
71
-
72
-
73
-
74
-
75
-
76
-
77
-
78
-
79
-
80
-
81
-
82
-
83
-
84
-
85
-
86
-
87
-
88
-
89
-
90
-
91
-
92
-
93
-
94
-
95
-
96
-
97
-
98
-
99
-
100
-
 101
101 -
 102
102 -
 103
103 -
 104
104 -
 105
105 -
 106
106 -
 107
107 -
 108
108 -
 109
109 -
 110
110 -
 111
111 -
112
-
113
-
114
-
115
-
116
-
117
-
118
-
119
-
120
-
121
-
122
-
123
-
124
-
125
-
126
-
127
-
128
-
129
-
130
-
131
-
132
-
133
-
134
-
135
-
136
-
137
-
138
-
139
-
140
-
141
-
142
-
143
-
144
-
145
-
146
-
147
-
148
-
149
-
150
-
151
-
152
-
153
-
154
-
155
-
156
-
157
-
158
-
159
-
160
-
161
-
162
-
163
-
164
-
165
-
166
-
167
-
168
-
169
-
170
-
171
-
172
-
173
-
174
-
175
-
176
-
177
-
178
-
179
-
180
-
181
-
182
-
183
-
184
-
185
-
186
-
187
-
188
-
189
-
190
-
191
 |
 |