ZyXEL P-202H Plus v2 User Guide - Page 63
P-202H Plus v2 User's Guide, WAN Setup, WAN Setup continued
 |
View all ZyXEL P-202H Plus v2 manuals
Add to My Manuals
Save this manual to your list of manuals |
Page 63 highlights
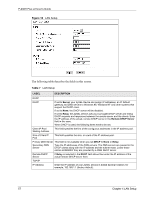
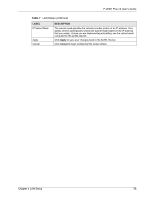
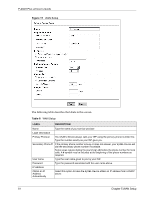
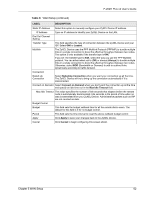
P-202H Plus v2 User's Guide Table 8 WAN Setup (continued) LABEL DESCRIPTION Static IP Address Select this option to manually configure your ZyXEL Device IP address. IP Address Type an IP address to identify your ZyXEL Device on the LAN. Dial Out Channel Setting Transfer Type This field specifies the type of connection between the ZyXEL Device and your ISP. Select 64K or Leased. Multilink The ZyXEL Device uses the PPP Multilink Protocol (PPP/MP) to bundle multiple links in a single connection to boost the effective throughput between two nodes. This option is only available if the transfer type is 64K. If you set the transfer type to 64K, select the way you use the PPP Multilink protocol. You can either select not to (Off) or always (Always) to bundle multiple links in a single connection to boost the effective throughput between two nodes. Otherwise, select BOD (Bandwidth on Demand) to add or subtract links dynamically according to traffic demand. Connection Nailed-Up Connection Select Nailed-Up Connection when you want your connection up all the time. The ZyXEL Device will try to bring up the connection automatically if it is disconnected. Connect on Demand Select Connect on Demand when you don't want the connection up all the time and specify an idle time-out in the Max Idle Timeout field. Max Idle Timeout This value specifies the number of idle seconds that elapses before the remote node is automatically disconnected. Idle seconds is the period of time when no data is transmitted from your ZyXEL Device. Administrative packets such as RIP are not counted as data. Budget Control Budget This field sets the budget callback time for all the remote dial-in users. The default for this field is 0 for no budget control. Period This field sets the time interval to reset the above callback budget control. Apply Click Apply to save your changes back to the ZyXEL Device. Cancel Click Cancel to begin configuring this screen afresh. Chapter 5 WAN Setup 62
-
 1
1 -
2
-
3
-
4
-
5
-
6
-
7
-
8
-
9
-
10
-
11
-
12
-
13
-
14
-
15
-
16
-
17
-
18
-
19
-
20
-
21
-
22
-
23
-
24
-
25
-
26
-
27
-
28
-
29
-
30
-
31
-
32
-
33
-
34
-
35
-
36
-
37
-
38
-
39
-
40
-
41
-
42
-
43
-
44
-
45
-
46
-
47
-
48
-
49
-
50
-
51
-
52
-
53
-
54
-
55
-
56
-
57
-
 58
58 -
 59
59 -
 60
60 -
 61
61 -
 62
62 -
 63
63 -
 64
64 -
 65
65 -
 66
66 -
 67
67 -
 68
68 -
69
-
70
-
71
-
72
-
73
-
74
-
75
-
76
-
77
-
78
-
79
-
80
-
81
-
82
-
83
-
84
-
85
-
86
-
87
-
88
-
89
-
90
-
91
-
92
-
93
-
94
-
95
-
96
-
97
-
98
-
99
-
100
-
101
-
102
-
103
-
104
-
105
-
106
-
107
-
108
-
109
-
110
-
111
-
112
-
113
-
114
-
115
-
116
-
117
-
118
-
119
-
120
-
121
-
122
-
123
-
124
-
125
-
126
-
127
-
128
-
129
-
130
-
131
-
132
-
133
-
134
-
135
-
136
-
137
-
138
-
139
-
140
-
141
-
142
-
143
-
144
-
145
-
146
-
147
-
148
-
149
-
150
-
151
-
152
-
153
-
154
-
155
-
156
-
157
-
158
-
159
-
160
-
161
-
162
-
163
-
164
-
165
-
166
-
167
-
168
-
169
-
170
-
171
-
172
-
173
-
174
-
175
-
176
-
177
-
178
-
179
-
180
-
181
-
182
-
183
-
184
-
185
-
186
-
187
-
188
-
189
-
190
-
191
-
192
-
193
-
194
-
195
-
196
-
197
-
198
-
199
-
200
-
201
-
202
-
203
-
204
-
205
-
206
-
207
-
208
-
209
-
210
-
211
-
212
-
213
-
214
-
215
-
216
-
217
-
218
-
219
-
220
-
221
-
222
-
223
-
224
-
225
-
226
-
227
-
228
-
229
-
230
-
231
-
232
-
233
-
234
-
235
-
236
-
237
-
238
-
239
-
240
-
241
-
242
-
243
-
244
-
245
-
246
-
247
-
248
-
249
-
250
-
251
-
252
-
253
-
254
-
255
-
256
-
257
-
258
-
259
-
260
-
261
-
262
-
263
-
264
-
265
-
266
-
267
-
268
-
269
-
270
-
271
-
272
-
273
-
274
-
275
-
276
-
277
-
278
-
279
-
280
-
281
-
282
-
283
-
284
-
285
-
286
-
287
-
288
-
289
-
290
-
291
-
292
-
293
-
294
-
295
-
296
-
297
-
298
-
299
-
300
-
301
-
302
-
303
-
304
-
305
-
306
-
307
-
308
-
309
-
310
-
311
-
312
-
313
-
314
-
315
-
316
-
317
-
318
-
319
-
320
-
321
-
322
-
323
-
324
-
325
-
326
-
327
-
328
-
329
-
330
-
331
-
332
-
333
-
334
-
335
-
336
-
337
-
338
-
339
-
340
-
341
-
342
-
343
-
344
-
345
-
346
-
347
-
348
-
349
-
350
-
351
-
352
-
353
-
354
-
355
-
356
-
357
-
358
-
359
-
360
-
361
-
362
-
363
-
364
-
365
-
366
-
367
-
368
-
369
-
370
-
371
-
372
-
373
-
374
-
375
 |
 |