1999 Nissan Sentra Owner's Manual - Page 133
1999 Nissan Sentra Manual
Page 133 highlights
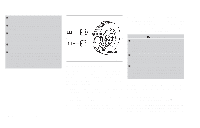
● Never jack up the vehicle more than necessary. ● Never use blocks on or under the jack. ● Do not start or run engine while vehicle is on the jack as it may cause the vehicle to move. ● Do not allow passengers to stay in the vehicle while it is on the jack. ● Never run the engine with a wheel off the ground. It may cause the vehicle to move. This is especially true for models equipped with a limited slip differential carrier. 4. Lower the vehicle slowly until the tire touches the ground. Then, with the wheel nut wrench, tighten the wheel nuts securely in the sequence as illustrated. Lower the vehicle completely. WARNING ● Incorrect wheel nuts or improperly tightened wheel nuts can cause the wheel to become loose or come off. This could cause an accident. CE1030 ● Do not use oil or grease on the wheel studs or nuts. This could cause the nuts to become loose. ● Retighten the wheel nuts when the vehicle has been driven for 600 miles (1,000 km) (also in cases of a flat tire, etc.). As soon as possible, tighten the wheel nuts to the specified torque with a torque wrench. Wheel nut tightening torque: 72 to 87 ft-lb (98 to 118 N⅐m) The wheel nuts must be kept tightened to specifications at all times. It is recommended that wheel nuts be tightened to Installing the spare tire The T-type spare tire is designed for emergency use. See specific instructions under the heading ''Wheels and tires'' in the ''Do-it- yourself'' section of this owner's manual. 1. Clean any mud or dirt from the surface between the wheel and hub. 2. Carefully put the spare tire on and tighten the wheel nuts finger tight. 3. With the wheel nut wrench, tighten wheel nuts alternately and evenly until they are tight. 6-6 In case of emergency
-
 1
1 -
2
-
3
-
4
-
5
-
6
-
7
-
8
-
9
-
10
-
11
-
12
-
13
-
14
-
15
-
16
-
17
-
18
-
19
-
20
-
21
-
22
-
23
-
24
-
25
-
26
-
27
-
28
-
29
-
30
-
31
-
32
-
33
-
34
-
35
-
36
-
37
-
38
-
39
-
40
-
41
-
42
-
43
-
44
-
45
-
46
-
47
-
48
-
49
-
50
-
51
-
52
-
53
-
54
-
55
-
56
-
57
-
58
-
59
-
60
-
61
-
62
-
63
-
64
-
65
-
66
-
67
-
68
-
69
-
70
-
71
-
72
-
73
-
74
-
75
-
76
-
77
-
78
-
79
-
80
-
81
-
82
-
83
-
84
-
85
-
86
-
87
-
88
-
89
-
90
-
91
-
92
-
93
-
94
-
95
-
96
-
97
-
98
-
99
-
100
-
101
-
102
-
103
-
104
-
105
-
106
-
107
-
108
-
109
-
110
-
111
-
112
-
113
-
114
-
115
-
116
-
117
-
118
-
119
-
120
-
121
-
122
-
123
-
124
-
125
-
126
-
127
-
 128
128 -
 129
129 -
 130
130 -
 131
131 -
 132
132 -
 133
133 -
 134
134 -
 135
135 -
 136
136 -
 137
137 -
 138
138 -
139
-
140
-
141
-
142
-
143
-
144
-
145
-
146
-
147
-
148
-
149
-
150
-
151
-
152
-
153
-
154
-
155
-
156
-
157
-
158
-
159
-
160
-
161
-
162
-
163
-
164
-
165
-
166
-
167
-
168
-
169
-
170
-
171
-
172
-
173
-
174
-
175
-
176
-
177
-
178
-
179
-
180
-
181
-
182
-
183
-
184
-
185
-
186
-
187
-
188
-
189
-
190
-
191
-
192
-
193
-
194
-
195
-
196
-
197
-
198
-
199
-
200
-
201
-
202
-
203
-
204
-
205
-
206
-
207
-
208
-
209
-
210
-
211
-
212
-
213
-
214
-
215
-
216
-
217
-
218
-
219
-
220
-
221
-
222
-
223
 |
 |
