1999 Nissan Sentra Owner's Manual - Page 165
1999 Nissan Sentra Manual
Page 165 highlights
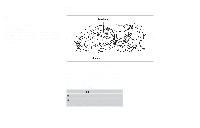
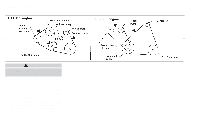
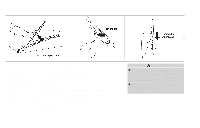
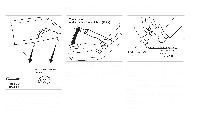
SPARK PLUG REPLACEMENT GA16DE Engine 1. Remove brackets as necessary to give access to the high tension cables and spark plugs. 2. Disconnect the spark plug cables from the spark plugs. When disconnecting, always hold the boots, not the cables. Mark all cables to identify their original locations. 3. Remove the spark plugs with a spark plug socket. DI1229M WARNING Be sure the engine and ignition switch are off and that the parking brake is engaged securely. The spark plug socket has a rubber seal that holds the spark plug so it does not fall when it is pulled out. Make sure each spark plug is snugly fitted into the spark plug socket. DI1017M 4. On conventional spark plugs, check the gap on each new spark plug with a feeler gauge. Use only the specified spark plugs. (The spark plug gap is shown in the ''Technical and consumer information'' section of this manual.) Adjust the gap as required. CAUTION Be sure to use the correct socket to remove the spark plugs. An incorrect socket can damage the spark plugs. 8-18 Do-it-yourself
-
 1
1 -
2
-
3
-
4
-
5
-
6
-
7
-
8
-
9
-
10
-
11
-
12
-
13
-
14
-
15
-
16
-
17
-
18
-
19
-
20
-
21
-
22
-
23
-
24
-
25
-
26
-
27
-
28
-
29
-
30
-
31
-
32
-
33
-
34
-
35
-
36
-
37
-
38
-
39
-
40
-
41
-
42
-
43
-
44
-
45
-
46
-
47
-
48
-
49
-
50
-
51
-
52
-
53
-
54
-
55
-
56
-
57
-
58
-
59
-
60
-
61
-
62
-
63
-
64
-
65
-
66
-
67
-
68
-
69
-
70
-
71
-
72
-
73
-
74
-
75
-
76
-
77
-
78
-
79
-
80
-
81
-
82
-
83
-
84
-
85
-
86
-
87
-
88
-
89
-
90
-
91
-
92
-
93
-
94
-
95
-
96
-
97
-
98
-
99
-
100
-
101
-
102
-
103
-
104
-
105
-
106
-
107
-
108
-
109
-
110
-
111
-
112
-
113
-
114
-
115
-
116
-
117
-
118
-
119
-
120
-
121
-
122
-
123
-
124
-
125
-
126
-
127
-
128
-
129
-
130
-
131
-
132
-
133
-
134
-
135
-
136
-
137
-
138
-
139
-
140
-
141
-
142
-
143
-
144
-
145
-
146
-
147
-
148
-
149
-
150
-
151
-
152
-
153
-
154
-
155
-
156
-
157
-
158
-
159
-
 160
160 -
 161
161 -
 162
162 -
 163
163 -
 164
164 -
 165
165 -
 166
166 -
 167
167 -
 168
168 -
 169
169 -
 170
170 -
171
-
172
-
173
-
174
-
175
-
176
-
177
-
178
-
179
-
180
-
181
-
182
-
183
-
184
-
185
-
186
-
187
-
188
-
189
-
190
-
191
-
192
-
193
-
194
-
195
-
196
-
197
-
198
-
199
-
200
-
201
-
202
-
203
-
204
-
205
-
206
-
207
-
208
-
209
-
210
-
211
-
212
-
213
-
214
-
215
-
216
-
217
-
218
-
219
-
220
-
221
-
222
-
223
 |
 |
