2009 Nissan Xterra Owner's Manual - Page 176
2009 Nissan Xterra Manual
Page 176 highlights
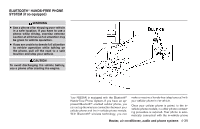
CAR PHONE OR CB RADIO Next/Previous track (CD): Push the tuning switch or for less than 1.5 seconds to return to the beginning of the present track or skip to the next track. Push several times to skip back or skip through tracks. Change disc (CD) (if so equipped): Push the SEEK tuning switch or for more than 1.5 seconds to change the playing disc up or down. When installing a CB, ham radio or car phone in your NISSAN, be sure to observe the following precautions; otherwise, the new equipment may adversely affect the engine control system and other electronic parts. CAUTION ● Keep the antenna as far away as possible from the electronic control modules. ● Keep the antenna wire more than 8 in (20 cm) away from the electronic control system harnesses. Do not route the antenna wire next to any harness. ● Adjust the antenna standing-wave ratio as recommended by the manufacturer. ● Connect the ground wire from the CB radio chassis to the body. ● For details, consult a NISSAN dealer. ● Do not ground electrical accessories directly to the battery terminal. Doing so, will bypass the variable voltage control system and the vehicle battery may not charge completely. Refer to "Variable voltage control system" in the "Maintenance and do-it-yourself" section later in this manual. ● Use electrical accessories with the engine running to avoid discharging the vehicle battery. WARNING ● A cellular telephone should not be used while driving so full attention may be given to vehicle operation. Some jurisdictions prohibit the use of cellular telephones while driving. ● If you must make a call while your vehicle is in motion, the hands free cellular phone operational mode (if so equipped) is highly recommended. Exercise extreme caution at all times so full attention may be given to vehicle operation. ● If you are unable to devote full attention to vehicle operation while talking on the phone, pull off the road to a safe location and stop your vehicle. ANTENNA The antenna cannot be shortened, but can be removed. When you need to remove the antenna, turn the antenna rod counterclockwise. To install the antenna rod, turn the antenna clockwise. Tighten the antenna rod to specification using a suitable tool such as an open-end wrench. The antenna rod tightening specification is 2.0 - 2.6 N·m (18 - 23 in-lb). Do not use pliers to tighten the antenna as they can leave marks on the antenna surface. The antenna rod cannot be hand tightened to the proper specification. CAUTION Always properly tighten the antenna rod during installation or the antenna rod may break during vehicle operation. 4-38 Heater, air conditioner, audio and phone systems
-
 1
1 -
2
-
3
-
4
-
5
-
6
-
7
-
8
-
9
-
10
-
11
-
12
-
13
-
14
-
15
-
16
-
17
-
18
-
19
-
20
-
21
-
22
-
23
-
24
-
25
-
26
-
27
-
28
-
29
-
30
-
31
-
32
-
33
-
34
-
35
-
36
-
37
-
38
-
39
-
40
-
41
-
42
-
43
-
44
-
45
-
46
-
47
-
48
-
49
-
50
-
51
-
52
-
53
-
54
-
55
-
56
-
57
-
58
-
59
-
60
-
61
-
62
-
63
-
64
-
65
-
66
-
67
-
68
-
69
-
70
-
71
-
72
-
73
-
74
-
75
-
76
-
77
-
78
-
79
-
80
-
81
-
82
-
83
-
84
-
85
-
86
-
87
-
88
-
89
-
90
-
91
-
92
-
93
-
94
-
95
-
96
-
97
-
98
-
99
-
100
-
101
-
102
-
103
-
104
-
105
-
106
-
107
-
108
-
109
-
110
-
111
-
112
-
113
-
114
-
115
-
116
-
117
-
118
-
119
-
120
-
121
-
122
-
123
-
124
-
125
-
126
-
127
-
128
-
129
-
130
-
131
-
132
-
133
-
134
-
135
-
136
-
137
-
138
-
139
-
140
-
141
-
142
-
143
-
144
-
145
-
146
-
147
-
148
-
149
-
150
-
151
-
152
-
153
-
154
-
155
-
156
-
157
-
158
-
159
-
160
-
161
-
162
-
163
-
164
-
165
-
166
-
167
-
168
-
169
-
170
-
 171
171 -
 172
172 -
 173
173 -
 174
174 -
 175
175 -
 176
176 -
 177
177 -
 178
178 -
 179
179 -
 180
180 -
 181
181 -
182
-
183
-
184
-
185
-
186
-
187
-
188
-
189
-
190
-
191
-
192
-
193
-
194
-
195
-
196
-
197
-
198
-
199
-
200
-
201
-
202
-
203
-
204
-
205
-
206
-
207
-
208
-
209
-
210
-
211
-
212
-
213
-
214
-
215
-
216
-
217
-
218
-
219
-
220
-
221
-
222
-
223
-
224
-
225
-
226
-
227
-
228
-
229
-
230
-
231
-
232
-
233
-
234
-
235
-
236
-
237
-
238
-
239
-
240
-
241
-
242
-
243
-
244
-
245
-
246
-
247
-
248
-
249
-
250
-
251
-
252
-
253
-
254
-
255
-
256
-
257
-
258
-
259
-
260
-
261
-
262
-
263
-
264
-
265
-
266
-
267
-
268
-
269
-
270
-
271
-
272
-
273
-
274
-
275
-
276
-
277
-
278
-
279
-
280
-
281
-
282
-
283
-
284
-
285
-
286
-
287
-
288
-
289
-
290
-
291
-
292
-
293
-
294
-
295
-
296
-
297
-
298
-
299
-
300
-
301
-
302
-
303
-
304
-
305
-
306
-
307
-
308
-
309
-
310
-
311
-
312
-
313
-
314
-
315
-
316
-
317
-
318
-
319
-
320
-
321
-
322
-
323
-
324
-
325
-
326
-
327
-
328
-
329
-
330
-
331
-
332
-
333
-
334
-
335
-
336
 |
 |