3Ware 9550SXU-8LP User Guide - Page 206
Locating a Drive by Blinking Its LED, 3ware 9000 Series Serial ATA RAID, Controller CLI Guide
 |
UPC - 693494978100
View all 3Ware 9550SXU-8LP manuals
Add to My Manuals
Save this manual to your list of manuals |
Page 206 highlights
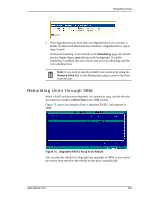
Chapter 9. Maintaining Units 3 On the pop-up menu, select Verify and press Enter. Verification of the selected unit starts immediately. Figure 75. Verifying a Unit Notes: If a unit that requires initialization has not previously been initialized, selecting Verify Unit starts initialization. This is because fault-tolerant units cannot be verified until after they are initialized. If the unit is already in a state of rebuild, initialization, or verification, the unit cannot be verified in 3BM. You must boot the system and let the task finish in the background. Locating a Drive by Blinking Its LED When you have drives installed in a supported chassis with an LED display and have connected the I2C connector on the 3ware RAID controller to the chassis, you can locate individual drives by blinking their associated LED. Note: Drive Locate will be supported by chassis vendors. This feature requires a chassis with a Chassis Control Unit (CCU). The CCU will also support the monitoring of fan speed, temperature sensors, door lock, and so forth, depending on the level of chassis vendor support. Check the 3ware support web site for future updates on a list of chassis vendors that support the CCU, as they become available. You can issue the command to blink the LED through 3DM and through the CLI. For details about using the CLI, see 3ware 9000 Series Serial ATA RAID Controller CLI Guide. 196 3ware Serial ATA RAID Controller User Guide
-
 1
1 -
2
-
3
-
4
-
5
-
6
-
7
-
8
-
9
-
10
-
11
-
12
-
13
-
14
-
15
-
16
-
17
-
18
-
19
-
20
-
21
-
22
-
23
-
24
-
25
-
26
-
27
-
28
-
29
-
30
-
31
-
32
-
33
-
34
-
35
-
36
-
37
-
38
-
39
-
40
-
41
-
42
-
43
-
44
-
45
-
46
-
47
-
48
-
49
-
50
-
51
-
52
-
53
-
54
-
55
-
56
-
57
-
58
-
59
-
60
-
61
-
62
-
63
-
64
-
65
-
66
-
67
-
68
-
69
-
70
-
71
-
72
-
73
-
74
-
75
-
76
-
77
-
78
-
79
-
80
-
81
-
82
-
83
-
84
-
85
-
86
-
87
-
88
-
89
-
90
-
91
-
92
-
93
-
94
-
95
-
96
-
97
-
98
-
99
-
100
-
101
-
102
-
103
-
104
-
105
-
106
-
107
-
108
-
109
-
110
-
111
-
112
-
113
-
114
-
115
-
116
-
117
-
118
-
119
-
120
-
121
-
122
-
123
-
124
-
125
-
126
-
127
-
128
-
129
-
130
-
131
-
132
-
133
-
134
-
135
-
136
-
137
-
138
-
139
-
140
-
141
-
142
-
143
-
144
-
145
-
146
-
147
-
148
-
149
-
150
-
151
-
152
-
153
-
154
-
155
-
156
-
157
-
158
-
159
-
160
-
161
-
162
-
163
-
164
-
165
-
166
-
167
-
168
-
169
-
170
-
171
-
172
-
173
-
174
-
175
-
176
-
177
-
178
-
179
-
180
-
181
-
182
-
183
-
184
-
185
-
186
-
187
-
188
-
189
-
190
-
191
-
192
-
193
-
194
-
195
-
196
-
197
-
198
-
199
-
200
-
 201
201 -
 202
202 -
 203
203 -
 204
204 -
 205
205 -
 206
206 -
 207
207 -
 208
208 -
 209
209 -
 210
210 -
 211
211 -
212
-
213
-
214
-
215
-
216
-
217
-
218
-
219
-
220
-
221
-
222
-
223
-
224
-
225
-
226
-
227
-
228
-
229
-
230
-
231
-
232
-
233
-
234
-
235
-
236
-
237
-
238
-
239
-
240
-
241
-
242
-
243
-
244
-
245
-
246
-
247
-
248
-
249
-
250
-
251
-
252
-
253
-
254
-
255
-
256
-
257
-
258
-
259
-
260
-
261
-
262
-
263
-
264
-
265
-
266
-
267
-
268
-
269
-
270
-
271
-
272
 |
 |
