AIWA CSD-ED87 Operating Instructions - Page 4
Press *RADIO/BAND - remote
 |
View all AIWA CSD-ED87 manuals
Add to My Manuals
Save this manual to your list of manuals |
Page 4 highlights
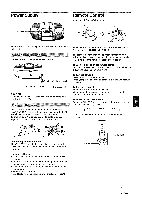
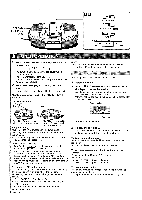
I I STOPIMEMORY ~ Q@ - TUNING + POWEbR STANDBY BAND TAPE n RADIO I19J Press *RADIO/BAND repeatedly to select the desired band. FM + AM The power is turned on and the previously tuned station is received. The RADIO indicator lights up. * or BAND on the remote control (applicable when the AC cord is connected) Press l++, -1 (+, - TUNING) station. During FM stereo reception, ~ to select a is displayed. After listening, press POWER (!) STANDBY to turn the power off. For better reception F AM NOTE If the unit picks up noise from other electrical appliances nearby, like a TV or fluorescent lights, move the unit. You can preset up to 15 stations in each band. 1 Select a station. z Press'~ STOP/MEMORY once so that "M" is displayed to store the station, A station is assigned a preset number, beginning from 1 in consecutive order for each band. "M" may not be displayed if the button is kept pressed for more than 0.5 second. Preset number Extend the FM antenna and orient it for the best reception. The AM antenna is inside the unit. Position the unit for the best reception. For quick tuning Keep -1-, - TUNING pressed until the tuner starts searching for a station. When a station is tuned to, the search stops. If the broadcast signal is weak, it does not stop. To stop the search manually, press -1- or -. *REPEAT/FM MODE/OSC - If an FM stereo broadcast contains noise, press the button so that - is displayed. Noise is reduced, although reception is monaural. To restore stereo reception, press the button again. - If a high-pitched sound is heard during AM recording, press the button repeatedly until the noise is reduced. Its position can be checked by "J' being on or off the display. * or MODE on the remote control To change the AM tuning interval The default setting of the AM tuning interval is 10 kHz/step. If you use this unit in an area where the frequency allocation system is 9 kHz/step, change the interval as follows. 1 Press RADIO/BAND to display FM. 2 Press s while pressing RADIO/BAND to display the AM frequency. When the AM tuning interval is changed, the preset stations are cleared. 4 ENGLISH * or u on the remote control Fre~uency g Repeat steps 1 and 2. The next station will not be stored if a total of 15 preset stations have already been stored for a band. To listen to preset stations Select a band then press -11 PLAY/PAUSE/PRESET repeatedly. - PLAY on the remote control is also available. To select a preset number directly with the remote control Press the numbered buttons O-9 and +1 O. Example: To select number 15, press +10 and 5. To select number 10, press +10 and O. To clear a preset station Display the preset number first. Then, press I preset number is displayed. The higher numbers in the band are decreased while the by one.
-
 1
1 -
 2
2 -
 3
3 -
 4
4 -
 5
5 -
 6
6 -
 7
7 -
 8
8 -
 9
9 -
 10
10 -
11
-
12
-
13
-
14
-
15
-
16
-
17
-
18
-
19
-
20
 |
 |
