Acer X1120H User Manual - Page 13
Control panel, Function, Description
 |
View all Acer X1120H manuals
Add to My Manuals
Save this manual to your list of manuals |
Page 13 highlights
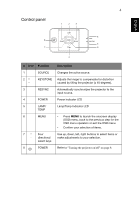
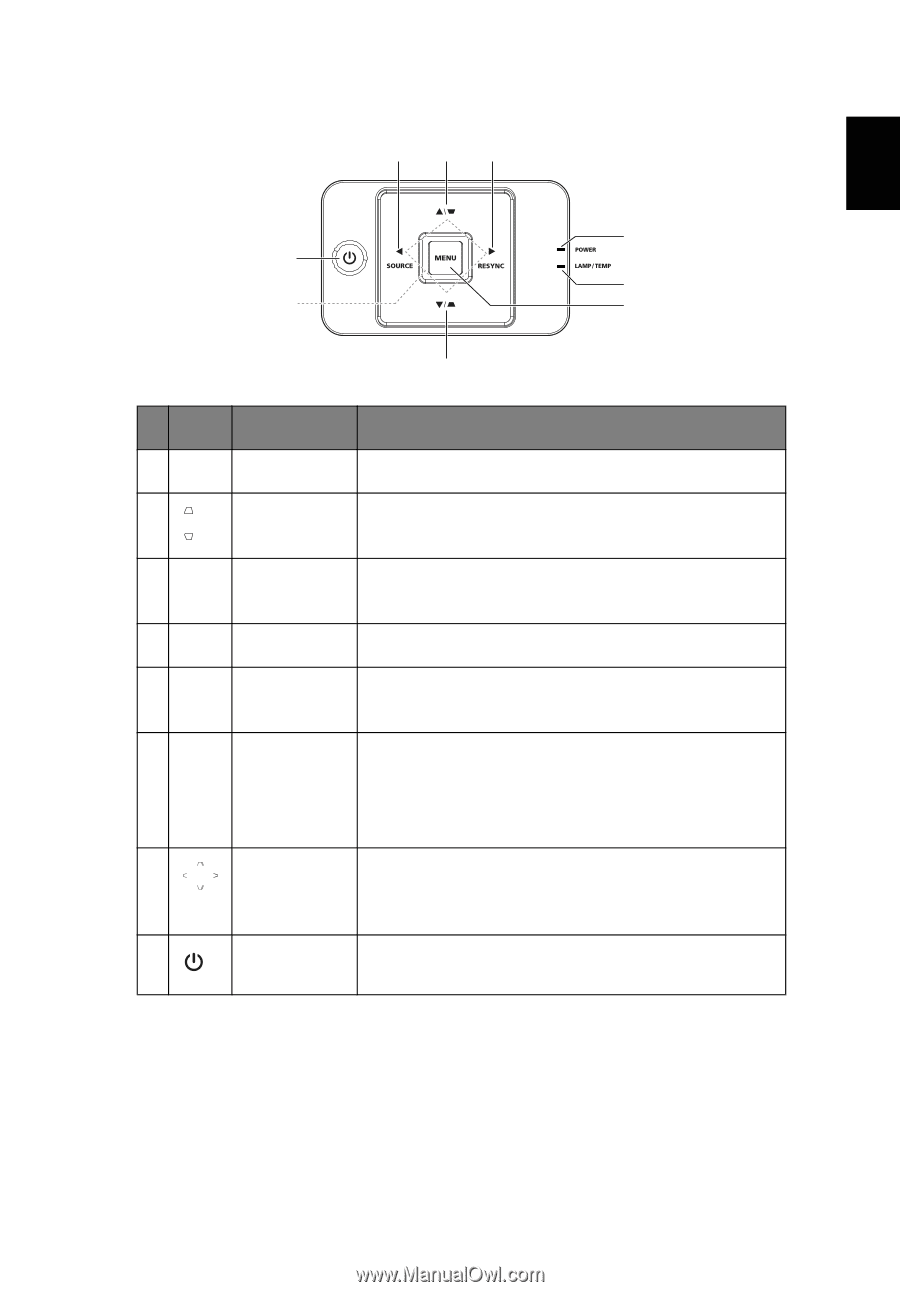
4 Control panel 1 2 3 English English 4 8 5 7 6 2 # Icon Function 1 SOURCE 2 KEYSTONE 3 RESYNC 4 POWER 5 LAMP/ TEMP 6 MENU 7 Four directional select keys 8 POWER Description Changes the active source. Adjusts the image to compensate for distortion caused by tilting the projector (± 40 degrees). Automatically synchronizes the projector to the input source. Power indicator LED Lamp/Temp Indicator LED • Press MENU to launch the onscreen display (OSD) menu, back to the previous step for the OSD menu operation or exit the OSD menu. • Confirm your selection of items. Use up, down, left, right buttons to select items or make adjustments to your selection. Refer to "Turning the projector on/off" on page 9.
-
 1
1 -
2
-
3
-
4
-
5
-
6
-
7
-
 8
8 -
 9
9 -
 10
10 -
 11
11 -
 12
12 -
 13
13 -
 14
14 -
 15
15 -
 16
16 -
 17
17 -
 18
18 -
19
-
20
-
21
-
22
-
23
-
24
-
25
-
26
-
27
-
28
-
29
-
30
-
31
-
32
-
33
-
34
-
35
-
36
-
37
-
38
-
39
-
40
-
41
-
42
-
43
-
44
-
45
-
46
-
47
-
48
-
49
-
50
-
51
-
52
-
53
-
54
-
55
-
56
-
57
-
58
-
59
-
60
-
61
-
62
-
63
-
64
-
65
-
66
-
67
 |
 |
4
English
Control panel
#
Icon
Function
Description
1
SOURCE
Changes the active source.
2
KEYSTONE
Adjusts the image to compensate for distortion
caused by tilting the projector (± 40 degrees).
3
RESYNC
Automatically synchronizes the projector to the
input source.
4
POWER
Power indicator LED
5
LAMP/
TEMP
Lamp/Temp Indicator LED
6
MENU
•
Press
MENU
to launch the onscreen display
(OSD) menu, back to the previous step for the
OSD menu operation or exit the OSD menu.
•
Confirm your selection of items.
7
Four
directional
select keys
Use up, down, left, right buttons to select items or
make adjustments to your selection.
8
POWER
Refer to
"Turning the projector on/off" on page 9
.
2
1
2
3
4
5
6
7
8