Alpine HCE-RCAM-WRA Installation Manual - Page 9
Camera & Light Extension Cable Installation, Bracket Installation
 |
View all Alpine HCE-RCAM-WRA manuals
Add to My Manuals
Save this manual to your list of manuals |
Page 9 highlights
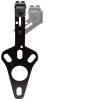
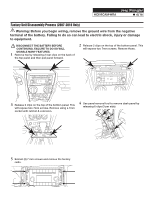
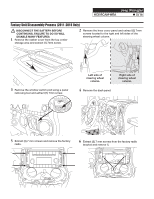
Jeep Wrangler HCE-RCAM-WRA ˜ 9/16 Camera & Light Extension Cable Installation G. Secure to the factory cables. H. Remove OEM grommet. Route the wire out of an OEM grommet hole. Insert the camera harness cable and the OEM third brake light cable through the rubber grommet provided. Cut rubber grommet by a razor blade if needed. Press the grommet firmly into the hole. Bracket Installation 1) Attach camera bracket (which already uses the M6x8 & Lock Washer pre-assembled) to spare tire bracket using the supplied allen wrench, M6x12 torx screw, lock washer, and nut. 2) Adjust the bracket for the camera height. 3) Place bracket with camera over the studs and slide to the back. There's usually 2 on the top and 1 on the bottom. 4) Slide retaining clips over the studs to hold the bracket in place. 5) Check the spacing of the bracket by placing the spare tire back over the studs. 6) If spacing is correct use 19mm socket to re-install spare tire. I. Route along and through the centric hub. Route the cable so it does not interfere with any moving parts or safety equipment. Use silicone to fill up all gaps around the grommet and cables to prevent water going into the rear gate. Failure to do so may cause moisture to go inside.
-
 1
1 -
2
-
3
-
 4
4 -
 5
5 -
 6
6 -
 7
7 -
 8
8 -
 9
9 -
 10
10 -
 11
11 -
 12
12 -
 13
13 -
 14
14 -
15
-
16
 |
 |
