Asus A7V600 SE Motherboard DIY Troubleshooting Guide - Page 80
Starting-Up, Select Disk Drives, Start Create Process, Array Mode, RAID SPAN for capacity
 |
View all Asus A7V600 SE manuals
Add to My Manuals
Save this manual to your list of manuals |
Page 80 highlights
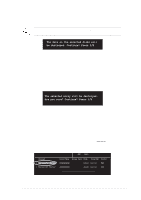
4. Select Select Disk Drives, then press . Use arrow keys to select disk drive/s, then press to mark selected drive. (An asterisk is placed before a selected drive.) 5. Select Start Create Process and press to setup hard disk for RAID system. The following confirmation message appears: The same confirmation message appears when the Auto Setup for Data Security option is selected. The data on the selected disks will be destroyed. Continue? Press Y/N Press "Y" to confirm or "N" to return to the configuration options. RAID SPAN for capacity 1. Select the second option item Array Mode, then press the key. The RAID system setting pop-up menu appears. RAID 0 for performance RAID 1 for data protection RAID 0/1 RAID SPAN for capacity 2. Select RAID SPAN for capacity from the menu and press . From this point, you may choose to auto-configure the RAID array by selecting Auto Setup for Capacity or manually configure the RAID array for spanned sets. If you want to manually configure the RAID array continue with next step. Screen reference on Auto Setup for Capacity can be found in step #4 3. Select Select Disk Drives, then press . Use arrow keys to select disk drive/s, then press to mark selected drive.(An asterisk is placed before a selected drive.) 3-12 Chapter 3: Starting-Up
-
 1
1 -
2
-
3
-
4
-
5
-
6
-
7
-
8
-
9
-
10
-
11
-
12
-
13
-
14
-
15
-
16
-
17
-
18
-
19
-
20
-
21
-
22
-
23
-
24
-
25
-
26
-
27
-
28
-
29
-
30
-
31
-
32
-
33
-
34
-
35
-
36
-
37
-
38
-
39
-
40
-
41
-
42
-
43
-
44
-
45
-
46
-
47
-
48
-
49
-
50
-
51
-
52
-
53
-
54
-
55
-
56
-
57
-
58
-
59
-
60
-
61
-
62
-
63
-
64
-
65
-
66
-
67
-
68
-
69
-
70
-
71
-
72
-
73
-
74
-
 75
75 -
 76
76 -
 77
77 -
 78
78 -
 79
79 -
 80
80 -
 81
81 -
 82
82 -
 83
83 -
 84
84
 |
 |
