Asus MeMO Pad 7 ME572CL ASUS MeMO Pad 7 ME572C E-Manual English - Page 107
Connecting to a Wi-Fi network, Disabling Wi-Fi, Bluetooth®, Enabling Bluetooth®
 |
View all Asus MeMO Pad 7 ME572CL manuals
Add to My Manuals
Save this manual to your list of manuals |
Page 107 highlights
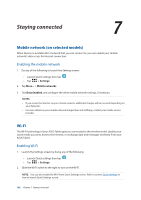
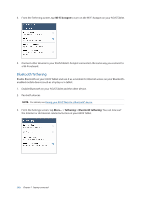
Connecting to a Wi-Fi network 1. On the Settings screen, tap Wi-Fi to display all detected Wi-Fi networks. 2. Tap a network name to connect to it. For a secured network, you may be prompted to key in a password or other security credentials. NOTES: • Your ASUS Tablet automatically reconnects to the network that you connected with previously. • Turn off the Wi-Fi feature when you're not using it to help save battery power. Disabling Wi-Fi To disable Wi-Fi: 1. Launch the Settings screen by doing any of the following: •• Launch Quick settings then tap . •• Tap > Settings. 2. Slide the Wi-Fi switch to the left to turn off the Wi-Fi. NOTE: You can also disable the Wi-Fi from Quick Settings screen. See Quick settings on how to launch Quick Settings screen. Bluetooth® Use the Bluetooth feature of your ASUS Tablet to send or receive files and stream multimedia files with other smart devices over short distances. With Bluetooth, you can share your media files with your friends' smart devices, send data for print with a Bluetooh printer, or play music files with a Bluetooth speaker. Enabling Bluetooth® 1. Do any of the following to launch the Settings screen: •• Launch Quick settings then tap . •• Tap > Settings. 2. Slide the Bluetooth switch to the right to turn on the Bluetooth. NOTE: You can also enable the Bluetooth from Quick Settings screen. See Quick settings on how to launch Quick Settings screen. Chapter 7: Staying connected 107
-
 1
1 -
2
-
3
-
4
-
5
-
6
-
7
-
8
-
9
-
10
-
11
-
12
-
13
-
14
-
15
-
16
-
17
-
18
-
19
-
20
-
21
-
22
-
23
-
24
-
25
-
26
-
27
-
28
-
29
-
30
-
31
-
32
-
33
-
34
-
35
-
36
-
37
-
38
-
39
-
40
-
41
-
42
-
43
-
44
-
45
-
46
-
47
-
48
-
49
-
50
-
51
-
52
-
53
-
54
-
55
-
56
-
57
-
58
-
59
-
60
-
61
-
62
-
63
-
64
-
65
-
66
-
67
-
68
-
69
-
70
-
71
-
72
-
73
-
74
-
75
-
76
-
77
-
78
-
79
-
80
-
81
-
82
-
83
-
84
-
85
-
86
-
87
-
88
-
89
-
90
-
91
-
92
-
93
-
94
-
95
-
96
-
97
-
98
-
99
-
100
-
101
-
 102
102 -
 103
103 -
 104
104 -
 105
105 -
 106
106 -
 107
107 -
 108
108 -
 109
109 -
 110
110 -
 111
111 -
 112
112 -
113
-
114
-
115
-
116
-
117
-
118
-
119
-
120
-
121
-
122
-
123
-
124
-
125
-
126
-
127
-
128
-
129
-
130
-
131
-
132
-
133
-
134
-
135
-
136
-
137
-
138
-
139
-
140
-
141
-
142
-
143
-
144
 |
 |
