Asus P5GD1-VM P5GD1-VM User's manual English Edition E1881 - Page 91

A.2.2, Using the EIST - blank screen

Page 91 highlights

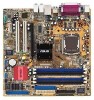
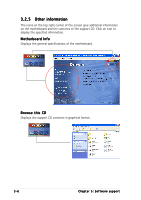
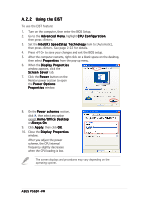
A.2.2 Using the EIST To use the EIST feature: 1. Turn on the computer, then enter the BIOS Setup. 2. Go to the Advanced Menu, highlight CPU Configuration, then press . 3. Set the Intel(R) SpeedStep Technology item to [Automatic], then press . See page 2-22 for details. 4. Press to save your changes and exit the BIOS setup. 5. After the computer restarts, right click on a blank space on the desktop, then select Properties from the pop-up menu. 6. When the Display Properties window appears, click the Screen Saver tab. 7. Click the Power button on the Monitor power section to open the Power Options Properties window. 8. On the Power schemes section, click , then select any option except Home/Office Desktop or Always On. 9. Click A p p l y, then click O K. 10. Close the Display Properties window. After you adjust the power scheme, the CPU internal frequency slightly decreases when the CPU loading is low. The screen displays and procedures may vary depending on the operating system. ASUS P5GD1-VM

  • 1
  • 2
  • 3
  • 4
  • 5
  • 6
  • 7
  • 8
  • 9
  • 10
  • 11
  • 12
  • 13
  • 14
  • 15
  • 16
  • 17
  • 18
  • 19
  • 20
  • 21
  • 22
  • 23
  • 24
  • 25
  • 26
  • 27
  • 28
  • 29
  • 30
  • 31
  • 32
  • 33
  • 34
  • 35
  • 36
  • 37
  • 38
  • 39
  • 40
  • 41
  • 42
  • 43
  • 44
  • 45
  • 46
  • 47
  • 48
  • 49
  • 50
  • 51
  • 52
  • 53
  • 54
  • 55
  • 56
  • 57
  • 58
  • 59
  • 60
  • 61
  • 62
  • 63
  • 64
  • 65
  • 66
  • 67
  • 68
  • 69
  • 70
  • 71
  • 72
  • 73
  • 74
  • 75
  • 76
  • 77
  • 78
  • 79
  • 80
  • 81
  • 82
  • 83
  • 84
  • 85
  • 86
  • 87
  • 88
  • 89
  • 90
  • 91
  • 92

ASUS P5GD1-VM
ASUS P5GD1-VM
ASUS P5GD1-VM
ASUS P5GD1-VM
ASUS P5GD1-VM
A.2.2
A.2.2
A.2.2
A.2.2
A.2.2
Using the EIST
Using the EIST
Using the EIST
Using the EIST
Using the EIST
To use the EIST feature:
1.
Turn on the computer, then enter the BIOS Setup.
2.
Go to the Advanced Menu
Advanced Menu
Advanced Menu
Advanced Menu
Advanced Menu, highlight CPU Configuration
CPU Configuration
CPU Configuration
CPU Configuration
CPU Configuration,
then press <Enter>.
3.
Set the Intel(R) SpeedStep Technology
Intel(R) SpeedStep Technology
Intel(R) SpeedStep Technology item to [Automatic],
then press <Enter>. See page 2-22 for details.
4.
Press <F10> to save your changes and exit the BIOS setup.
5.
After the computer restarts, right click on a blank space on the desktop,
then select Properties
Properties
Properties
Properties
Properties from the pop-up menu.
6.
When the Display Properties
Display Properties
Display Properties
Display Properties
Display Properties
window appears, click the
Screen Saver
Screen Saver
Screen Saver
Screen Saver
Screen Saver tab.
7.
Click the Power
Power
Power
Power
Power button on the
Monitor power section to open
the Power Options
Power Options
Power Options
Power Options
Power Options
Properties
Properties
Properties
Properties
Properties window.
8.
On the Power schemes
Power schemes
Power schemes
Power schemes
Power schemes section,
click
, then select any option
except
Home/Office Desktop
Home/Office Desktop
Home/Office Desktop
Home/Office Desktop
Home/Office Desktop
or Always On
Always On
Always On
Always On
Always On.
9.
Click Apply
Apply
Apply
Apply
A p p l y, then click O K
OK
OK
OK
OK.
10.
Close the Display Properties
Display Properties
Display Properties
Display Properties
Display Properties
window.
After you adjust the power
scheme, the CPU internal
frequency slightly decreases
when the CPU loading is low.
The screen displays and procedures may vary depending on the
operating system.