Asus W90VP User Manual - Page 70
Advanced, SATA Operation Mode, RAID Volumes, Physical Disks, Port Drive Model, Serial
 |
View all Asus W90VP manuals
Add to My Manuals
Save this manual to your list of manuals |
Page 70 highlights
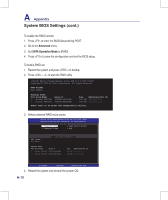
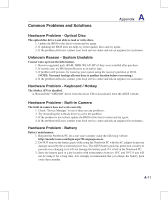
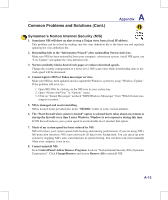
A Appendix System BIOS Settings (cont.) To enable the RAID function 1. Press to enter the BIOS Setup during POST. 2. Go to the Advanced menu. 3. Set SATA Operation Mode to [RAID]. 4. Press to save the configuration and exit the BIOS setup. To build a RAID set 1. Restart the system and press on bootup. 2. Press + to start the RAID utility. Intel(R) Matrix Storage Manager option ROM v8.0.0.1038 ICH10R Copyright(C) 2003-08 Intel Corporation. All Rights Reserved. RAID Volumes: None defined. Physical Disks: Port Drive Model Serial Size Type/Status(Vol ID) 0 Hitachi HTS72202 02DP0410DTG564WP 186.3GB Non-RAID Disk 1 Hitachi HTS72202 02DP1400DEG1XRGN 186.3GB Non-RAID Disk Press to Enter the Configuration Utility.. 3. Select a desired RAID set to create. Intel(R) Matrix Storage Manager option ROM v8.0.0.1038 ICH10R Copyright(C) 2003-08 Intel Corporation. All Rights Reserved. [ MAIN MENU ] 1. Create RAID Volume 3. Reset Disks to Non-RAID 2. Delete RAID Volume 4. Exit RAID Volumes: None defined. [ DISK/VOLUME INFORMATION ] Physical Disks: Port Drive Model Serial Size Type/Status(Vol ID) 0 Hitachi HTS72202 02DP0410DTG564WP 186.3GB Non-RAID Disk 1 Hitachi HTS72202 02DP1400DEG1XRGN 186.3GB Non-RAID Disk Select ESC]-Exit [ENTER]-Select Menu 4. Restart the system and reinstall the system OS. A-10
-
 1
1 -
2
-
3
-
4
-
5
-
6
-
7
-
8
-
9
-
10
-
11
-
12
-
13
-
14
-
15
-
16
-
17
-
18
-
19
-
20
-
21
-
22
-
23
-
24
-
25
-
26
-
27
-
28
-
29
-
30
-
31
-
32
-
33
-
34
-
35
-
36
-
37
-
38
-
39
-
40
-
41
-
42
-
43
-
44
-
45
-
46
-
47
-
48
-
49
-
50
-
51
-
52
-
53
-
54
-
55
-
56
-
57
-
58
-
59
-
60
-
61
-
62
-
63
-
64
-
 65
65 -
 66
66 -
 67
67 -
 68
68 -
 69
69 -
 70
70 -
 71
71 -
 72
72 -
 73
73 -
 74
74 -
 75
75 -
76
-
77
-
78
-
79
-
80
-
81
-
82
-
83
-
84
-
85
-
86
-
87
-
88
-
89
-
90
-
91
-
92
-
93
-
94
-
95
 |
 |