Behringer BTR2000 Manual - Page 4
Introduction, Control Elements and Connections - metronome
 |
View all Behringer BTR2000 manuals
Add to My Manuals
Save this manual to your list of manuals |
Page 4 highlights
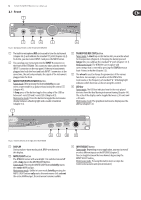
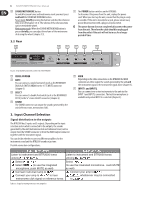
4 RACKTUNER BTR2000 User Manual 1. Introduction Thank you for the confidence you have placed in us with your purchase of the BTR2000. You have acquired an extraordinary combination of a tuner and a metronome with integrated rack lighting that also makes it perfect for on-stage use. This advanced equipment sets new standards with its extensive list of features. It is an auto-chromatic tuner, which means it can automatically recognize any pitch when tuning your instrument. It also offers 3 individually configurable functions in tuner mode: • With 11 different modes, the tuner lets you respond fully to the specific needs of your instrument. For example, in guitar mode the BTR2000 recognizes the pitches of the open guitar strings, while in chromatic mode it recognizes all 12 half-tones. • The standard "A" pitch can be calibrated individually. This makes the tuning of your instrument even more flexible. • To achieve a particular sound or to allow you to play better with other instruments (such as brass), the RACKTUNER lets you transpose your instrument by half steps, tuning it higher or lower. This way you can be fully responsive to the unique features of both the music and your instrument. In addition to its function as a tuner, the BTR2000 can also be used as a metronome. You can set the BPM rate manually or use the TAP function. With its well-engineered circuitry, the RACKTUNER can be used with one or two amplifiers, so that you can adapt the BTR2000 for use in many different settings, where it will provide optimal support in any situation. 1.1 Before you get started 1.1.1 Shipment The RACKTUNER was carefully packed at the assembly plant to assure secure transport. If the condition of the cardboard box suggests that damage may have occurred, please inspect the unit immediately and look for physical indications of damage. ◊ Damaged equipment should NEVER be sent directly to us. Please inform the dealer from whom you acquired the unit immediately as well as the transportation company from which you took delivery of the unit. Otherwise, all claims for replacement/repair may be rendered invalid. ◊ To assure optimal protection of your BTR2000 during transport, we recommend utilizing a carrying case. ◊ If the unit needs to be shipped, please always use the original packaging to avoid damage. ◊ Never let unsupervised children play with the BTR2000 or with its packaging. ◊ Please dispose of all packaging materials in an environmentally-friendly fashion. 1.1.2 Initial operation Be sure that there is enough space around the unit for cooling. To avoid overheating, please do not place the VINTAGER near radiators and other equipment emitting heat. The BTR2000 features a shockproof housing to ensure safe operation without requiring separate grounding. 1.1.3 Online registration Please register your new BEHRINGER equipment right after your purchase by visiting behringer.com and read the terms and conditions of our warranty carefully. Should your BEHRINGER product malfunction, it is our intention to have it repaired as quickly as possible. To arrange for warranty service, please contact the BEHRINGER retailer from whom the equipment was purchased. Should your BEHRINGER dealer not be located in your vicinity, you may directly contact one of our subsidiaries. Corresponding contact information is included in the original equipment packaging (Global Contact Information/ European Contact Information). Should your country not be listed, please contact the distributor nearest you. A list of distributors can be found in the support area of our website (behringer.com). Registering your purchase and equipment with us helps us process your repair claims more quickly and efficiently. Thank you for your cooperation! 2. Control Elements and Connections This chapter describes the different control elements of your BTR2000. All of the buttons and connectors are explained in detail with useful information on how to make the most of them. Most of the buttons on the RACKTUNER have a dual function. The different functions on each button are distinguished by how long the button is held down when pressed. The RACKTUNER's operating mode-tuner or metronome mode-also determines button function. There are one or two LEDs above each button. They correspond to the functions of the buttons. For example, either the "1" or "2/MIC" light is always on above the INPUT SELECT (9) button. The "MUTE" LED on the other hand only lights up when the MUTE button (8) is pressed to turn off the sound of the unit. ◊ When you switch to metronome mode, the LEDs for the tuner mode are turned off.
-
 1
1 -
 2
2 -
 3
3 -
 4
4 -
 5
5 -
 6
6 -
 7
7 -
 8
8 -
 9
9 -
 10
10 -
11
-
12
-
13
-
14
-
15
 |
 |
