Behringer BTR2000 Manual - Page 7
Tuner - user manual
 |
View all Behringer BTR2000 manuals
Add to My Manuals
Save this manual to your list of manuals |
Page 7 highlights
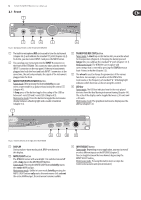
7 RACKTUNER BTR2000 User Manual ◊ To enable reference tones and the metronome, click to be output from the MAIN connector, INPUT 2 must be selected and there must be nothing plugged into the SOUND connector! Using the built-in microphone If you want to use the built-in microphone, you must select INPUT 2 and the MUTE button must be pressed. 4. Tuner The BTR2000 tuner lets you control several parameters: • There are 11 different tuner modes. • The standard "A" pitch can be calibrated individually. • You can transpose the pitch if desired. This lets you set the optimal configuration for any purpose. ◊ When the BTR2000 is first switched on or when no functions are selected, the display shows the following: ---. Once a button has been pressed to select a function, the display shows the values that have been set. 4.1 Instrument tuning There are several ways to use the BTR2000 to tune your instrument: • You can tune an instrument plugged into the input connector by using the tuning display. • If the instrument is not connected to the BTR2000, you can tune it using the built-in microphone. • You can also tune an instrument using a reference tone emitted by the BTR2000. 4.1.1 Tuning with an instrument plugged in 1. Plug your instrument into one of the INPUT connectors on the front or rear panel of the unit (see chapter 3). 2. Press the INPUT SELECT button to select the input your instrument is plugged into. The 1 or 2/MIC LED will light up depending on which input is selected. 3. Select the tuner mode you wish to use (see chapter 4.2). ◊ The BTR2000 only recognizes and displays certain pitches depending on the selected tuner mode. 4. Calibrate the reference tone and set the transposition if desired (see chapter 4.3 / 4.4). 5. Play a note on your instrument (generally an open string). The tuner is set to recognize the frequency of the pitch. 6. The display will show the name of the note closest to the frequency you have generated. ◊ The unit displays the note that is available in this mode and comes closest to the frequency played. ◊ In chromatic mode the BTR2000 can recognize half-tones. These are indicated by a "b" in the display. For example, a note that is played and identified on the display as "A" may deviate somewhat from the ideal pitch. The LED bar clearly indicates this deviation. 7. Using the LED bar, you can monitor how far and in what direction your note deviates from the ideal. If the display tends to the left, the note played is somewhat flat and if the LEDs tend to the right your note is too sharp. ◊ The LED bar on the BTR2000 can indicate deviations up to 50 cents (a quarter tone) sharp or flat. If the incoming frequency deviates more than this from the displayed note, the LED display either remains on the far left or right or jumps to the next note. 8. Tune the string of your instrument until the green light in the center of the LED bar lights up. 9. Repeat steps 5 through 8 for all of the strings of your instrument. 4.1.2 Tuning with the built-in microphone ◊ To be able to work with the built-in microphone, there must be no cable plugged into the INPUT 2 connector in the back of the BTR2000 and the MUTE button must be depressed. 1. Select INPUT 2 with the INPUT switch on the front of the BTR2000. The 2/MIC LED lights up. 2. Mute this channel by pressing MUTE/LIGHT; the MUTE LED above the MUTE/LIGHT button lights up. The built-in microphone is now activated and ready for use. 3. Position your instrument as close as possible to the BTR2000. Make certain that there is as little noise as possible to disrupt the tuning process. 4. Tune your instrument as described in steps 3 through 9 in chapter 4.1.1. 4.1.3 Tuning with a reference tone The BTR2000 can generate and output notes. You can then tune your instrument by ear without an optical display. ◊ If your instrument is plugged into INPUT 1, the reference tone is output only through the SOUND output connector; if it is plugged into the INPUT 2 connector and there is nothing plugged into the SOUND output, the reference pitch is played through the MAIN output together with the instrument signal. 1. Select the tuner mode you wish to use (see chapter 4.2). ◊ The BTR2000 can only recognize certain pitches depending on the tuner mode selected. 2. Calibrate the reference tone and set the transposition if desired (see chapter 4.3 / 4.4). 3. Briefly press the SOUND/METRONOME button. The sound mode is activated and the SOUND LED above the SOUND/METRONOME flashes. The display shows the volume level currently set (1, 2, ... 12). 4. The unit emits the lowest pitch available in this mode or the last pitch set in the tuner (even if it is not available in the currently selected tuner mode) through the SOUND and/or MAIN connector on the back panel of the BTR2000. 5. The volume of the reference tone can be set with the wheel. 6. After briefly pressing the TRANSPOSE/REF button you can turn the wheel to change the reference tone emitted depending on the selected tuner mode. During this adjustment the TRANSP and SOUND LEDs are illuminated. 7. After a short time or after the TRANSPOSE/REF button is pressed again, the unit returns to sound mode and the wheel can again be used to control the volume. 8. Tune each string of your instrument to an appropriate reference tone.
-
 1
1 -
 2
2 -
 3
3 -
 4
4 -
 5
5 -
 6
6 -
 7
7 -
 8
8 -
 9
9 -
 10
10 -
 11
11 -
 12
12 -
13
-
14
-
15
 |
 |
