Behringer BTR2000 Manual - Page 9
Transposition, Setting your own tempering - racktuner manual
 |
View all Behringer BTR2000 manuals
Add to My Manuals
Save this manual to your list of manuals |
Page 9 highlights
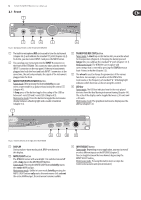
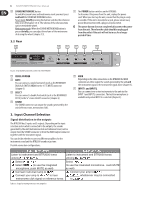
9 RACKTUNER BTR2000 User Manual ◊ Any note can be played for the automatic calibration. 1. Connect your instrument to an input of the BTR2000. You can also use the built-in microphone (select INPUT 2 and press the MUTE button). 2. Depress the TRANSPOSE/REF button for at least two seconds. The display shows the frequency currently set for the standard "A" and the ≠ 440 light flashes above the TRANSPOSE/REF button during the entire process. 3. Turn the frequency all the way down (to the left) with the wheel. After the lowest possible frequency for the standard "A" (428 Hz), auT appears on the display, automatic calibration is activated and the unit waits for an input frequency. 4. Play a note. The display shows the name of the note closest to the one you played. The LED bar indicates the deviation from the displayed note. If this is unsatisfactory, you can play the note again. You can cancel the calibration by pressing and holding the TRANSPOSE/REF button. ◊ If the input note is too unstable or too soft, the automatic calibration cannot proceed. 5. If the note is satisfactory and the display in the LED bar is stable, you must briefly press the TRANSPOSE/REF button. The BTR2000 stores a standard "A" pitch that is attuned to the note you played. The frequency of this "A" is displayed. 6. The calibration is completed by pressing and holding the TRANSPOSE/REF button. If you do not hold the button long enough, the calibration process restarts. 7. If the pitch of the standard "A" is other than 440 Hz, the ≠ 440 LED above the TRANSPOSE/REF button lights up. In order to change the frequency of a stored standard "A," press the TRANSPOSE/REF button for at least one second and adjust the frequency using the wheel. 4.4 Transposition For certain applications, it may be useful to shift the tuning of the instrument by a few half-tones. Easier interplay with other instruments Say a song needs to have brass accompaniment. While pieces in a flat key (such as F major (1 flat), B flat major (2 flats) and C minor (3 flats)) are especially well suited to brass, many guitarists and bassists are not very comfortable playing in these keys. There are several options for playing such pieces: • The guitarist and bassist play the complicated fingerings of the flat keys. • These two players' instruments are tuned (transposed) so that the easier fingerings of a different key (e.g. C major or G major) can be used to produce the correct chords in the actual key of the piece. Achieve a specific sound With a different tuning, the tension on the strings is different. This change creates different overtones when the strings are played, giving the instrument a different sound. The BTR2000 lets you complete such a transposition easily and accurately. 1. Briefly press the TRANSPOSE/REF button. The TRANSP light flashes and the display shows the transposition currently set (0, if no transposition is set). 2. Turn the wheel to transpose up to 7 half-tones higher or lower. The display indicates the number of half-tones by which a nontransposed instrument is too high (1, 2, ..., 7) or too low (-1, -2, ..., -7), when compared with the BTR2000 transposition. 3. You can exit this menu by pressing the TRANSPOSE/REF button again. 4. When a transposition is set, the TRANSP LED above the TRANSPOSE/REF button lights up. Example A piece should be played in F major. This key has 1 flat, and thus it has several complex fingerings. You want to retune the guitar so that you can use G major fingerings to play F major chords. To do this, you must transpose the instrument down 2 half-tones. • To set the transposition, briefly press the TRANSPOSE/REF button. The display still shows the number 0 (no transposition set). • Turn the wheel so that the display shows the number 2 (2 half-tones higher). Now your instrument is tuned 2 half-tones above the tuner and must be tuned down. ◊ When a transposition has been set, the TRANSP LED above the TRANSPOSE/REF button lights up. • Select a tuner mode (chapter 4.2) and tune all strings of your instrument as described in chapter 4.1. • When the tuning process is finished, the fingering for a G major chord plays an F major chord. ◊ The calibration settings are stored even if you switch the BTR2000 off. To turn off the transposition, press the TRANSPOSE/REF button and turn the wheel until the display indicates a transposition up/down or 0. The TRANSP light goes out. 4.5 Setting your own tempering The topic of "tempering" is a very interesting and extensive one. It has been much studied scientifically and this knowledge gives you many ways to work with the specific characteristics of your instrument and individual pieces. This topic can only be touched upon here. You can find more exciting information about this at our website at behringer.de (behringer.com). Equal tempering The pre-set tuner modes of the BTR2000 are all based on an equal tempering. This means that only the octave interval is exactly right (frequency doubling); to generate other intervals, the octave is divided into 12 equal half steps, which make up the individual intervals (e.g. a fourth = 5 half steps). However, the resulting intervals do not correspond entirely to the ideal intervals (intervals of a natural scale); each interval is slightly out of tune. At any rate, these deviations are barely audible and are thus not perceived as dissonant. This type of tuning is nevertheless a compromise, but it enables all keys to be played with just one tuning.
-
 1
1 -
2
-
3
-
 4
4 -
 5
5 -
 6
6 -
 7
7 -
 8
8 -
 9
9 -
 10
10 -
 11
11 -
 12
12 -
 13
13 -
 14
14 -
15
 |
 |
