Behringer DDM4000 Manual - Page 11
Operation
 |
View all Behringer DDM4000 manuals
Add to My Manuals
Save this manual to your list of manuals |
Page 11 highlights
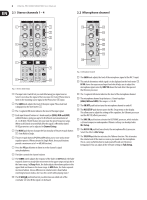
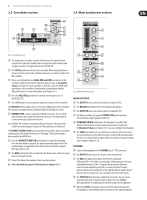
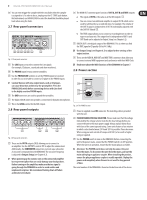
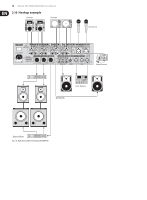
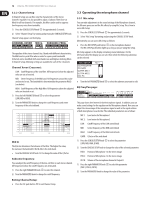
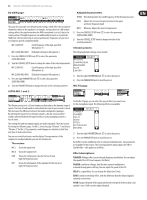
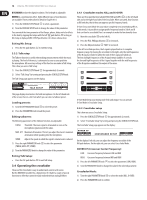
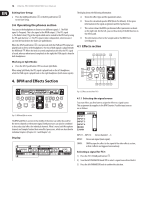
11 DIGITAL PRO MIXER DDM4000 User Manual 3. Operation 3.1 Console setup Console Setup allows you to make all standard settings for the DDM4000. 1) Press the CONSOLE SETUP knob (51) for approximately 2 seconds. The setup list appears in the center of the display.: SINGLE Mode: In Single Mode, the push buttons P1, P2 and P3 (6) are each permanently assigned to a frequency band (P1 = HIGH, P2 = MID, P3 = LOW). This means that a Preset can be assigned to each EQ control. When activated, the Preset push buttons provide a Kill function with maximum attenuation (-∞ dB). Preset settings in SINGLE Mode P1 HIGH Kill -∞ dB Suppresses high frequencies P2 MID Kill -∞ dB Suppresses mid frequencies P3 LOW Kill -∞ dB Suppresses low frequencies Tab. 3.1: Functionality of Preset push buttons in Single Mode 2) Turn the CONSOLE SETUP knob to select the setup you want to edit. 3) Press the CONSOLE SETUP knob to confirm the selection. Exit Console Setup: • Press the ESC push button (52) to exit Console Setup. Some of the setup pages can be accessed in different ways. This is the case for Mic Setup and User Settings: Open Mic Setup: 1) Press the MIC SETUP push button (16) to access Mic Setup. 2) Press the MIC SETUP push button (16) again to exit Mic Setup. Open User Settings: 1) Press the LOAD push button (35) to access User Settings. 2) Press the LOAD push button (35) again to exit User Settings. 3.1.1 Selection lists on screen The individual setup pages contain further selection lists, which appear either on the left or right side of the display, in addition to the Console Setup list. Left: 1) Turn the left PARAMETER knob (45) (in the FX 1 section) to select the preferred function from the list. 2) Press the left PARAMETER knob to confirm the selection. Right: 1) Turn the right PARAMETER knob (45) (in the FX 2 section) to select the preferred function from the list. 2) Press the right PARAMETER knob to confirm the selection. 3.2 Using stereo channels 3.2.1 EQ modes: SINGLE and MULTI The equalizer provides Preset push buttons, labeled P1, P2 and P3, with which preset configurations are stored. The behavior of the push buttons depend on the selected EQ mode: Single Mode or Multi Mode. After switching on the device, Single Mode is active. The degree of cut can, however, be modified. Alternatively, a frequency boost can also be stored. In case you want to boost instead of cutting the bass (Punch function), proceed as follows: 1) Turn the LOW knob (4) to the right until you have reached the boost you want. 2) Press and hold the MODE push button (5) while pressing P3 (6). 3) Press P3 to load the Preset. The bass frequencies are now boosted. P3 flashes blue. This way you can also program the mids and highs with P2 and P1 respectively. Reset: The Preset push buttons can be restored to their initial states at all times (Reset function): • Press MODE (5) for approximately 2 seconds. The MULTI LED briefly lights up to confirm the reset. MULTI Mode: In Multi Mode, the Preset push buttons are not assigned to individual EQ bands, but are assigned to the 3-band equalizer as a whole. This way you can create three EQ presets and assign these to the Preset push buttons. When activated, the Preset push buttons are assigned as follows: Preset settings in MULTI Mode P1 High pass P2 Band pass P3 Low pass Suppresses MID and LOW Suppresses HIGH and LOW Suppresses HIGH and MID Tab. 3.2: Functionality of Preset push buttons in Multi Mode • To activate Multi Mode, press the MODE push button (5). The MULTI LED lights up. To create your own EQ presets, proceed as follows: 1) Adjust the equalizer as needed by turning the LOW, MID and HIGH knobs. 2) Press and hold the MODE push button (5) while pressing P1 (6). 3) Press P1 to load the EQ Preset. P1 flashes yellow. Two more EQ Presets can be stored with P2 and P3. Reset: The Preset push buttons can be restored at all times: • Press MODE for approximately 2 seconds. The SINGLE LED briefly lights up to confirm the reset.
-
 1
1 -
2
-
3
-
4
-
5
-
 6
6 -
 7
7 -
 8
8 -
 9
9 -
 10
10 -
 11
11 -
 12
12 -
 13
13 -
 14
14 -
 15
15 -
 16
16 -
17
-
18
-
19
-
20
-
21
-
22
-
23
-
24
-
25
-
26
-
27
-
28
-
29
-
30
-
31
-
32
 |
 |
