Behringer DDM4000 Manual - Page 22
Further Settings
 |
View all Behringer DDM4000 manuals
Add to My Manuals
Save this manual to your list of manuals |
Page 22 highlights
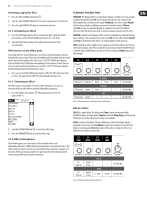
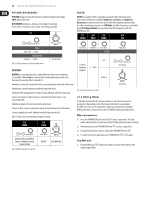
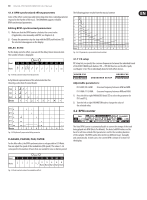
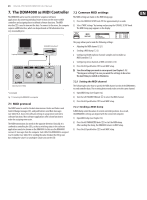
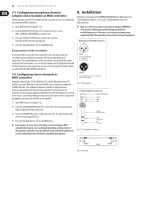
22 DIGITAL PRO MIXER DDM4000 User Manual 5.2.4 Pitch bend The Pitch Bend function lets you change the speed of the sampler playback so that it can be aligned to the tracks being played. There are two options: 1) Turn the BPM Adjust knob to permanently change the playback speed of the sampler. Turn the knob to the right to speed up the tempo and turn the knob to the left to slow down the tempo. 2) The ADJUST push buttons correspond to "Bend +" and "Bend -." Pressing one of these push buttons changes the speed for a short while, in order for you to easily match the beat of the playing track. 5.3 Sampler effect The sampler features a brake effect which simulates the braking of the rotating platter until it comes to a halt. The length of the brakes are available as 1-beat-, 4-beat- und 8-beat brakes. 1) Press the BANK ASSIGN push button to select the memory bank that is to be processed with the effect. 2) Select the length of the brake by continuously pressing the SELECT push button (64). This is shown on the display. 3) Press the SMP FX ON push button (63) to activate the effect. The push button flashes. When the sampler comes to an end (SMP FX ON push button and PLAY/OUT push button of the selected bank flash), the sampler-effect needs to be deactivated by pressing SMP FX ON again in order to restart playback. 4) Press the SMP FX ON push button to restart playback. 6. Further Settings 6.1 Loading factory settings 1) Press the LOAD push button (35). The display switches to "User Setup". The LOAD push button lights up. 2) Select the factory preset by turning and pressing the left PARAMETER knob (45). 3) Press the left PARAMETER knob to confirm the selection. 4) Press the LOAD push button (35) or the ESC push button (52) to exit User Setup. In Output Setup, you make the following settings: Mono: Use this function to switch the OUT B outputs (74) to mono. 1) Turn the left PARAMETER knob (45) to select OFF or ON. 2) Press the left PARAMETER knob to confirm. MODE: You can use Output A (73) together with the Subwoofer output, in which case the bass frequencies are separated from the Main output (crossover function). FULL-FREQ: MAIN OUT A (73) emits the entire frequency spectrum (including the bass signal). The Subwoofer output gives out the subwoofer signal. CROSSOVER: The Subwoofer output gives out the subwoofer signal. MAIN OUT A emits frequencies that are above the crossover frequency. 1) Turn the CONSOLE SETUP knob (51) to select the mode (FULL-FREQ, CROSSOVER). 2) Press the CONSOLE SETUP knob to confirm. SUB OUT: The following are used to adjust the crossover frequency and output level of the subwoofer output. FREQ: Crossover frequency between SUB OUT and MAIN OUT GAIN: Output level of SUB OUT TAPE / S/PDIF: The levels of both Tape and S/PDIF outputs can be adjusted individually. 1) Press the right PARAMETER knob to select the parameter (FREQ, GAIN or TAPE/ S/PDIF GAIN). 2) Turn the PARAMETER knob to change the value. 3) Press the ESC push button to exit Output Setup. 6.3 Adjusting display contrast 1) Press the LOAD push button (35). User Setup appears on the display. 2) Turn the right PARAMETER knob (45) to change the con-trast. 3) Press the LOAD push button to exit User Setup. 6.2 Output setup 1) Press the CONSOLE SETUP knob (51) for approximately 2 seconds. 2) Select "Output Setup" by turning and pressing the CONSOLE SETUP knob. Output Setup appears on the display: OUT B MONO OFF ON OUTPUT SETUP MODE FULL-FREQ CROSSOVER SUB-OUT FREQ 55Hz GAIN -3.0dB TAPE/ S/PDIF GAIN -6.0dB
-
 1
1 -
2
-
3
-
4
-
5
-
6
-
7
-
8
-
9
-
10
-
11
-
12
-
13
-
14
-
15
-
16
-
 17
17 -
 18
18 -
 19
19 -
 20
20 -
 21
21 -
 22
22 -
 23
23 -
 24
24 -
 25
25 -
 26
26 -
 27
27 -
28
-
29
-
30
-
31
-
32
 |
 |
