BenQ PB6110 User Manual
BenQ PB6110 - SVGA DLP Projector Manual
 |
UPC - 840046007720
View all BenQ PB6110 manuals
Add to My Manuals
Save this manual to your list of manuals |
BenQ PB6110 manual content summary:
- BenQ PB6110 | User Manual - Page 1
PB6110 / PB6210 Digital Projector Portable Series User's Manual Welcome - BenQ PB6110 | User Manual - Page 2
, magnetic, optical, chemical, manual or otherwise, without the prior written permission of this company. Disclaimer BenQ Corporation makes no representations or warranties, either expressed or implied, with respect to the contents hereof and specifically disclaims any warranties, merchantability or - BenQ PB6110 | User Manual - Page 3
Contents 6 Optional Accessories 7 Projector Exterior View 7 Front / Upper Side 7 Rear Side ...7 Bottom Side ...7 Connector Panel 8 Controls and Functions 9 External Control Panel 9 Remote Control Description 10 Remote Control Effective Range 11 Installing or Replacing the Battery 11 - BenQ PB6110 | User Manual - Page 4
Message 34 Replacing the Lamp 34 Temp Information 36 Indicators ...36 Service Information 38 Accessories (included in the standard package 38 Optional Accessories (not included in the standard package 38 Ordering Parts or Getting Information 38 Troubleshooting 39 Specifications 40 Projector - BenQ PB6110 | User Manual - Page 5
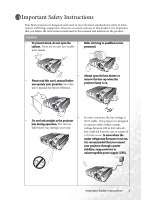
• Refer servicing to qualified service cabinet. There are no user serviceable personnel. parts inside. • Always open the lens shutter or • Please read this user's manual before you operate your projector. Save this remove the lens cap when the projector lamp is on. user's manual for future - BenQ PB6110 | User Manual - Page 6
not disassemble this appliance. Take it to a qualified technician when service or repair is required. Incorrect reassembly can cause malfunction of the projector or electric shock when the appliance is subse- quently used. 3. Never replace the lamp assembly or any electronic components unless the - BenQ PB6110 | User Manual - Page 7
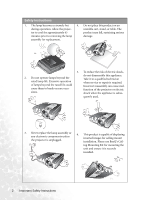
Instructions (Continued) 7. Do not place this projector in any of the 8. Do not block the ventilation holes. following environments. - Space that is poorly ventilated or confined. Allow at least 50 cm clearance from walls and free flow of air around the projector or damage to, the lamp. 10. Do not - BenQ PB6110 | User Manual - Page 8
possible injury. 12. Do not block the projection lens with any objects when the projector is under operation as this could cause the objects to become heated or deformed or even a fire. To temporarily turn off the lamp, press Blank on the projector or remote control. 4 Important Safety Instructions - BenQ PB6110 | User Manual - Page 9
of use. The projector offers the following features: • Compact and portable unit • High quality manual zoom lens • One-key auto-adjustment to display the best picture quality • Digital keystone correction to correct distorted images • Adjustable color balance control for data/video display • Ultra - BenQ PB6110 | User Manual - Page 10
of these items are missing, please contact your place of purchase. Projector Soft Carry Case User's Manual Pull the tab before using the remote control. User's Manual CD Quick Start Guide Remote Control Warranty Booklet Batteries USB Cable S-Video Cable Video Cable VGA Cable Audio Cables - BenQ PB6110 | User Manual - Page 11
Plus 6. Component Video cable Projector Exterior View Front / Upper Side Ventilation grill Front adjuster button Rear Side Front adjuster foot External control panel (See page 9 for detailed information.) Focus ring and Zoom ring Front IR remote sensor Projection lens Connector panel - BenQ PB6110 | User Manual - Page 12
Connector Panel Refer to page 12 for more information on making connections to various equipment. IR remote sensor RGB signal output USB connector Audio jack RGB signal input (PC/ YPbPr/ YCbCr) S-Video Mini DIM Video RCA jack AC inlet 8 Introduction - BenQ PB6110 | User Manual - Page 13
S-Video. 3. 3 Left 4. Right 4 Lights up or flashes when the projector is under operation. 10. Temperature warning light (Refer to When the on- Indicates the status of the lamp. Lights up or flashes when the lamp has Turns the on-screen display control menu on. developed a problem. 12. Zoom ring - BenQ PB6110 | User Manual - Page 14
Remote Control Description II Power II/ Freeze 5Up 3 Left / Right 4 Menu 6 Down Keystone Page Up / Down Auto Source Blank Preset Functions II Power II/ Freeze 5Up, Menu 3Left / Right4, 6 Down Keystone Page Up and Down Auto Source Blank Descriptions Turns the projector on or off. Refer to pages 18 - BenQ PB6110 | User Manual - Page 15
should not exceed 6 meters (19.5 feet). 6m Notes on Remote Control Operation: Make sure that there are no obstacles between the remote control and the IR sensors on the projector that might obstruct the infra-red beam. Installing or Replacing the Battery 1. Pull out the battery holder. 2. Insert - BenQ PB6110 | User Manual - Page 16
Connection When connecting a signal source to the projector, be sure to: 1. Turn all equipment off before making any VGA cable RGB To RGB input PC audio PC audio Audio cable USB USB USB cable A Mac adapter (an optional accessory) is needed if you are connecting to Macintosh - BenQ PB6110 | User Manual - Page 17
standard VGA output, or a YPbPr (default) format. The projector is capable of accepting HDTV data through a Component Video connector. Use a Component Video cable (an optional accessory) to display these images. The following standards are supported in the HDTV function: • 480i • 576i • 720p (50 - BenQ PB6110 | User Manual - Page 18
Video devices Audio cable Video cable If the selected video image is not displayed after the projector is turned on and the correct video source has been selected, check that the video source is turned on and operating correctly. Also check that - BenQ PB6110 | User Manual - Page 19
Installation Choosing a Location Your projector is designed to be installed in the four installation rear For further information on the four configurations, please refer to page 29. If you place the projector above or below the screen, you have to tilt it down or up to center the image - BenQ PB6110 | User Manual - Page 20
becomes vertically trapezoidal. To correct this situation, adjust the value of Keystone in the Picture menu, on the projector control panel or on the remote control. Screen Size Place the projector at the required distance from the screen according to the required picture size (see the table on the - BenQ PB6110 | User Manual - Page 21
4.04 404.5 4.95 495.3 7 700 4.36 435.6 5.33 533.4 7.5 750 4.67 466.7 5.72 571.5 8 800 4.98 497.8 6.10 609.6 8.5 850 5.40 539.8 6.48 647.7 PB6110 (SVGA) / PB6210 (XGA) screen size chart (16:9 aspect ratio) Distance from screen feet inch 4 48 6 72 8 96 10 120 12 144 14 168 16 192 18 216 20 - BenQ PB6110 | User Manual - Page 22
"S-Video Searching". 7. You can also press Source on the projector or remote control to select your desired input signal. For more information, please refer to page 21. If the frequency/ resolution of the input signal exceeds the projector's operating range, you will see the message "Out of Range - BenQ PB6110 | User Manual - Page 23
appears. Press Power a second time to turn the projector off. 2. The Power indicator light flashes orange and the lamp shuts down, the fans continue to run for approximately 110 seconds to cool down the projector. To protect the lamp, the projector will not respond to any commands during the cooling - BenQ PB6110 | User Manual - Page 24
the values by pressing 3 Left/ Right 4 on the projector or 3 / 4 on the remote control. For example, 1. Press 3 Left on the projector or 2. Press on the remote control or 3. Press 3 Left on the projector or 3 on the remote control when you are in Picture --> Keystone menu. Keystone 0 Keystone - BenQ PB6110 | User Manual - Page 25
. Auto Adjustment In some cases, you may need to optimize the picture quality. To do this, press Auto on the control panel of the projector or on the remote control. Within 3 seconds, the builtin Intelligent Auto Adjustment function will re-adjust the values of Frequency and Clock to provide the - BenQ PB6110 | User Manual - Page 26
be heard. You can set the blank time in Advance --> Blank Time menu to let the projector shut down automatically after a period of time when there is no action taken on the blank and Page Down. Connect the projector to your PC or notebook with a USB cable prior to using this function. 22 Operation - BenQ PB6110 | User Manual - Page 27
Freeze The image is frozen when Freeze is pressed. An icon will appear in the lower right corner of the screen. To release the function, press Freeze, Source (this will change the input source and release the pause function). Preset Mode Selection Press Preset to select a operation mode that suits - BenQ PB6110 | User Manual - Page 28
Auto Resize Aspect Ratio H Position V Position Phase H. Size Mute Volume OSD Time Reset Color Temp Mirror Blank Time Source Scan Language User Logo High Altitude Mode Source Resolution Preset Mode Lamp Hour Preset Mode Keystone Brightness Contrast Color Tint* Auto Resize Aspect Ratio Sharpness - BenQ PB6110 | User Manual - Page 29
3 Left / Right 4 on the screen menu on. projector or 3 / 4 on the remote control. 2. Use 3 Left/ Right 4 on the projector or 5. Press5Exit on the projector or 3 / 4 on the remote control to select press Menu twice* on the Picture menu. remote control to leave and save the setting. 3. Press - BenQ PB6110 | User Manual - Page 30
are provided so you can optimize your projector image set-up to suit your program system noise and reduce power consumption by 20%. The lamp life is also extended with lower light output. And lower the setting, darker the image. Adjust this control so the black areas of the image appear just as - BenQ PB6110 | User Manual - Page 31
Video/ S-Video/ Component Video signal input FUNCTION Preset Mode Keystone Brightness Contrast Color Tint DESCRIPTION As above. As above. As above. As above. Increases or decreases the color intensity of the image. Adjusts the color tones of the image. The higher the value, the more reddish the - BenQ PB6110 | User Manual - Page 32
2. Pro-Picture Menu PC signal input FUNCTION DESCRIPTION Auto Resize Makes the best fit of the image to the screen. 1. On 2. Off There are two aspect ratio settings. Aspect Ratio 1. 4 : 3 (Standard) 2. 16 : 9 (Wide Screen) Adjusts the horizontal position of the projected image. H Position -30 +30 - BenQ PB6110 | User Manual - Page 33
3. Setting Menu FUNCTION Mute DESCRIPTION Off On Volume Adjusts the volume level. OSD Time Reset Sets the length of time the OSD will remain active after your last button press. The range is from 5 to 100 seconds. Returns all settings - BenQ PB6110 | User Manual - Page 34
the remote control to select your desired language from among English, French, German, Italian, Spanish, Russian, Traditional Chinese, Simplified Chinese, Japanese and Korean. Enables the user to select which logo screen will appear during projector start-up. Three modes are available: Default (BenQ - BenQ PB6110 | User Manual - Page 35
Mode" may cause a higher decibel operating noise level because of increased fan speed necessary to improve overall system cooling and performance. If you use this projector under other extreme environments excluding the above, it may display auto shut-down symptoms, which is designed to protect your - BenQ PB6110 | User Manual - Page 36
the current operating status of the projector. PC signal / Component Video input FUNCTION Source Resolution DESCRIPTION Shows the current signal source. Shows the native resolution of the input signal. Preset Mode Shows the selected mode in Picture menu. Lamp Hour Displays the number of hours - BenQ PB6110 | User Manual - Page 37
the instructions below. Make sure the temperature and humidity of the storage area are within the recommended range for the projector. Please refer to the Spec. page in the manual or consult your dealer about the range. Retract the adjuster feet. Remove the batteries from the remote control. Pack - BenQ PB6110 | User Manual - Page 38
will flash in the center of the screen together with the Lamp indicator lighting up red for 40 seconds. The projector will shutdown after 40 seconds. The lamp MUST be replaced before the projector will operate normally. Replacing the Lamp To reduce the risk of electrical shock, always turn the - BenQ PB6110 | User Manual - Page 39
. Do not insert your hands into the projector after the lamp is removed. If you touch the optical lamp cover and tighten the screw. Do not turn the power on with the lamp cover removed. Whenever the lamp is replaced, reset the total lamp operation time. Do not reset if the lamp is not replaced - BenQ PB6110 | User Manual - Page 40
time. ii. Press Auto on the projector or on the remote control to reset the lamp hour to "0". iii. Wait about 5 seconds to let the OSD disappear. Temp Information When the Temperature warning light is on, it is warning you of the following possible problems: 1. The internal temperature is too high - BenQ PB6110 | User Manual - Page 41
Light Status & Description Power Temp Lamp Lamp events - - (1) The projector needs 110 seconds to cool down. Or R (2) Please contact your dealer for assistance. Thermal events The projector has shutdown automatically. If you try to re-start - R - the projector, it will shutdown again. - BenQ PB6110 | User Manual - Page 42
PC audio cable 50.L4302.501 Soft carry case 47.J9904.001 USB mouse cable 50.73213.501 Remote control 56.26J98.001 3-2 power adaptor 22.91008.001 Optional Accessories (not , product assistance, service information, or to order accessories, please visit the BenQ Corporation website at http://www - BenQ PB6110 | User Manual - Page 43
CONTROL DOES NOT WORK Cause The battery is out of power. There is an obstacle between the remote control and the projector. You are too far away from the projector. Remedy Replace the battery with a new one. Remove the obstacle. Stand within 6 meters (19.5 feet) of the projector. Troubleshooting - BenQ PB6110 | User Manual - Page 44
Projector Specifications All specifications are subject to change without notice. General Product name Model name Optical Digital Projector PB6210 1024 x 768 XGA PB6110 800 x 600 SVGA Display system Lens F/Number 1-CHIP DMD PB6210 F=2.4 to 2.6, f= 24.0 to 29.1 mm Lamp Electrical PB6110 USB - BenQ PB6110 | User Manual - Page 45
Timing Chart Supported Timing for PC Input Resolution Horizontal Frequency (kHz) Vertical Frequency (Hz) 720 x 400 640 x 480 800 x 600 1024 x 768 1280 x 1024 37.927 31.469 73 60 NTSC4.43 15.73 60 Color subcarrier Frequency (MHz) 3.58 4.43 4.25 or 4.41 3.58 3.58 4.43 4.43 Specifications 41 - BenQ PB6110 | User Manual - Page 46
Dimensions 91.2 262 215 91.2 Unit: mm 42 Dimensions - BenQ PB6110 | User Manual - Page 47
in accordance with BenQ's written instructions, especially the ambient humidity must be in-between 10% and 90%, temperature in-between 0°C and 40°C, altitude lower than 10000 feet, and avoiding to operate the projector in a dusty environment. This warranty gives you specific legal rights, and - BenQ PB6110 | User Manual - Page 48
frequency energy and, if not installed and used in accordance with the instructions, may cause harmful interference to radio communications. However, there is , which can be determined by turning the equipment off and on, the user is encouraged to try to correct the interference by one or more of
-
 1
1 -
 2
2 -
 3
3 -
 4
4 -
 5
5 -
 6
6 -
 7
7 -
8
-
9
-
10
-
11
-
12
-
13
-
14
-
15
-
16
-
17
-
18
-
19
-
20
-
21
-
22
-
23
-
24
-
25
-
26
-
27
-
28
-
29
-
30
-
31
-
32
-
33
-
34
-
35
-
36
-
37
-
38
-
39
-
40
-
41
-
42
-
43
-
44
-
45
-
46
-
47
-
48
 |
 |

Welcome
PB6110 / PB6210 Digital Projector
Portable Series
User’s Manual