BenQ PB6110 User Manual - Page 34
Advance Menu
 |
UPC - 840046007720
View all BenQ PB6110 manuals
Add to My Manuals
Save this manual to your list of manuals |
Page 34 highlights
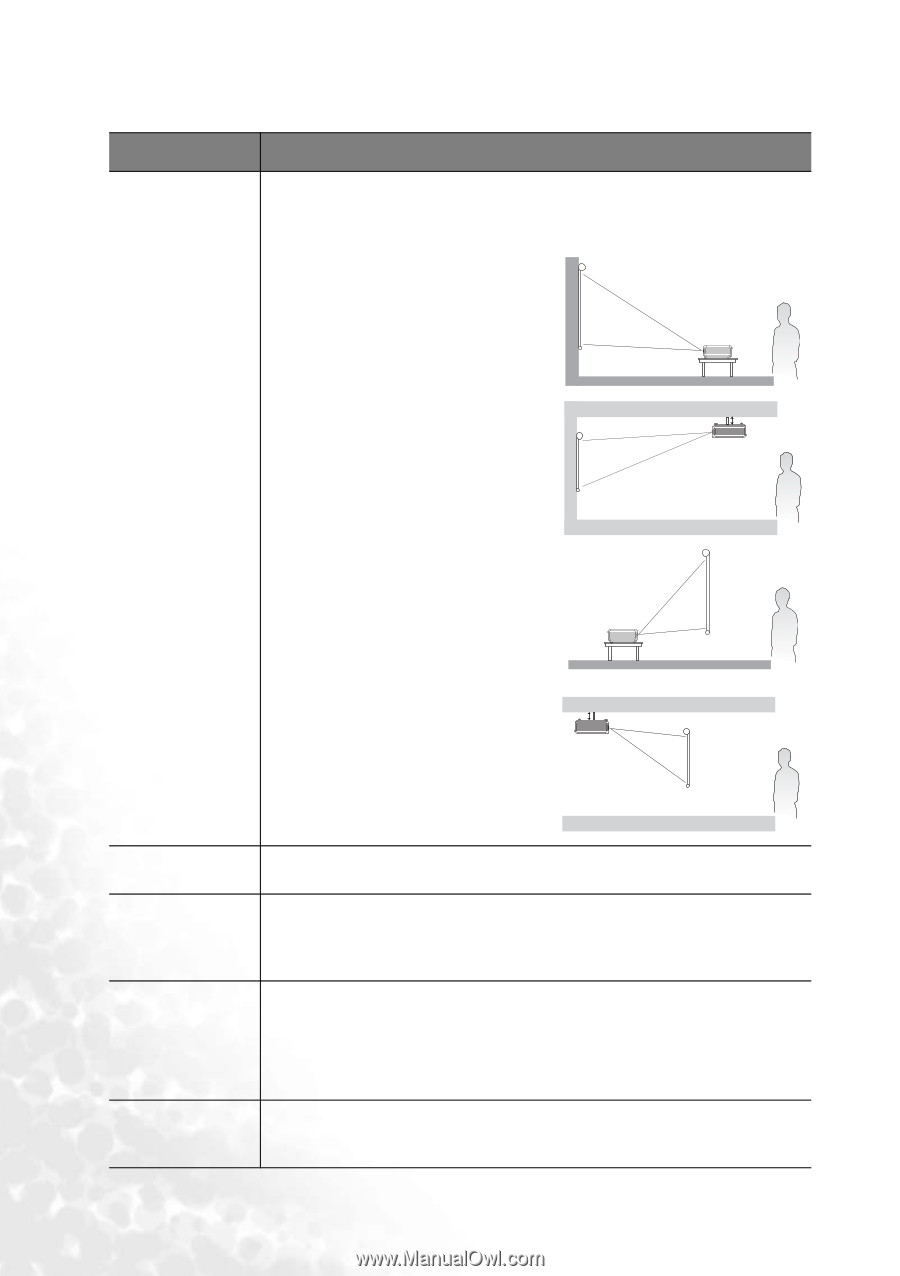
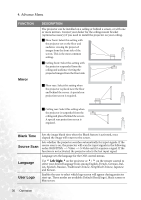
4. Advance Menu FUNCTION Mirror DESCRIPTION The projector can be installed on a ceiling or behind a screen, or with one or more mirrors. Contact your dealer for the ceiling mount bracket (optional accessory) if you need to install the projector on your ceiling. Floor front: Select this setting with the projector set on the floor and audience viewing the projected images from the front side of the screen. This is the most common setting. Ceiling front: Select this setting with the projector suspended from the ceiling and audience viewing the projected images from the front side. Floor rear: Select this setting when the projector is placed near the floor and behind the screen. A special rear projection screen is required. Ceiling rear: Select this setting when the projector is suspended from the ceiling and placed behind the screen. A special rear projection screen is required. Blank Time Source Scan Language User Logo Sets the image blank time when the Blank feature is activated, once elapsed the image will return to the screen. Sets whether the projector searches automatically for input signals. If the source scan is on, the projector will scan for input signals in the following order: RGB/YPbPr --> Video --> S-Video until it acquires a signal. If the function is not activated, the projector selects the last input signal. Language sets the language for the OSD control menus. Use 3 Left/ Right 4on the projector or 3/ 4 on the remote control to select your desired language from among English, French, German, Italian, Spanish, Russian, Traditional Chinese, Simplified Chinese, Japanese and Korean. Enables the user to select which logo screen will appear during projector start-up. Three modes are available: Default (BenQ logo), black screen or blue screen. 30 Operation
-
 1
1 -
2
-
3
-
4
-
5
-
6
-
7
-
8
-
9
-
10
-
11
-
12
-
13
-
14
-
15
-
16
-
17
-
18
-
19
-
20
-
21
-
22
-
23
-
24
-
25
-
26
-
27
-
28
-
 29
29 -
 30
30 -
 31
31 -
 32
32 -
 33
33 -
 34
34 -
 35
35 -
 36
36 -
 37
37 -
 38
38 -
 39
39 -
40
-
41
-
42
-
43
-
44
-
45
-
46
-
47
-
48
 |
 |