Binatone Acura 3000 User Guide - Page 9
Set Time
 |
View all Binatone Acura 3000 manuals
Add to My Manuals
Save this manual to your list of manuals |
Page 9 highlights
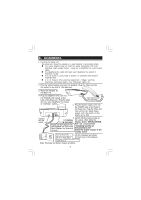
Setting up continue... SET TIME/ DATE 1 2 3 4 Note: If you subscribe to the caller display service (see section 9) the time and date will be set automatically, but the year may still need to be adjusted to ensure the answering machine time stamp gives the correct day. Press the OK/MENU button. Ö The display shows OPTIONS MENU . Press the UP or DOWN button until the display shows SET TIME/DATE. Press the OK/MENU button to confirm. Ö The 'year' will be blinking. Press the UP or DOWN button to set the year. 5 Press the OK/MENU button to confirm. Ö The 'month' will be blinking. 6 Press the UP or DOWN button to set the month. 7 Press the OK/MENU button to confirm. Ö The 'date' will be blinking. 8 Press the UP or DOWN button to set the date. 9 Press the OK/MENU button to confirm. Ö The 'hour' will be blinking. 10 Press the UP or DOWN button to set the hour. Ö When setting the 'hour it is in 24 hour mode only. 11 Press the OK/MENU button to confirm. Ö The 'minutes' will be blinking. 12 Press the UP or DOWN button to set the minutes. 13 Press the OK/MENU button to confirm the TIME and DATE setting. 14 Continue with programming, or press the / button to return to standby mode. Binatone Help Line - 0845 345 9677 Calls are charged at Local Call rate. 9
-
 1
1 -
2
-
3
-
 4
4 -
 5
5 -
 6
6 -
 7
7 -
 8
8 -
 9
9 -
 10
10 -
 11
11 -
 12
12 -
 13
13 -
 14
14 -
15
-
16
-
17
-
18
-
19
-
20
-
21
-
22
-
23
-
24
-
25
-
26
-
27
-
28
-
29
-
30
-
31
-
32
-
33
-
34
-
35
-
36
 |
 |
