Brother International 5100c Users Manual - English - Page 142
PreScanning an Image, How to Use PreScan to Adjust an Image:
 |
UPC - 012502565826
View all Brother International 5100c manuals
Add to My Manuals
Save this manual to your list of manuals |
Page 142 highlights
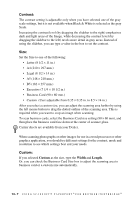
PreScanning an Image PreScanning allows you to scan an image quickly at a low resolution. A thumbnail version of the image will appear in the Scanning Area. This is only a preview of the image so you can see how it will look. The PreScan button is used to preview an image for cropping any unwanted portions from the image. When you are satisfied with the preview, select the Start button from the scanner window to scan the image. How to Use PreScan to Adjust an Image: 1 Place the original face up in the ADF, or face down on the scanner glass. 2 In the Twain-32 Brother MFL Pro Color Setup dialog box, click the PreScan button. The entire original will be scanned into the PC and will appear in the Scanning Area. PreScanned Image Cropped Image 3 To crop a portion of the original to be scanned, drag any side or corner of the dotted outline in the Scanning Area with the left mouse button. Adjust the dotted outline until it surrounds only the portion of the original you wish to scan. 4 Place the original face up in the ADF again, if you used the ADF in step 1. 5 Adjust the settings for Resolution, Scan Type and Size in the Scanner window, as needed. 6 Click Start. This time only the selected area of the original will appear in the PaperPort® window. 7 In the PaperPort® window, use the options available to refine the image. (See PaperPort® for Brother Online Documentation on the CD-ROM for details.) U S I N G S C A N S O F T ™ P A P E R P O R T ® F O R B R O T H E R / T E X T B R I D G E ® 14 - 8
-
 1
1 -
2
-
3
-
4
-
5
-
6
-
7
-
8
-
9
-
10
-
11
-
12
-
13
-
14
-
15
-
16
-
17
-
18
-
19
-
20
-
21
-
22
-
23
-
24
-
25
-
26
-
27
-
28
-
29
-
30
-
31
-
32
-
33
-
34
-
35
-
36
-
37
-
38
-
39
-
40
-
41
-
42
-
43
-
44
-
45
-
46
-
47
-
48
-
49
-
50
-
51
-
52
-
53
-
54
-
55
-
56
-
57
-
58
-
59
-
60
-
61
-
62
-
63
-
64
-
65
-
66
-
67
-
68
-
69
-
70
-
71
-
72
-
73
-
74
-
75
-
76
-
77
-
78
-
79
-
80
-
81
-
82
-
83
-
84
-
85
-
86
-
87
-
88
-
89
-
90
-
91
-
92
-
93
-
94
-
95
-
96
-
97
-
98
-
99
-
100
-
101
-
102
-
103
-
104
-
105
-
106
-
107
-
108
-
109
-
110
-
111
-
112
-
113
-
114
-
115
-
116
-
117
-
118
-
119
-
120
-
121
-
122
-
123
-
124
-
125
-
126
-
127
-
128
-
129
-
130
-
131
-
132
-
133
-
134
-
135
-
136
-
 137
137 -
 138
138 -
 139
139 -
 140
140 -
 141
141 -
 142
142 -
 143
143 -
 144
144 -
 145
145 -
 146
146 -
 147
147 -
148
-
149
-
150
-
151
-
152
-
153
-
154
-
155
-
156
-
157
-
158
-
159
-
160
-
161
-
162
-
163
-
164
-
165
-
166
-
167
-
168
-
169
-
170
-
171
-
172
-
173
-
174
-
175
-
176
-
177
-
178
-
179
-
180
-
181
-
182
-
183
-
184
-
185
-
186
-
187
-
188
-
189
-
190
-
191
-
192
-
193
-
194
-
195
-
196
-
197
-
198
-
199
-
200
-
201
-
202
-
203
-
204
-
205
-
206
-
207
-
208
-
209
-
210
-
211
-
212
-
213
 |
 |
