Brother International AX325 Owner's Manual - English - Page 2
Repeat, Inserting, Moving, Paper, Viewing, Margins
 |
View all Brother International AX325 manuals
Add to My Manuals
Save this manual to your list of manuals |
Page 2 highlights
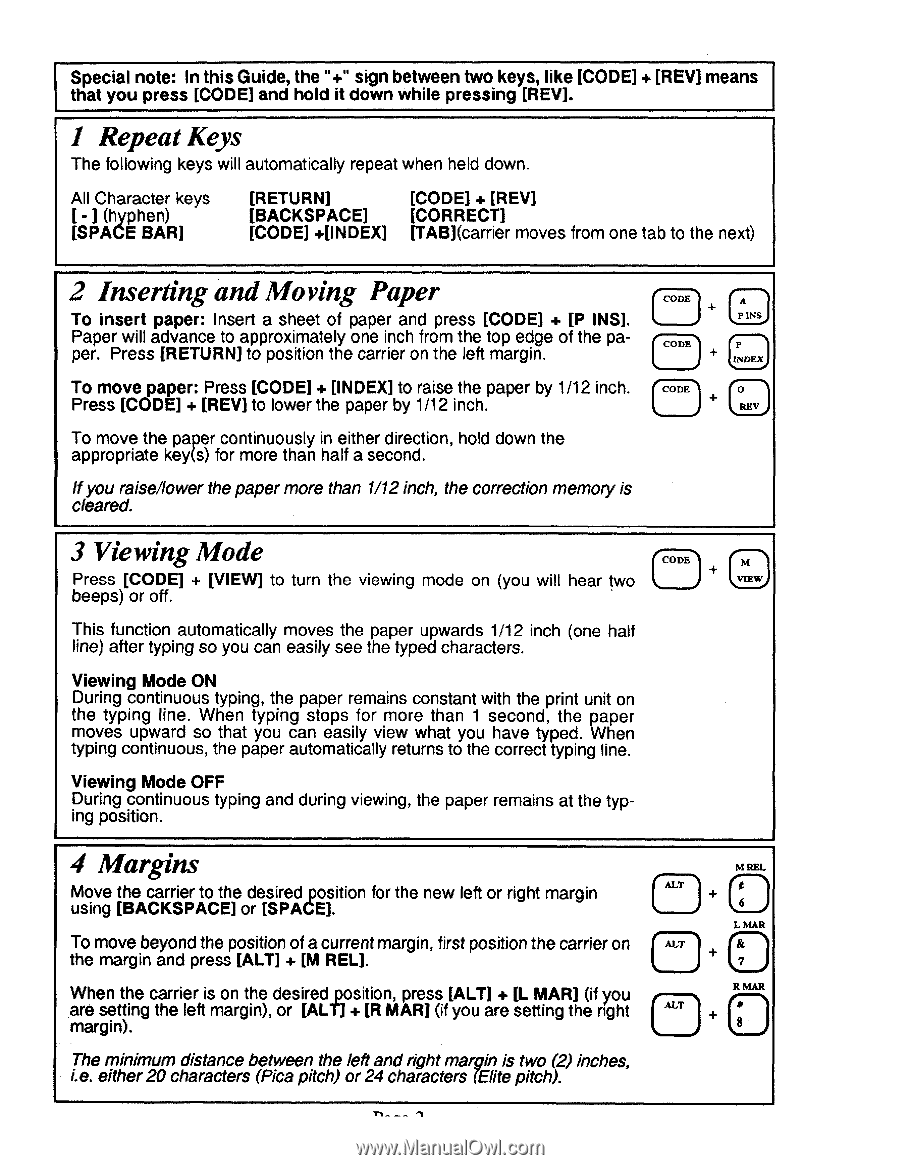
Special note: In this Guide, the "+" sign between two keys, like [CODE] + [REV] means that you press [CODE] and hold it down while pressing [REV]. 1 Repeat Keys The following keys will automatically repeat when held down. All Character keys I - I (hyphen) [SPACE BAR] [RETURN] [CODE] + [REV] [BACKSPACE] [CORRECT] [CODE] +[INDEX] ITAIncarrier moves from one tab to the next) 2 Inserting and Moving Paper CODE A To insert paper: Insert a sheet of paper and press [CODE] + [13 INS]. P INS Paper will advance to approximately one inch from the top edge of the pa- CODE per. Press [RETURN] to position the carrier on the left margin. P INDEX To move paper: Press [CODE] + [INDEX] to raise the paper by 1/12 inch. (CODE 0 Press [CODE] + [REV] to lower the paper by 1/12 inch. REV To move the paper continuously in either direction, hold down the appropriate key(s) for more than half a second. If you raise/lower the paper more than 1/12 inch, the correction memory is cleared. 3 Viewing Mode CODE Press [CODE] + [VIEW] to turn the viewing mode on (you will hear two VIEW beeps) or off. This function automatically moves the paper upwards 1/12 inch (one half line) after typing so you can easily see the typed characters. Viewing Mode ON During continuous typing, the paper remains constant with the print unit on the typing line. When typing stops for more than 1 second, the paper moves upward so that you can easily view what you have typed. When typing continuous, the paper automatically returns to the correct typing line. Viewing Mode OFF During continuous typing and during viewing, the paper remains at the typing position. 4 Margins Move the carrier to the desired position for the new left or right margin ALT using [BACKSPACE] or [SPACE]. • To move beyond the position of a current margin, first position the carrier on the margin and press [ALT] + [M REL]. When the carrier is on the desired position, press [ALT] + IL MAR] (if you are setting the left margin), or [ALT] + [R MAR] (if you are setting the right margin). • ALT 1 The minimum distance between the left and right margin is two (2) inches, i.e. either 20 characters (Pica pitch) or 24 characters (Elite pitch). M REL 6 L MAR R MAR •
-
 1
1 -
 2
2 -
 3
3 -
 4
4 -
 5
5 -
 6
6 -
 7
7 -
 8
8 -
9
-
10
-
11
-
12
-
13
-
14
-
15
-
16
 |
 |