Brother International BAS-375E Extended Option Output Instruction Manual - Eng - Page 10
Advanced
 |
View all Brother International BAS-375E manuals
Add to My Manuals
Save this manual to your list of manuals |
Page 10 highlights
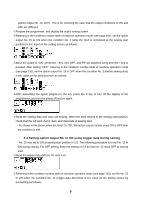
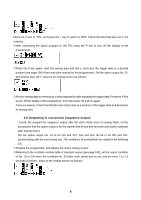
Advanced 1. Preparation In addition to the things required in the Basic, prepare check PCB (see the appendix of this text) 2. Things that can not be done by the extended option output function •In case of the number of outputs exceeding 16 (including the work clamp output) ,In case of the number of inputs exceeding 13 ƒSince input check can not be accomplished during sewing, it is not possible to turn output ON or OFF by judging input of the presser lifter pedal, etc. during sewing (overlap operation by input check). „Sequence output can not be accomplished during sewing. By inputting trigger data of the sewing data (see page 100 of the instruction manual for the programmer), it is possible to turn the output ON or OFF. By inputting trigger data, it is possible to pause the machine and start sequence (it is possible to turn output ON and OFF in this case). ...If there are too many AND conditions (enabling conditions), the extended option output function is not available, therefore, the operations such as changing several modes and prohibiting output by 4 or more inputs are not possible. 2 input AND condition can be set per one option output, therefore, 3 input AND condition can be made by using one output as a virtual output (see the following example). †Built-in step motor output can not be controlled by the extended option output function. 3. Examples of option output (Advanced) 3-1 Automating sewing start By setting the memory SW No. 22 to ON, the machine starts sewing after the option output No. 1 is ON. Create the program which starts sewing after the work clamp descends. •Set the memory SW No. 22 to ON. ,Prepare the programmer, and display the output setting screen. If option programs which have already been registered, delete them with the delete icon, and turn the power off and on again. ƒReferring to the condition number table of the standard output (see page 192), set the output condition of No. 1 to ON when the condition No. 31 (after work clamp descends) is set, and set the timer 2 to 100ms on the setting screen as follows: 10
-
 1
1 -
2
-
3
-
4
-
 5
5 -
 6
6 -
 7
7 -
 8
8 -
 9
9 -
 10
10 -
 11
11 -
 12
12 -
 13
13 -
 14
14 -
 15
15 -
16
-
17
-
18
 |
 |
