Brother International BAS-375E Extended Option Output Instruction Manual - Eng - Page 11
Start control by input check for automatic start, 3 Adding the input check to make 3 input
 |
View all Brother International BAS-375E manuals
Add to My Manuals
Save this manual to your list of manuals |
Page 11 highlights
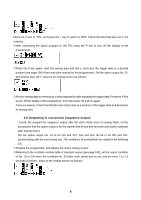
„Write the option program to the FD, press the P key to turn off the display of the programmer, and then turn the power off and on again. ...Read the sewing data. Press the starting pedal so that the feed moves to a sewing start position after the origin position is detected. Pressing the starting pedal normally starts sewing, however if the memory SW No. 22 is ON, sewing will not start. Check that sewing starts after work clamp rises and descends by pressing the presser lifer pedal twice. 3-2 Start control by input check for automatic start In addition to 3-1, add the option input No. 1 to enabling conditions. •Read the written data with the FD read icon. ,Display the enabling condition setting screen. Referring to the condition number table of the extended option external input (see page 192), set the condition No. 40 (input 1: ON): ENABLE ¡ and the condition No. 41 (input 1: OFF): DISABLE X. ƒAfter overwriting the option program to the FD, press the P key to turn off the display of the programmer, and turn the power off and on again. „In addition to 3-1, check that sewing starts only when the option input No. 1 is ON. As the example above, since the work clamp rise and descent is sequence-controlled by option output, the sequence for automatic material loading before sewing can be made. 3-3 Adding the input check to make 3 input AND In addition to 3-1, set enabling condition to the option input No. 1 and 2: ON. The condition No. 31 (after the work clamp descends) has already been set as output condition, therefore, 3 input AND has been set. Up to 2 input AND per one option output can be set, therefore, use one output as a virtual output to make 3 input AND condition. Use the option output No. 2 as a virtual output in this case. 11
-
 1
1 -
2
-
3
-
4
-
5
-
 6
6 -
 7
7 -
 8
8 -
 9
9 -
 10
10 -
 11
11 -
 12
12 -
 13
13 -
 14
14 -
 15
15 -
 16
16 -
17
-
18
 |
 |
