Brother International Innov-ís 4000D Users Manual - English - Page 103
Eyelet
 |
View all Brother International Innov-ís 4000D manuals
Add to My Manuals
Save this manual to your list of manuals |
Page 103 highlights
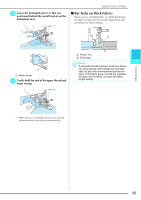
SEWING THE STITCHES Eyelet Use this stitch for making belt holes and other similar applications. Stitch Stitch name Eyelet Star eyelet Presser foot Applications For making eyelets, holes on belts, etc. Stitch width [mm (inch.)] Auto. Manual Stitch length [mm (inch.)] Auto. Manual Twin needle 7.0 7.0 6.0 5.0 7.0 7.0 6.0 5.0 (1/4) (1/4 15/64 3/16) (1/4) (1/4 15/64 3/16) NO For making star-shaped eyelets on holes. - - - - NO a Select or . b Use in either the stitch width display or the stitch length display to choose the size of the eyelet. d Lower the presser foot and start sewing. → When sewing is finished, the machine sews reinforcement stitches and stops automatically. Note If the stitch pattern comes out poorly, make adjustments (see page 103). e Use the eyelet punch to center of the stitching. make a hole in the a b c (Actual a Large 7 mm (approx. 1/4 inch) b Medium 6 mm (approx. 15/64 inch) c Small 5 mm (approx. 3/16 inch) Note Only one size is available for . c Attach monogramming foot the handwheel to check the "N", then turn needle drop position. a a Needle drop position 92
-
 1
1 -
2
-
3
-
4
-
5
-
6
-
7
-
8
-
9
-
10
-
11
-
12
-
13
-
14
-
15
-
16
-
17
-
18
-
19
-
20
-
21
-
22
-
23
-
24
-
25
-
26
-
27
-
28
-
29
-
30
-
31
-
32
-
33
-
34
-
35
-
36
-
37
-
38
-
39
-
40
-
41
-
42
-
43
-
44
-
45
-
46
-
47
-
48
-
49
-
50
-
51
-
52
-
53
-
54
-
55
-
56
-
57
-
58
-
59
-
60
-
61
-
62
-
63
-
64
-
65
-
66
-
67
-
68
-
69
-
70
-
71
-
72
-
73
-
74
-
75
-
76
-
77
-
78
-
79
-
80
-
81
-
82
-
83
-
84
-
85
-
86
-
87
-
88
-
89
-
90
-
91
-
92
-
93
-
94
-
95
-
96
-
97
-
 98
98 -
 99
99 -
 100
100 -
 101
101 -
 102
102 -
 103
103 -
 104
104 -
 105
105 -
 106
106 -
 107
107 -
 108
108 -
109
-
110
-
111
-
112
-
113
-
114
-
115
-
116
-
117
-
118
-
119
-
120
-
121
-
122
-
123
-
124
-
125
-
126
-
127
-
128
-
129
-
130
-
131
-
132
-
133
-
134
-
135
-
136
-
137
-
138
-
139
-
140
-
141
-
142
-
143
-
144
-
145
-
146
-
147
-
148
-
149
-
150
-
151
-
152
-
153
-
154
-
155
-
156
-
157
-
158
-
159
-
160
-
161
-
162
-
163
-
164
-
165
-
166
-
167
-
168
-
169
-
170
-
171
-
172
-
173
-
174
-
175
-
176
-
177
-
178
-
179
-
180
-
181
-
182
-
183
-
184
-
185
-
186
-
187
-
188
-
189
-
190
-
191
-
192
-
193
-
194
-
195
-
196
-
197
-
198
-
199
-
200
-
201
-
202
-
203
-
204
-
205
-
206
-
207
-
208
-
209
-
210
-
211
-
212
-
213
-
214
-
215
-
216
-
217
-
218
-
219
-
220
-
221
-
222
-
223
-
224
-
225
-
226
-
227
-
228
-
229
-
230
-
231
-
232
-
233
-
234
-
235
-
236
-
237
-
238
-
239
-
240
-
241
-
242
-
243
-
244
-
245
-
246
-
247
-
248
-
249
-
250
-
251
 |
 |
