Brother International Innov-ís 4000D Users Manual - English - Page 98
buttonhole foot.
 |
View all Brother International Innov-ís 4000D manuals
Add to My Manuals
Save this manual to your list of manuals |
Page 98 highlights
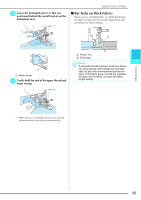
d Lower the buttonhole lever so that it is positioned behind the metal bracket on the buttonhole foot. a a Buttonhole lever a a Metal bracket e Gently hold the end of the upper thread, and then press the "Start/Stop" button to start the machine. → Once sewing is completed, the machine automatically sews reinforcement stitches, and then stops. Memo If automatic thread cutting is turned on before you start sewing, both threads are automatically cut after the reinforcement stitches are sewn. If the fabric does not feed (for example, because it is too thick), increase the stitch length setting. SEWING THE STITCHES 3 Utility Stitches 87
-
 1
1 -
2
-
3
-
4
-
5
-
6
-
7
-
8
-
9
-
10
-
11
-
12
-
13
-
14
-
15
-
16
-
17
-
18
-
19
-
20
-
21
-
22
-
23
-
24
-
25
-
26
-
27
-
28
-
29
-
30
-
31
-
32
-
33
-
34
-
35
-
36
-
37
-
38
-
39
-
40
-
41
-
42
-
43
-
44
-
45
-
46
-
47
-
48
-
49
-
50
-
51
-
52
-
53
-
54
-
55
-
56
-
57
-
58
-
59
-
60
-
61
-
62
-
63
-
64
-
65
-
66
-
67
-
68
-
69
-
70
-
71
-
72
-
73
-
74
-
75
-
76
-
77
-
78
-
79
-
80
-
81
-
82
-
83
-
84
-
85
-
86
-
87
-
88
-
89
-
90
-
91
-
92
-
 93
93 -
 94
94 -
 95
95 -
 96
96 -
 97
97 -
 98
98 -
 99
99 -
 100
100 -
 101
101 -
 102
102 -
 103
103 -
104
-
105
-
106
-
107
-
108
-
109
-
110
-
111
-
112
-
113
-
114
-
115
-
116
-
117
-
118
-
119
-
120
-
121
-
122
-
123
-
124
-
125
-
126
-
127
-
128
-
129
-
130
-
131
-
132
-
133
-
134
-
135
-
136
-
137
-
138
-
139
-
140
-
141
-
142
-
143
-
144
-
145
-
146
-
147
-
148
-
149
-
150
-
151
-
152
-
153
-
154
-
155
-
156
-
157
-
158
-
159
-
160
-
161
-
162
-
163
-
164
-
165
-
166
-
167
-
168
-
169
-
170
-
171
-
172
-
173
-
174
-
175
-
176
-
177
-
178
-
179
-
180
-
181
-
182
-
183
-
184
-
185
-
186
-
187
-
188
-
189
-
190
-
191
-
192
-
193
-
194
-
195
-
196
-
197
-
198
-
199
-
200
-
201
-
202
-
203
-
204
-
205
-
206
-
207
-
208
-
209
-
210
-
211
-
212
-
213
-
214
-
215
-
216
-
217
-
218
-
219
-
220
-
221
-
222
-
223
-
224
-
225
-
226
-
227
-
228
-
229
-
230
-
231
-
232
-
233
-
234
-
235
-
236
-
237
-
238
-
239
-
240
-
241
-
242
-
243
-
244
-
245
-
246
-
247
-
248
-
249
-
250
-
251
 |
 |

SEWING THE STITCHES
Utility Stitches
87
3
d
Lower the buttonhole lever so that it is
positioned behind the metal bracket on the
buttonhole foot.
a
Buttonhole lever
a
Metal bracket
e
Gently hold the end of the upper thread,
and then press the “Start/Stop” button to
start the machine.
→
Once sewing is completed, the machine
automatically sews reinforcement stitches, and then
stops.
Memo
If automatic thread cutting is turned on before
you start sewing, both threads are automati-
cally cut after the reinforcement stitches are
sewn. If the fabric does not feed (for example,
because it is too thick), increase the stitch
length setting.
a
a