Brother International JS60 Operation Manual
Brother International JS60 Manual
 |
View all Brother International JS60 manuals
Add to My Manuals
Save this manual to your list of manuals |
Brother International JS60 manual content summary:
- Brother International JS60 | Operation Manual - Page 1
Operation Manual Sewing Machine Product Code: 888-X62/X72 Manual de instrucciones Máquina de coser Product Code (Código de producto): 888-X62/X72 ENGLISH ESPAÑOL Be sure to read this document before using the machine. We recommend that you keep this document nearby for future reference. Lea este - Brother International JS60 | Operation Manual - Page 2
Please read these safety instructions before attempting to use the machine. DANGER - To reduce the risk of electric shock: 1 Always unplug the machine from the electrical outlet immediately after using, when cleaning, when making any user servicing adjustments mentioned in this manual, or if you are - Brother International JS60 | Operation Manual - Page 3
occurs or adjustment is required, first follow the troubleshooting table in the back of the operation manual to inspect and adjust the machine yourself. If the problem persists, please consult your local authorized Brother Service Center. Use this machine only for its intended use as described in - Brother International JS60 | Operation Manual - Page 4
SAVE THESE INSTRUCTIONS This machine is intended for household use. FOR USERS IN COUNTRIES EXCEPT EUROPEAN COUNTRIES This appliance is not outlet is not suitable for the plug supplied with this equipment, you should contact your authorized Brother Service Center to obtain the correct lead. 3 - Brother International JS60 | Operation Manual - Page 5
CONTENTS IMPORTANT SAFETY INSTRUCTIONS .......... 1 1. KNOWING YOUR SEWING MACHINE 5 ACCESSORIES 5 Optional accessories 5 THE MAIN PARTS 6 Flat bed attachment 6 USING YOUR SEWING MACHINE 7 Connecting plugs 7 Main power and sewing light switch 8 Foot controller 8 Checking the needle 8 - Brother International JS60 | Operation Manual - Page 6
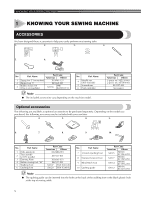
KNOWING YOUR SEWING MACHINE 1 KNOWING YOUR SEWING MACHINE ACCESSORIES We have designed these accessories to help you easily perform most sewing tasks. 1. 2. 3. 4. JJ I I 5. 6. No. Part Name Part Code Americas Others 1 Zigzag foot "J" (on machine) XC4901-121 2 Zipper foot "I" - Brother International JS60 | Operation Manual - Page 7
to set the stitch length. E Handwheel Used to manually raise and lower the needle. F Air vent The air vent allows the air surrounding the motor to circulate. Do not cover the air vent while the machine is being used. I K G H G Main power and sewing light switch (Page 8) You can turn the main - Brother International JS60 | Operation Manual - Page 8
damaged, take the machine to your authorized Brother Service Center for repairs before continuing use. ● Unplug the power cord if the machine is not to be power supply cord. When restarting the sewing machine, follow the necessary procedure to correctly operate the machine. (For U.S.A. only) ● This - Brother International JS60 | Operation Manual - Page 9
. Otherwise, injuries may occur if the foot controller is accidentally pressed and the machine starts sewing. ● Only use sewing machine needles for home use. Other needles may bend or break and cause injury. ● Never sew with a bent needle. A bent needle will easily break and cause injury. Turn off - Brother International JS60 | Operation Manual - Page 10
not use excessive force when loosening or tightening the needle clamp screw, otherwise certain parts of the sewing machine may be damaged. With the flat side of the needle toward the e back of the machine, insert the needle until it touches the needle stopper. Next, tighten the needle clamp using - Brother International JS60 | Operation Manual - Page 11
injury. 1 Shank 2 Bar ■ Presser foot installation orientation You will have to change the presser foot depending on what you want to sew and how. Turn off the machine. a Raise the presser foot lever. Raise the needle by turning the b handwheel toward you (counterclockwise) so that the mark on the - Brother International JS60 | Operation Manual - Page 12
KNOWING YOUR SEWING MACHINE THE CONTROLS Pattern selection dial The width of the zigzag longer stitch length. When the dial is set to 0, the fabric is not fed. This setting is used for sewing on a button. The area noted with an F is used for making a Satin Stitch (a close zigzag stitch), which - Brother International JS60 | Operation Manual - Page 13
tacking and 1 reinforcing seams. To sew in reverse, push the reverse sewing lever in as far as possible and hold it in that position while you lightly push the foot controller. To sew forward, release the reverse sewing lever. The machine will then sew forward. The length of reverse stitches - Brother International JS60 | Operation Manual - Page 14
SEWING MACHINE THREADING THE MACHINE Winding the bobbin CAUTION ● We designed the bobbin that comes with this machine. If you use bobbins from other models, the machine will not work properly. Only use the bobbin that comes with this machine the groove on the thread guide. Then, pass the thread - Brother International JS60 | Operation Manual - Page 15
2 1 1 1 cm (1/2 inch) CAUTION ● Make sure you follow the instructions carefully. If you do not cut the excess thread completely before winding the bobbin, Note ● When the sewing machine is started or the handwheel is turned after winding the thread around the bobbin, the machine will make a clicking - Brother International JS60 | Operation Manual - Page 16
KNOWING YOUR SEWING MACHINE Lower threading Install the bobbin wound with thread. • For more details on using the quick-set bobbin, see page 16. CAUTION ● Make sure you turn off the machine while threading. If you accidentally step on the foot controller and the machine starts to sew, you could - Brother International JS60 | Operation Manual - Page 17
15. While lightly holding down the bobbin b with your right hand as shown, guide the thread through the slit (1 and 2). Then, pull the thread toward you to 3 1 12 1 Groove 2 Projection • Start sewing after threading the lower and upper thread. When sewing gathers or darts, you can draw up the lower - Brother International JS60 | Operation Manual - Page 18
KNOWING YOUR SEWING MACHINE Upper threading 2 2 3 4 1 5 1 Spool pin 2 Thread guide (back) 3 Thread guide (front) 4 Thread take-up lever 5 Mark on the handwheel CAUTION ● When threading the upper thread, carefully follow the instructions. If the upper threading is not correct, the thread - Brother International JS60 | Operation Manual - Page 19
guide 53 Make sure you guide the thread through g the thread take-up lever from right to left as shown in the following illustration. 1 Thread the needle from front to back i leaving a thread tail of about 5 cm (2 inches). • If your sewing machine feed the thread you may cause sewing problems. 18 - Brother International JS60 | Operation Manual - Page 20
through 100/16 home sewing machine needle. However, the needle threader cannot be used with a 65/9 home sewing machine needle. When using Needle threader lever 3 Guide Pull down the needle threader lever as e much as possible, and then turn the lever toward the back of the machine (away from you). - Brother International JS60 | Operation Manual - Page 21
needle threader lever. g 1 1 5 cm (2 inches) Note ● If you incorrectly feed the thread you may cause sewing problems. Pull the loop of the thread passed through h the eye of the needle toward the rear of the machine. 1 1 Loop of thread CAUTION ● Be careful not to pull on the thread with force or - Brother International JS60 | Operation Manual - Page 22
KNOWING YOUR SEWING MACHINE Drawing up the lower thread While lightly holding the end of the upper a thread, slowly turn the handwheel toward you (counterclockwise) by hand to lower and then raise the needle. ■ For models equipped with a quick-set bobbin You can begin sewing immediately without - Brother International JS60 | Operation Manual - Page 23
Note ● Never use a thread weighted #20 or lower. It may cause machine malfunction. Memo ● The lower the thread number, the thicker the thread; and the needle. ■ Ball point needle Use the ball point needle when sewing on stretch fabrics or fabrics where skipped stitches easily occur. ■ Transparent - Brother International JS60 | Operation Manual - Page 24
under the presser foot, otherwise the presser foot may be damaged. Starting sewing Raise the presser foot lever. e Turn on the machine. a 1 CAUTION ● Do not turn on the machine while pressing down the foot controller. The machine may start unexpectedly and cause personal injury or damage to the - Brother International JS60 | Operation Manual - Page 25
handwheel toward you (counterclockwise). Raise the presser foot lever. l Pull the fabric to the left side of the m machine, and then pass the threads through the thread cutter to cut them. . 1 Sewing thick fabrics ■ If the fabric does not fit under the presser foot If the fabric does not fit easily - Brother International JS60 | Operation Manual - Page 26
bed attachment to the left to a release it. 1 1 Flat bed attachment With the flat bed attachment removed, free-arm sewing is possible. CAUTION ● Use only twin needles that have been made for this machine (part code: X57521-021:2.0/75 with a 2 mm width). Other needles could break and damage the - Brother International JS60 | Operation Manual - Page 27
. Use the thread from the first spool to a thread the machine to the needle bar thread guide. The path for threading the machine to the needle bar thread guide is the same as for normally threading the machine (for a single needle). See page 18 for more details. Thread the left needle from front - Brother International JS60 | Operation Manual - Page 28
are sewn parallel to each other. CAUTION ● When changing the sewing direction, be sure to raise the needle from the fabric, and then raise the presser foot lever and turn the fabric. Otherwise the needle may break or the machine may be damaged. Thread tension The tension of the thread will - Brother International JS60 | Operation Manual - Page 29
■ Upper tension is too loose Loops appear on the back of the fabric. Note ● If the upper thread was incorrectly threaded, the upper thread may be too loose. In this case, refer to "Upper threading" on page 17 and rethread the upper thread. 2 25 1 3 4 1 Surface of fabric 2 Back of fabric 3 - Brother International JS60 | Operation Manual - Page 30
You can use the zigzag stitches to join together seams and finish them in one operation. They are also useful for sewing stretch materials. Needle Available stitch width ( ) 5 Available stitch length Single 0.5 0.5-5 F-4 (For the Satin Stitch, set at F.) Twin 3 0.5 3 or less ■ Simple zigzag - Brother International JS60 | Operation Manual - Page 31
Start sawing. b Blind hem stitching Needle Single Available stitch width ( ) See the instructions below. Available stitch length See the instructions below. Memo • For details, refer to "Starting sewing" (Page 23). ● When the size of cylindrical pieces is too small to slide onto the arm - Brother International JS60 | Operation Manual - Page 32
fabric> Remove the flat bed attachment and make f free-arm sewing possible. • For details on free-arm sewing, refer to "Stitching cylindrical pieces" (Page 25). Slide the part that you wish to sew onto g the arm, make sure that the fabric feeds correctly, and then start - Brother International JS60 | Operation Manual - Page 33
your hands, so that the needle slightly catches the fold of the hem. Sew 5-6 stitches on the fold with the stitch m width set at the right ) 5 Available stitch length Single 3 3-4 3 Quickly set the width to 3-5, then sew 1 n stitch, and then set the width back to the right needle position. Repeat - Brother International JS60 | Operation Manual - Page 34
SEWING BUTTONHOLES 4 SEWING BUTTONHOLES Making a buttonhole Needle Available stitch width ( ) Single See the instructions below. ■ Making a buttonhole Available over the top right b corner of the buttonhole mark and sew 3- 5 stitches. Stop the machine when the needle is not c in the fabric, or - Brother International JS60 | Operation Manual - Page 35
an axis. Buttonhole To secure the stitching, turn the material a 90 degrees counterclockwise and sew straight stitches to the end of the front bar tack of the buttonhole. C Remove the material from the machine. b We recommend that you put pins across both ends of the buttonhole to prevent the - Brother International JS60 | Operation Manual - Page 36
before replacing the presser foot. Otherwise, injuries may occur if the foot controller is accidentally pressed and the machine starts sewing. Zipper insertion Prepare the fabric with the zipper basted a on the wrong side. Needle Available stitch width ( ) Available stitch length Single - Brother International JS60 | Operation Manual - Page 37
and applying it as a decoration. Needle Available stitch width ( ) Available stitch length Baste the cut design to the fabric. a Single 4 Carefully sew around the edge of the b design with a zigzag stitch. Straight stitch (middle needle position) Loosen the tension of the upper thread so - Brother International JS60 | Operation Manual - Page 38
the needle may bend or break. Turn on the machine. h CAUTION ● Do not turn on the machine while pressing down the foot controller. The machine may start unexpectedly and cause personal injury or damage to the machine. Start sewing. i • After sewing for about 10 seconds at a low speed, press and - Brother International JS60 | Operation Manual - Page 39
the stitch width according to the distance between the reinforcement. Turn on the machine. d holes in the button and sew on the button as previously explained. After sewing about 10 stitches, remove b the fabric from the machine leaving a longer upper thread (about 15 cm (6")) in order to form - Brother International JS60 | Operation Manual - Page 40
to the machine. Align the foot guide with the needle c position. Turn the pattern selection dial to set it to d the desired width. Place the fabric under the foot so the foot e guide is aligned between both edges of the fabric. Lower the presser foot and start sewing. f 2 2 1 1 Screw 2 Guide 39 - Brother International JS60 | Operation Manual - Page 41
hem. • For more details on blind hem stitching, see page 30. 1 1 Screw 2 Guide 3 Folded hem 2 3 Satin stitches Various decorative stitches can be obtained by sewing with the Satin Stitch when following the instructions below. Lower the needle into the fabric at the a beginning of the stitching - Brother International JS60 | Operation Manual - Page 42
periodic oiling unnecessary. If problems occur, such as difficulty turning the handwheel or an unusual noise, immediately stop using the machine, and contact your authorized Brother Service Center or the nearest authorized Brother Service Center. Precautions on storing the machine Do not store the - Brother International JS60 | Operation Manual - Page 43
the bobbin case so that the ▲ mark g on the bobbin case aligns with the ● mark on machine as shown below. 1 1 2 2 • Align the ▲ and ● marks. 1 Screws • Make , or sewing performance may suffer. For a new bobbin case (part code: XE9326-001), contact your nearest authorized Brother Service Center. - Brother International JS60 | Operation Manual - Page 44
Brother Solutions Center offers the latest FAQs and troubleshooting tips. Visit us at " http://support.brother.com ". If the problem persists, contact your Brother dealer or the nearest authorized Brother Service Center. Symptom The sewing machine has come out of the guide above the needle.) There - Brother International JS60 | Operation Manual - Page 45
Brother Service Center. - You have not used a bobbin that has been Use a bobbin that has been designed for designed for this machine. this machine the needle. 8 If thin fabrics are being sewn, the fabric is Sew with stabilizer material under the not being fed correctly. fabric. 25 The - Brother International JS60 | Operation Manual - Page 46
are using is not appropriate for the type of stitch that you want to sew. How to put it right Correct the upper threading. Choose a thread and needle presser foot that is correct for the type of stitch that you want to sew. Adjust the tension of the upper thread. Remove the tangled thread. If the - Brother International JS60 | Operation Manual - Page 47
length dial 11 Straight stitching 29 T Thread cutter 24 Thread tension 27 , Threading lower 15 16 upper 17 Troubleshooting 43 , Twin needle attaching 9 25 sewing 25 U Upper tension control dial 27 Upper threading 17 F Fabric, thread, and needle combinations .......22 Flat bed attachment - Brother International JS60 | Operation Manual - Page 48
de la toma de corriente cuando realice cualquier ajuste mencionado en el manual de instrucciones: • Para desenchufarla, coloque el interruptor de derramado agua dentro. Devuelva la máquina al distribuidor autorizado Brother o al servicio de reparaciones más cercano para su revisión, reparación o para - Brother International JS60 | Operation Manual - Page 49
ya que, de lo contrario, la máquina podría caerse y provocar lesiones. 6 Hay que tener especial cuidado al coser: • Preste de Servicio Brother autorizado. • En caso de que se produzca una avería o se requiera un ajuste, consulte primero la tabla de solución de problemas al final del manual de - Brother International JS60 | Operation Manual - Page 50
de una persona responsable de su seguridad. Los niños deberán ser vigilados para asegurarse de que no juegan con el aparato. PARA USUARIOS DE PAÍSES EUROPEOS Este aparato puede ser utilizado por niños de a partir de 8 años de • Si la toma de corriente disponible no es apropiada para el enchufe suministrado - Brother International JS60 | Operation Manual - Page 51
de cama plana 6 USO DE LA MÁQUINA DE COSER 7 Conexión de enchufes 7 Interruptor de la alimentación y de luz de cosido 8 Pedal 8 Comprobación de la aguja 8 Cambio de la aguja 8 Cambio del pie prensatela 10 CONTROLES 11 Selector de puntadas 11 Dial de longitud de la puntada 11 Pulsador de - Brother International JS60 | Operation Manual - Page 52
CONOZCA SU MÁQUINA DE COSER 1 CONOZCA SU MÁQUINA DE COSER ACCESORIOS Hemos diseñado estos accesorios para ayudarle a realizar fácilmente la mayoría de las tareas de costura. 1. 2. 3. 4. JJ I I 5. 6. N.º Nombre de la pieza Código de la pieza América Otros 1 Pie para zig-zag "J" ( - Brother International JS60 | Operation Manual - Page 53
-127 V (solo Brasil) Modelo KD-2902 para área de 220-240 V El código de pieza del pedal varía dependiendo del país o de la región. Póngase en contacto con su distribuidor Brother o con el Centro de Servicio Brother autorizado más cercano. Unidad de cama plana Los accesorios pueden almacenarse en un - Brother International JS60 | Operation Manual - Page 54
1 Conecte el enchufe en una toma de 2 corriente de la pared. Nota ● Si se produce un corte de corriente mientras está utilizándose la máquina de coser, apague la máquina y desenchufe el cable de corriente. Al volver a poner en funcionamiento la máquina de coser, siga el procedimiento necesario para - Brother International JS60 | Operation Manual - Page 55
una descarga eléctrica. PRECAUCIÓN ● Apague siempre la máquina antes de cambiar la aguja. De lo contrario, podría lesionarse si el pedal se pisa accidentalmente y la máquina comienza a coser. ● Utilice solamente agujas de máquina de coser para uso doméstico. Otras agujas podrían doblarse o romperse - Brother International JS60 | Operation Manual - Page 56
procedimiento. 1 Utilice un destornillador • No ejerza una fuerza excesiva para aflojar o apretar el tornillo de la presilla de la aguja, pues podría dañar algunas piezas de la máquina de coser. PRECAUCIÓN ● Asegúrese de insertar la aguja hasta que llegue al tope y apriete fuertemente el tornillo - Brother International JS60 | Operation Manual - Page 57
colocación del pie prensatela Deberá cambiar el pie prensatela según lo que desee coser y cómo. Apague la máquina. 1 Suba la palanca del pie prensatela aguja girando la rueda hacia usted 2 (hacia la izquierda), de manera que la marca de la rueda apunte hacia arriba. 3 Retire el prensatelas tirando - Brother International JS60 | Operation Manual - Page 58
CONOZCA SU MÁQUINA DE COSER CONTROLES Selector de puntadas La anchura de la puntada en zig-zag se regula accionando el selector de puntadas. Los símbolos del dial muestran las anchuras de la puntada y las puntadas rectas tal y como se indica a continuación. Gire el dial de modo que el símbolo - Brother International JS60 | Operation Manual - Page 59
1 y reforzar costuras. Para coser en reversa, empuje el pulsador de retroceso todo lo posible y manténgalo en esa posición mientras pisa ligeramente el pedal. Para coser hacia delante, suelte el pulsador de retroceso. La máquina coserá hacia delante. La longitud de las puntadas en reversa se - Brother International JS60 | Operation Manual - Page 60
CONOZCA SU MÁQUINA DE COSER ENHEBRADO DE LA MÁQUINA Devanado de la bobina PRECAUCIÓN ● Hemos diseñado la bobina que se proporciona con esta máquina. Si utiliza bobinas de otros modelos, la máquina no funcionará correctamente. Utilice exclusivamente la bobina suministrada con esta máquina o - Brother International JS60 | Operation Manual - Page 61
bobina parece estar llena y 9 empieza a girar despacio, deje de pisar el pedal. Corte el hilo, mueva el eje de la 0 devanadora de bobina hacia la izquierda y retire la bobina. Nota ● Cuando se pone en marcha la máquina de coser o se gira la rueda después de enrollar el hilo en la bobina, la máquina - Brother International JS60 | Operation Manual - Page 62
MÁQUINA DE COSER Enhebrado del hilo inferior Coloque la bobina devanada con hilo. • Si desea más información sobre el uso de la bobina rápida, consulte la página 16. PRECAUCIÓN ● Asegúrese de apagar la máquina cuando vaya a enhebrar. Si pisa el pedal sin querer y la máquina empieza a coser, podr - Brother International JS60 | Operation Manual - Page 63
el cortador (3). • En este momento, compruebe que la bobina gira fácilmente hacia la izquierda. 2 1 2 3 1 12 1 Ranura 2 Proyección • Comience a coser después de enhebrar los hilos inferior y superior. Al coser zurcidos o pinzas, puede tirar del hilo inferior manualmente para que sobre un poco - Brother International JS60 | Operation Manual - Page 64
Suba la aguja girando la rueda hacia usted 3 (hacia la izquierda), de manera que la marca de la rueda apunte hacia arriba. • Si la aguja no está levantada correctamente, la máquina de coser no podrá enhebrarse. PRECAUCIÓN ● Si el carrete de hilo no está en el lugar correcto o no está bien colocado - Brother International JS60 | Operation Manual - Page 65
muestra en la ilustración siguiente. 1 Enhebre la aguja desde la parte delantera 9 a la trasera, dejando un trocito de hilo de unos 5 cm (2 pulgadas). • Si su máquina de coser tiene enhebrador, utilícelo para enhebrar la aguja (consulte la sección siguiente). 1 1 Tirahilo Recuerde ● Si el tirahilo - Brother International JS60 | Operation Manual - Page 66
nicamente en determinados modelos. PRECAUCIÓN ● El enhebrador de aguja puede utilizarse con una aguja de máquina de coser doméstica de 75/11 a 100/16. No obstante, el enhebrador de aguja no puede utilizarse con una aguja para máquina de coser doméstica de 65/9. Si se utiliza hilo especial (como hilo - Brother International JS60 | Operation Manual - Page 67
7 1 1 5 cm (2 pulg.) Nota ● Si no pasa el hilo de manera correcta, pueden producirse problemas al coser. Saque el lazo del hilo pasado por el ojo de 8 la aguja hacia la parte trasera de la máquina. 1 1 Lazo de hilo PRECAUCIÓN ● Tenga cuidado de no tirar del hilo con fuerza o podría doblar la aguja - Brother International JS60 | Operation Manual - Page 68
Para los modelos equipados con una bobina rápida Puede comenzar a coser inmediatamente sin tener que tirar del hilo de la bobina. Al coser zurcidos o pinzas, puede tirar del hilo inferior manualmente para que sobre un poco de hilo. Antes de tirar del hilo inferior, vuelva a colocar la bobina. Retire - Brother International JS60 | Operation Manual - Page 69
. Puede producir averías. Recuerde ● Cuanto más pequeño sea el número de hilo, más grueso será el hilo. Cuanto más grande sea el número de aguja, más gruesa será la aguja. ■ Aguja de punta redonda Utilice la aguja de punta redonda para coser en telas elásticas o telas en las que es fácil que las - Brother International JS60 | Operation Manual - Page 70
podría engancharse y causar daños en la aguja o la tecla, y podría lesionarse. ● No comience a coser sin colocar la tela bajo el pie prensatela; de lo contrario, el pie prensatela podría dañarse. Comienzo de la costura Encienda la máquina. 1 Suba la palanca del pie prensatela. 5 1 PRECAUCIÓN ● No - Brother International JS60 | Operation Manual - Page 71
y continúe cosiendo. 1 1 Palanca del pie prensatela Pise lentamente el pedal. 9 La máquina comienza a coser. Retire el pie del pedal. 0 La máquina deja de coser. • Con el pulsador de retroceso puede hacer costura en reversa para hilvanar en reversa y reforzar costuras. Consulte "Pulsador - Brother International JS60 | Operation Manual - Page 72
y cósalo junto con la tela. Cuando haya terminado de coser, quite el papel sobrante. Nota ● Cuando termine con la costura de brazo libre, vuelva a colocar la unidad de cama plana en su posición original. Deslice la parte que desee coser sobre el 2 brazo y, a continuación, cosa desde la parte - Brother International JS60 | Operation Manual - Page 73
desea más información, consulte la página 18. 1 El hilo de la aguja izquierda pasa a través de la guía del hilo de la varilla de la aguja. 2 El hilo de la aguja derecha pasa delante de la guía del hilo de la varilla de la aguja. 3 Guía del hilo de la varilla de la aguja Coloque el pie para zig-zag - Brother International JS60 | Operation Manual - Page 74
o la máquina averiarse. Tensión del hilo La tensión del hilo afectará a la calidad de las puntadas. Cuando cambie de tela o de hilo, es posible que necesite ajustar la tensión del hilo. Recuerde ● Antes de comenzar a coser, recomendamos que haga una prueba en un retal. ■ Tensión adecuada Una tensi - Brother International JS60 | Operation Manual - Page 75
está demasiado flojo Aparecerán ondas en el revés de la tela. Nota ● Si el hilo superior no est 4 1 Superficie de la tela 2 Revés de la tela 3 Hilo superior 4 Hilo inferior 5 Aparecen ondas en el revés de la tela Solución Aumente la tensión girando el disco de control de la tensión superior - Brother International JS60 | Operation Manual - Page 76
Gemela Puntada recta (posición media o derecha de la aguja) Hilvane o una con alfileres los trozos de 1 tela. Baje la aguja para insertarla en la tela al 2 principio de la costura. Comience a coser. 3 • Si desea más información, consulte "Comienzo de la costura" (Página 23). Cuando haya terminado - Brother International JS60 | Operation Manual - Page 77
Comience a coser. 2 Costura invisible para dobladillo Aguja Anchura de la puntada disponible ( ) Longitud de la haya terminado la costura, corte 3 el hilo. • Si desea más información, consulte "Comienzo de la costura" (Página 23). PRECAUCIÓN ● Gire lentamente la rueda hacia usted (hacia la - Brother International JS60 | Operation Manual - Page 78
" (Página 25). Deslice la parte que desee coser sobre el 7 brazo, asegurándose de que la tela avanza correctamente y, a continuación, comience a coser. 1 1 Brazo Ajuste la longitud de la puntada en 0, la 8 anchura de la puntada en la posición de aguja derecha. Gire lentamente la rueda hacia usted - Brother International JS60 | Operation Manual - Page 79
pasos l - n. e Quite el hilvanado y ponga la tela con el f derecho hacia arriba. 3-5 Coloque el borde de la tela debajo del pie prensatela de manera que la aguja se inserte en la tela cuando se cosa el lado izquierdo de la costura de zig-zag y no coja el borde la tela con el lado derecho - Brother International JS60 | Operation Manual - Page 80
la tela la posición y la longitud del ojal. Paso A: Barra de remate Ajuste la longitud de la puntada en 0 y la 1 anchura de la puntada en 5. Paso B: Fila derecha Ajuste la longitud de la puntada entre 0 y 1 1 (F) y la anchura de la puntada en 2. Cosa la longitud predeterminada del ojal 2 hasta el - Brother International JS60 | Operation Manual - Page 81
en los dos extremos del ojal para evitar que las puntadas se corten. 4 C Corte una abertura en el centro del ojal 3 con el abridor de costura. Tenga cuidado de no cortar la costura. Baje el pie prensatela. A continuación, 2 gire la rueda para mover la aguja hacia el lado derecho. Levante el - Brother International JS60 | Operation Manual - Page 82
cremallera en el lado izquierdo 2 Patilla izquierda para coser con la cremallera en el lado derecho 3 Punto de entrada de la aguja para coser con la cremallera en el lado izquierdo 4 Punto de entrada de la aguja para coser con la cremallera en el lado derecho 1 1 3 3 5 4 2 4 1 Costura - Brother International JS60 | Operation Manual - Page 83
cremallera en el lado derecho del pie prensatela. Tire de los hilos inferiores para fruncir el 3 material. 1 Extremo de la abertura de la cremallera 2 Costura de hilvanado 3 Cremallera • Cosa las puntadas en orden, de 1 a 3. PRECAUCIÓN ● Asegúrese de que la aguja no golpea la cremallera durante la - Brother International JS60 | Operation Manual - Page 84
ocasionar lesiones personales o daños a la máquina. Comience a coser. 9 • Tras coser durante unos 10 segundos a baja velocidad, mantenga pulsado el pulsador de retroceso para coser las costuras de remate. Tire del hilo hacia la izquierda de la 0 máquina y, a continuación, corte los hilos superiores - Brother International JS60 | Operation Manual - Page 85
entre los orificios Encienda la máquina. del botón y cosa el botón como se ha 4 explicado anteriormente. Después de coser unas 10 puntadas, retire PRECAUCIÓN 2 la tela de la máquina dejando un hilo superior más largo (aprox. 15 cm (6")) ● No encienda la máquina mientras pisa el para - Brother International JS60 | Operation Manual - Page 86
elástica, sino también para coser bordes de tela y costuras. ■ Para coser bordes Aguja Anchura de la puntada disponible ( ) Longitud de la puntada disponible ■ Para coser costuras Aguja Anchura de la puntada disponible ( ) 5 Simple Longitud de la puntada disponible 1-2 Simple F-4 Puntada - Brother International JS60 | Operation Manual - Page 87
aguja para insertarla en la tela al 1 principio de la costura. Comience a coser. 2 • Si desea más información, consulte "Comienzo de la costura" (Página 23). Cosa puntadas de satén mientras ajusta la 3 anchura de la puntada girando el selector de puntadas en el rango mostrado en la siguiente tabla - Brother International JS60 | Operation Manual - Page 88
dificultad en girar la rueda o ruidos no habituales, deje inmediatamente de usar la máquina y póngase en contacto con su Centro de Servicio Brother autorizado o con el Centro de Servicio Brother autorizado más cercano. Precauciones para el almacenamiento de la máquina No guarde la máquina en ninguno - Brother International JS60 | Operation Manual - Page 89
se vea afectado el rendimiento de la costura. Si desea una caja de bobina nueva (código de la pieza: XE9326-001), póngase en contacto con el Centro de Servicio Brother autorizado más cercano. ● Asegúrese de que coloca la caja de bobina correctamente ya que, de lo contrario, la aguja podría romperse - Brother International JS60 | Operation Manual - Page 90
, así como la lista actualizada de preguntas y respuestas más frecuentes. Visítenos en " http://support.brother.com ". Si el problema persiste, póngase en contacto con su proveedor Brother o con el Centro de Servicio Brother autorizado más cercano. Síntoma La máquina de coser no funciona. La tela - Brother International JS60 | Operation Manual - Page 91
Póngase en contacto con su proveedor o su Centro de Servicio Brother autorizado más cercano. - La caja de bobina está rayada o tiene pelusa. Cambie la caja de bobina. Póngase en contacto con su proveedor o su Centro de Servicio Brother - autorizado más cercano. No ha utilizado una bobina dise - Brother International JS60 | Operation Manual - Page 92
ANEXO Síntoma ▲ La tela está arrugada. Las puntadas quedan sueltas. No se puede utilizar el enhebrador de aguja. Al coser, el resultado de las puntadas no es el correcto. La tela no se arrastra bien. Causa posible Si se cosen telas finas, la tela no está avanzando correctamente. - Brother International JS60 | Operation Manual - Page 93
32 Costura en zig-zag 29 Costura invisible para dobladillo 30 Costura recta 29 D Devanado de la bobina 13 Dial de longitud de la puntada 11 Disco de control de la tensión superior .........27 E , Enhebrado hilo inferior 15 16 hilo superior 17 Enhebrado del hilo inferior 15 Enhebrado - Brother International JS60 | Operation Manual - Page 94
- Brother International JS60 | Operation Manual - Page 95
- Brother International JS60 | Operation Manual - Page 96
Please visit us at http://support.brother.com where you can get product support and answers to frequently asked questions (FAQs). Visítenos en http://support.brother.com donde hallará consejos para la solución de problemas así como la lista de preguntas y respuestas más frecuentes. English Spanish
-
 1
1 -
 2
2 -
 3
3 -
 4
4 -
 5
5 -
 6
6 -
 7
7 -
8
-
9
-
10
-
11
-
12
-
13
-
14
-
15
-
16
-
17
-
18
-
19
-
20
-
21
-
22
-
23
-
24
-
25
-
26
-
27
-
28
-
29
-
30
-
31
-
32
-
33
-
34
-
35
-
36
-
37
-
38
-
39
-
40
-
41
-
42
-
43
-
44
-
45
-
46
-
47
-
48
-
49
-
50
-
51
-
52
-
53
-
54
-
55
-
56
-
57
-
58
-
59
-
60
-
61
-
62
-
63
-
64
-
65
-
66
-
67
-
68
-
69
-
70
-
71
-
72
-
73
-
74
-
75
-
76
-
77
-
78
-
79
-
80
-
81
-
82
-
83
-
84
-
85
-
86
-
87
-
88
-
89
-
90
-
91
-
92
-
93
-
94
-
95
-
96
 |
 |
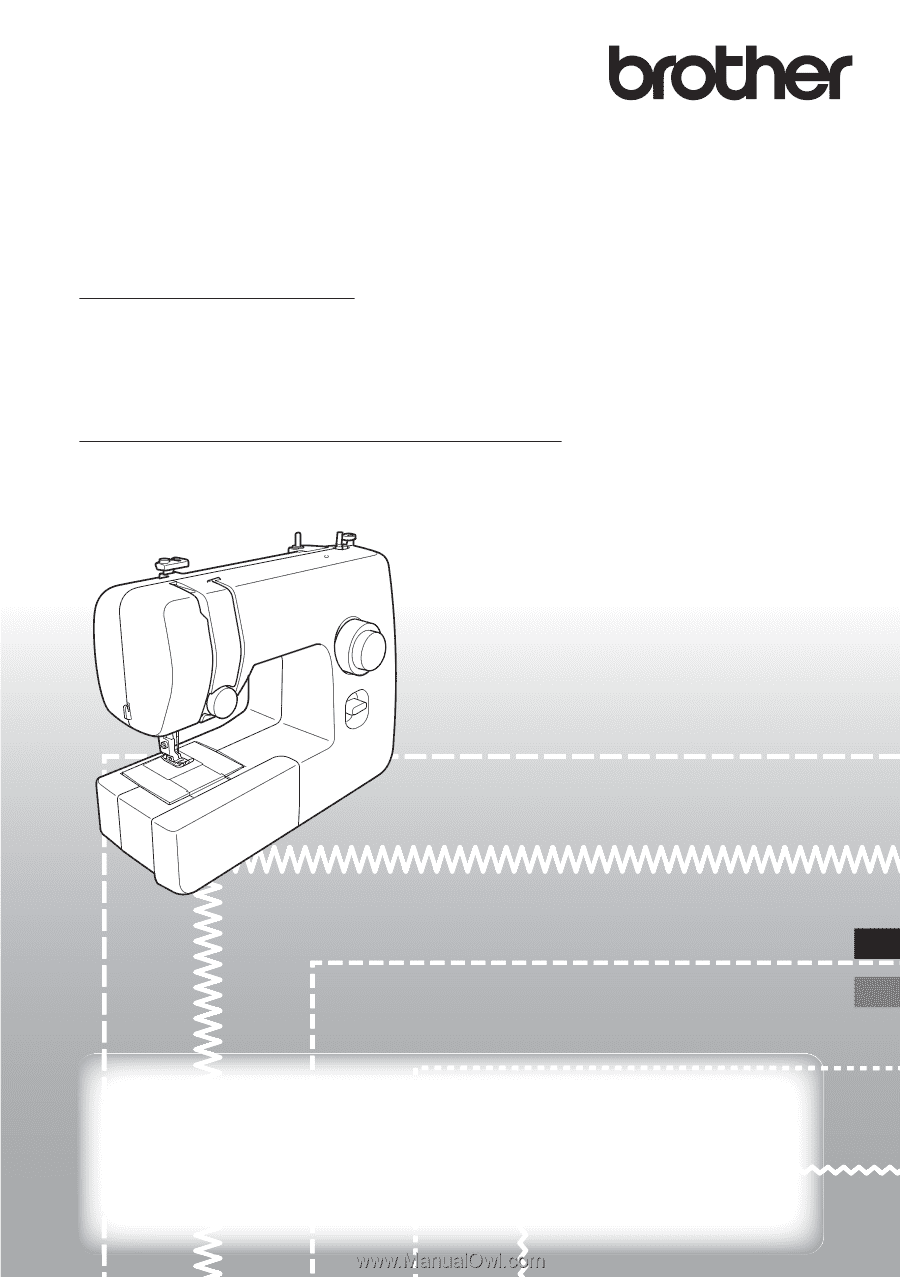
Operation Manual
Product Code: 888-X62/X72
Sewing Machine
Be sure to read this document before using the machine.
We recommend that you keep this document nearby for future reference.
ENGLISH
ESPAÑOL
Lea este documento antes de utilizar la máquina.
Recomendamos que tenga este documento a mano por si necesita
consultarlo más adelante.
Manual de instrucciones
Product Code (Código de producto): 888-X62/X72
Máquina de coser