Brother International PC-210PRW Users Manual - English - Page 38
Before starting to sew, slowly turn the, causing it to bend or break.
 |
View all Brother International PC-210PRW manuals
Add to My Manuals
Save this manual to your list of manuals |
Page 38 highlights
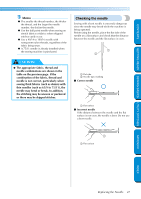
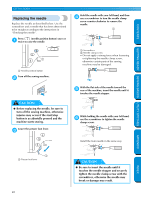
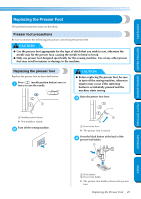
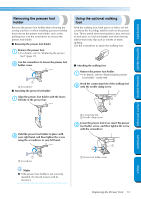
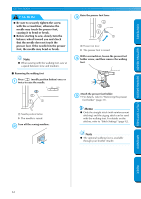
GETTING READY CONTENTS CAUTION ● Be sure to securely tighten the screw with the screwdriver, otherwise the needle may touch the presser foot, causing it to bend or break. ● Before starting to sew, slowly turn the balance wheel toward you and check that the needle does not touch the presser foot. If the needle hits the presser foot, the needle may bend or break. Note ● When sewing with the walking foot, sew at a speed between slow and medium. Raise the presser foot lever. 3 1 1 Presser foot lever X The presser foot is raised. With a screwdriver, loosen the presser foot 4 holder screw, and then remove the walking foot. ■ Removing the walking foot Press (needle position button) once or 1 twice to raise the needle. GETTING READY SEWING BASICS UTILITY STITCHES 1 1 Needle position button X The needle is raised. Turn off the sewing machine. 2 Attach the presser foot holder. 5 • For details, refer to "Removing the presser foot holder" (page 31). Memo ● Only the straight stitch (with reinforcement stitching) and the zigzag stitch can be used with the walking foot. For details on the stitches, refer to "Stitch Settings" (page 92). Note ● The optional walking foot is available through your brother retailer. APPENDIX INDEX 32
-
 1
1 -
2
-
3
-
4
-
5
-
6
-
7
-
8
-
9
-
10
-
11
-
12
-
13
-
14
-
15
-
16
-
17
-
18
-
19
-
20
-
21
-
22
-
23
-
24
-
25
-
26
-
27
-
28
-
29
-
30
-
31
-
32
-
 33
33 -
 34
34 -
 35
35 -
 36
36 -
 37
37 -
 38
38 -
 39
39 -
 40
40 -
 41
41 -
 42
42 -
 43
43 -
44
-
45
-
46
-
47
-
48
-
49
-
50
-
51
-
52
-
53
-
54
-
55
-
56
-
57
-
58
-
59
-
60
-
61
-
62
-
63
-
64
-
65
-
66
-
67
-
68
-
69
-
70
-
71
-
72
-
73
-
74
-
75
-
76
-
77
-
78
-
79
-
80
-
81
-
82
-
83
-
84
-
85
-
86
-
87
-
88
-
89
-
90
-
91
-
92
-
93
-
94
-
95
-
96
-
97
-
98
-
99
-
100
-
101
-
102
-
103
-
104
-
105
-
106
-
107
-
108
-
109
-
110
-
111
 |
 |
