Brother International PC-210PRW Users Manual - English - Page 51
Adjusting the Stitch Width and Length
 |
View all Brother International PC-210PRW manuals
Add to My Manuals
Save this manual to your list of manuals |
Page 51 highlights
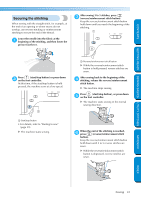
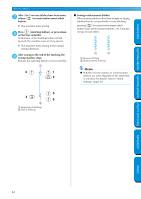
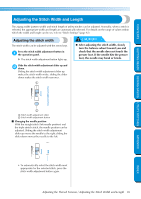
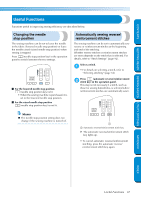
CONTENTS GETTING READY SEWING BASICS UTILITY STITCHES Adjusting the Stitch Width and Length The zigzag width (pattern width) and stitch length of utility stitches can be adjusted. Normally, when a stitch is selected, the appropriate width and length are automatically selected. For details on the range of values within which the width and length can be set, refer to "Stitch Settings" (page 92). Adjusting the stitch width The stitch width can be adjusted with the arrow keys. Press the stitch width adjustment button in 1 the operation panel. X The stitch width adjustment button lights up. CAUTION ● After adjusting the stitch width, slowly turn the balance wheel toward you and check that the needle does not touch the presser foot. If the needle hits the presser foot, the needle may bend or break. Slide the stitch width adjustment slider up and 2 down. Sliding the stitch width adjustment slider up makes the stitch width wider; sliding the slider down makes the stitch width narrower. 1 2 1 Stitch width adjustment slider 2 Stitch width adjustment button ■ Changing the needle position With the straight stitch (left needle position) and the triple stretch stitch, the needle position can be adjusted. Sliding the stitch width adjustment slider up moves the needle to the right; sliding the slider down moves the needle to the left. APPENDIX INDEX • To automatically select the stitch width most appropriate for the selected stitch, press the stitch width adjustment button again. Adjusting the Thread Tension / Adjusting the Stitch Width and Length 45
-
 1
1 -
2
-
3
-
4
-
5
-
6
-
7
-
8
-
9
-
10
-
11
-
12
-
13
-
14
-
15
-
16
-
17
-
18
-
19
-
20
-
21
-
22
-
23
-
24
-
25
-
26
-
27
-
28
-
29
-
30
-
31
-
32
-
33
-
34
-
35
-
36
-
37
-
38
-
39
-
40
-
41
-
42
-
43
-
44
-
45
-
 46
46 -
 47
47 -
 48
48 -
 49
49 -
 50
50 -
 51
51 -
 52
52 -
 53
53 -
 54
54 -
 55
55 -
 56
56 -
57
-
58
-
59
-
60
-
61
-
62
-
63
-
64
-
65
-
66
-
67
-
68
-
69
-
70
-
71
-
72
-
73
-
74
-
75
-
76
-
77
-
78
-
79
-
80
-
81
-
82
-
83
-
84
-
85
-
86
-
87
-
88
-
89
-
90
-
91
-
92
-
93
-
94
-
95
-
96
-
97
-
98
-
99
-
100
-
101
-
102
-
103
-
104
-
105
-
106
-
107
-
108
-
109
-
110
-
111
 |
 |