Brother International PC-210PRW Users Manual - English - Page 64
Sewing overcasting stitches using the optional side cutter
 |
View all Brother International PC-210PRW manuals
Add to My Manuals
Save this manual to your list of manuals |
Page 64 highlights
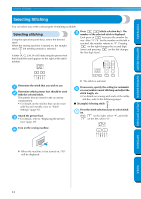
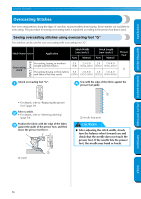
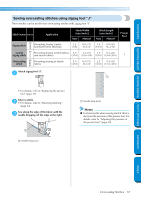
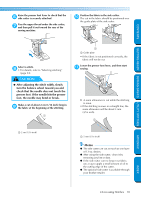
GETTING READY SEWING BASICS UTILITY STITCHES UTILITY STITCHES CONTENTS Sewing overcasting stitches using the optional side cutter Using the side cutter, seam allowances can be finished while the edge of the fabric is cut off. The following four stitches can be used to sew overcasting. When the side cutter is attached, be sure to use the settings in the ranges listed below. Stitch Name Pattern Application Overcasting stitch Sewing straight stitches while cutting the fabric Preventing fraying in thin and mediumweight fabrics while cutting the fabric Preventing fraying in thick fabrics while cutting the fabric Stitch Width [mm (inch.)] Auto Manual Stitch Length [mm (inch.)] Auto Manual Presser Foot 0.0 0.0-2.5 2.5 0.2-5.0 (0) (0-3/32) (3/32) (1/64-3/16) 3.5 3.5-5.0 2.0 1.0-4.0 (1/8) (1/8-3/16) (1/16) (1/16-3/16) S 5.0 3.5-5.0 2.5 1.0-4.0 (3/16) (1/8-3/16) (3/32) (1/16-3/16) Sewing zigzag stitches while cutting the fabric 3.5 3.5-5.0 1.4 0.0-4.0 (1/8) (1/8-3/16) (1/16) (0-3/16) Hook the connecting fork of the side cutter 4 onto the needle clamp screw. 1 APPENDIX Remove the presser foot. 1 • For details, refer to "Replacing the presser foot" (page 29). Lower the presser foot lever, and then 2 manually thread the needle. • The needle threader cannot be used. If the needle threader is used with the side cutter, the sewing machine may be damaged. Raise the presser foot lever. 3 2 1 Connecting fork 2 Needle clamp screw Position the side cutter so that side cutter pin 5 is aligned with the notch in the presser foot holder, and then slowly lower the presser foot lever. 2 1 1 Notch in presser foot holder 2 Pin X The side cutter is attached. 58 INDEX
-
 1
1 -
2
-
3
-
4
-
5
-
6
-
7
-
8
-
9
-
10
-
11
-
12
-
13
-
14
-
15
-
16
-
17
-
18
-
19
-
20
-
21
-
22
-
23
-
24
-
25
-
26
-
27
-
28
-
29
-
30
-
31
-
32
-
33
-
34
-
35
-
36
-
37
-
38
-
39
-
40
-
41
-
42
-
43
-
44
-
45
-
46
-
47
-
48
-
49
-
50
-
51
-
52
-
53
-
54
-
55
-
56
-
57
-
58
-
 59
59 -
 60
60 -
 61
61 -
 62
62 -
 63
63 -
 64
64 -
 65
65 -
 66
66 -
 67
67 -
 68
68 -
 69
69 -
70
-
71
-
72
-
73
-
74
-
75
-
76
-
77
-
78
-
79
-
80
-
81
-
82
-
83
-
84
-
85
-
86
-
87
-
88
-
89
-
90
-
91
-
92
-
93
-
94
-
95
-
96
-
97
-
98
-
99
-
100
-
101
-
102
-
103
-
104
-
105
-
106
-
107
-
108
-
109
-
110
-
111
 |
 |
