Brother International PC-210PRW Users Manual - English - Page 53
Useful Functions, Changing the needle stop position
 |
View all Brother International PC-210PRW manuals
Add to My Manuals
Save this manual to your list of manuals |
Page 53 highlights
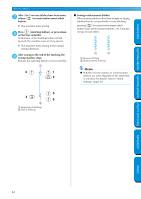
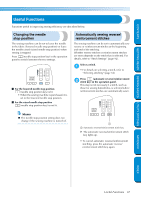
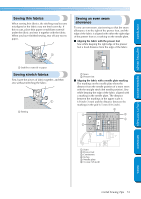
CONTENTS GETTING READY SEWING BASICS UTILITY STITCHES Useful Functions Functions useful in improving sewing efficiency are described below. Changing the needle stop position The sewing machine can be set to leave the needle in the fabric (lowered needle stop position) or leave the needle raised (raised needle stop position) when sewing is stopped. Press (needle stop position key) in the operation panel to switch between the two settings. ■ For the lowered needle stop position (needle stop position key) is lit. • When the sewing machine is purchased, it is set to the lowered needle stop position. ■ For the raised needle stop position (needle stop position key) is not lit. Automatically sewing reverse/ reinforcement stitches The sewing machine can be set to automatically sew reverse or reinforcement stitches at the beginning and end of the stitching. Whether reverse stitches or reinforcement stitches are sewn depends on the stitch that is selected. For details, refer to "Stitch Settings" (page 92). Select a stitch. 1 • For details on selecting a stitch, refer to "Selecting stitching" (page 54). Press (automatic reverse/reinforcement 2 stitch key) in the operation panel. This step is not necessary if a stitch, such as those for sewing buttonholes, is selected where reinforcement stitches are automatically sewn. Memo ● The needle stop position setting does not change if the sewing machine is turned off. 1 1 Automatic reverse/reinforcement stitch key X The automatic reverse/reinforcement stitch key lights up. • To cancel automatic reverse/reinforcement stitching, press the automatic reverse/ reinforcement stitch key again. APPENDIX INDEX Useful Functions 47
-
 1
1 -
2
-
3
-
4
-
5
-
6
-
7
-
8
-
9
-
10
-
11
-
12
-
13
-
14
-
15
-
16
-
17
-
18
-
19
-
20
-
21
-
22
-
23
-
24
-
25
-
26
-
27
-
28
-
29
-
30
-
31
-
32
-
33
-
34
-
35
-
36
-
37
-
38
-
39
-
40
-
41
-
42
-
43
-
44
-
45
-
46
-
47
-
 48
48 -
 49
49 -
 50
50 -
 51
51 -
 52
52 -
 53
53 -
 54
54 -
 55
55 -
 56
56 -
 57
57 -
 58
58 -
59
-
60
-
61
-
62
-
63
-
64
-
65
-
66
-
67
-
68
-
69
-
70
-
71
-
72
-
73
-
74
-
75
-
76
-
77
-
78
-
79
-
80
-
81
-
82
-
83
-
84
-
85
-
86
-
87
-
88
-
89
-
90
-
91
-
92
-
93
-
94
-
95
-
96
-
97
-
98
-
99
-
100
-
101
-
102
-
103
-
104
-
105
-
106
-
107
-
108
-
109
-
110
-
111
 |
 |
