Brother International PC-210PRW Users Manual - English - Page 6
Operation panel - 50 stitch sewing machine
 |
View all Brother International PC-210PRW manuals
Add to My Manuals
Save this manual to your list of manuals |
Page 6 highlights
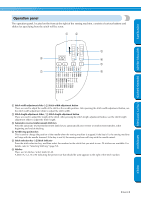
CONTENTS GETTING READY SEWING BASICS UTILITY STITCHES Operation panel The operation panel, located on the front at the right of the sewing machine, consists of various buttons and sliders for specifying how the stitch will be sewn. 1 2 3 8 4 5 7 6 1 Stitch width adjustment slider / 2 Stitch width adjustment button These are used to adjust the width of the stitch or the needle position. After pressing the stitch width adjustment button, use the stitch width adjustment slider to adjust the stitch width. 3 Stitch length adjustment slider / 4 Stitch length adjustment button These are used to adjust the length of the stitch. After pressing the stitch length adjustment button, use the stitch length adjustment slider to adjust the stitch length. 5 Automatic reverse/reinforcement stitch key Press the automatic reverse/reinforcement stitch key to automatically sew reverse or reinforcement stitches at the beginning and end of stitching. 6 Needle stop position key This is used to change the position of the needle when the sewing machine is stopped. If the key is lit, the sewing machine will stop with the needle lowered. If the key is not lit, the sewing machine will stop with the needle raised. 7 Stitch selection key / 8Stitch indicator Press the stitch selection key, and then select the number for the stitch that you wish to use. 50 stitches are available. For details, refer to "Selecting Stitching" (page 54). 9 Stitches There are 50 stitches. Select stitch 00-49. A letter (A, G, J, N or R) indicating the presser foot that should be used appears to the right of the stitch number. APPENDIX INDEX Cover E
-
 1
1 -
 2
2 -
 3
3 -
 4
4 -
 5
5 -
 6
6 -
 7
7 -
 8
8 -
 9
9 -
 10
10 -
 11
11 -
 12
12 -
13
-
14
-
15
-
16
-
17
-
18
-
19
-
20
-
21
-
22
-
23
-
24
-
25
-
26
-
27
-
28
-
29
-
30
-
31
-
32
-
33
-
34
-
35
-
36
-
37
-
38
-
39
-
40
-
41
-
42
-
43
-
44
-
45
-
46
-
47
-
48
-
49
-
50
-
51
-
52
-
53
-
54
-
55
-
56
-
57
-
58
-
59
-
60
-
61
-
62
-
63
-
64
-
65
-
66
-
67
-
68
-
69
-
70
-
71
-
72
-
73
-
74
-
75
-
76
-
77
-
78
-
79
-
80
-
81
-
82
-
83
-
84
-
85
-
86
-
87
-
88
-
89
-
90
-
91
-
92
-
93
-
94
-
95
-
96
-
97
-
98
-
99
-
100
-
101
-
102
-
103
-
104
-
105
-
106
-
107
-
108
-
109
-
110
-
111
 |
 |
