Brother International PEDESIGN 5.0 Users Manual - English - Page 117
[Color Reduction function], Image Tune, Colors, Pick Color, Cancel, Noise Reduction
 |
View all Brother International PEDESIGN 5.0 manuals
Add to My Manuals
Save this manual to your list of manuals |
Page 117 highlights
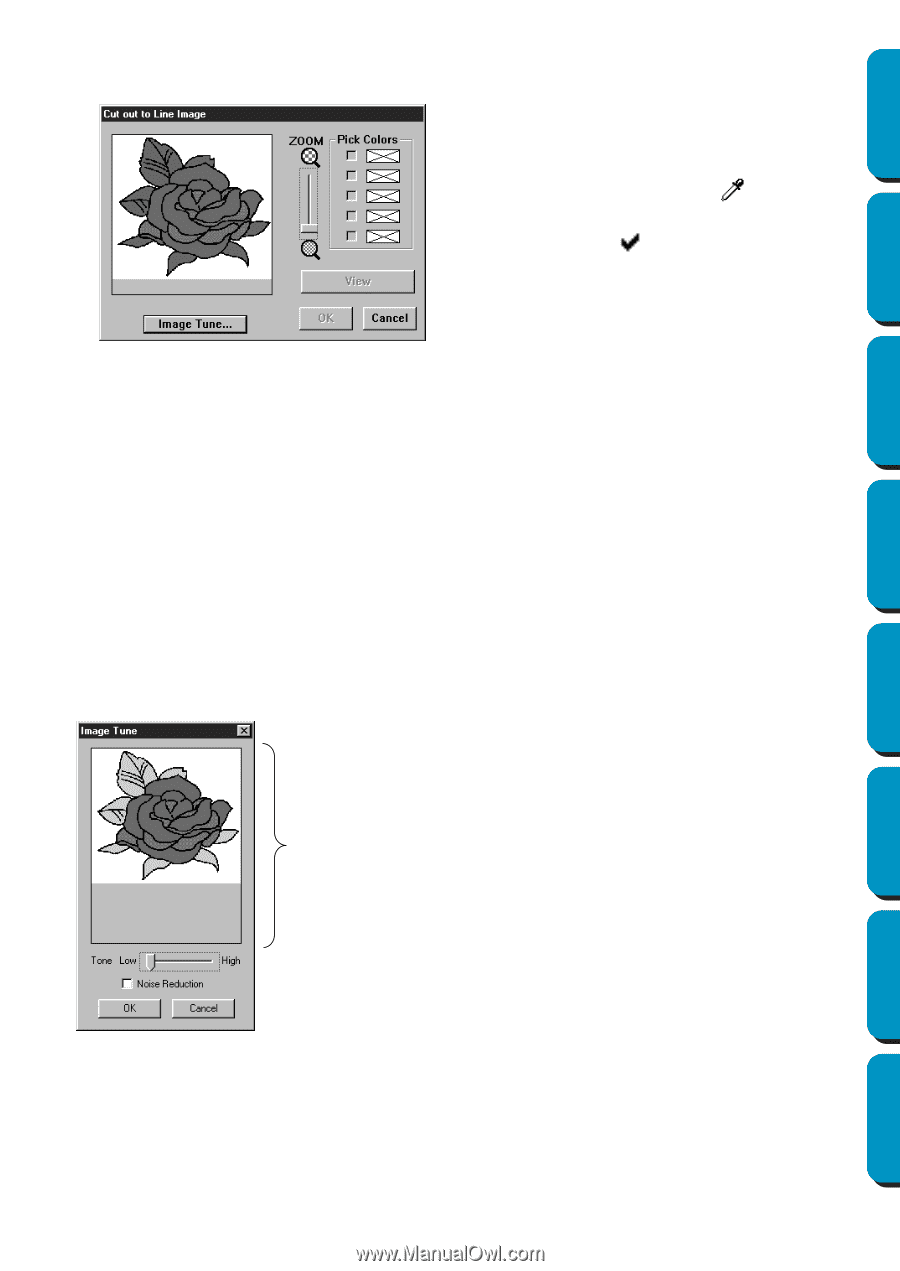
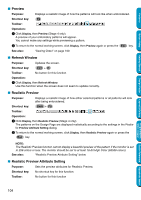
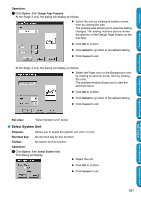
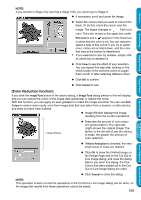
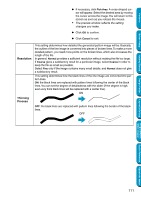
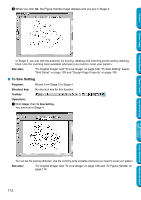
Contents Before Using NOTE: If you started in Stage 3 by opening a Stage 3 file, you cannot go to Stage 2. N If necessary, scroll and zoom the image. N Select the color(s) that you want to convert into black. To do this, move the cursor over the image. The shape changes to . Click on a color. The color moves to the upper box under Pick Colors and a appears in the check box to show that the color is on. You can repeat to select a total of five colors. If you try to select more, colors are scrolled down, and the color that was at the bottom is deselected. • If you selected a color by mistake, simply click its check box to deselect it. N Click View to see the effect of your selection. You can repeat this step after clicking on the check boxes of the selected colors to toggle them on/off, or after selecting different colors. N Click OK to confirm. N Click Cancel to exit. Getting Started Design Center Layout & Editing Programmable Stitch Creator [Color Reduction function] If you click the Image Tune button in the above dialog, a Image Tune dialog similar to this will display, and you can reduce the colors of the image data (posterize) or reduce the noise. With this function, you can apply an even gradation to make the image smoother. You can use Pick Colors to select colors easily, even from image data that was taken from a scanner or other device, and does not have clear outlines. N Image Window displays the image resulting from the current operations. Image Window N Tone sets the amount of color reduction (posterization). The right side (High) shows the original image. The farther to the left side (Low) the setting is made, the greater the amount of color reduction. N If Noise Reduction is checked, the very small areas of noise are deleted. N Click OK to show the finished image on the Design Page and on the Cut Out to Line Image dialog, and close the dialog. Before you open this dialog, the Pick Colors that were picked out in the Cut Out to Line Image dialog are reset. N Click Cancel to close the dialog. NOTE: This operation is done so that the operations in the Cut Out to Line Image dialog can be done, so the image that results from these operations cannot be saved. 109 Quick Reference Alphabetic Index
-
 1
1 -
2
-
3
-
4
-
5
-
6
-
7
-
8
-
9
-
10
-
11
-
12
-
13
-
14
-
15
-
16
-
17
-
18
-
19
-
20
-
21
-
22
-
23
-
24
-
25
-
26
-
27
-
28
-
29
-
30
-
31
-
32
-
33
-
34
-
35
-
36
-
37
-
38
-
39
-
40
-
41
-
42
-
43
-
44
-
45
-
46
-
47
-
48
-
49
-
50
-
51
-
52
-
53
-
54
-
55
-
56
-
57
-
58
-
59
-
60
-
61
-
62
-
63
-
64
-
65
-
66
-
67
-
68
-
69
-
70
-
71
-
72
-
73
-
74
-
75
-
76
-
77
-
78
-
79
-
80
-
81
-
82
-
83
-
84
-
85
-
86
-
87
-
88
-
89
-
90
-
91
-
92
-
93
-
94
-
95
-
96
-
97
-
98
-
99
-
100
-
101
-
102
-
103
-
104
-
105
-
106
-
107
-
108
-
109
-
110
-
111
-
 112
112 -
 113
113 -
 114
114 -
 115
115 -
 116
116 -
 117
117 -
 118
118 -
 119
119 -
 120
120 -
 121
121 -
 122
122 -
123
-
124
-
125
-
126
-
127
-
128
-
129
-
130
-
131
-
132
-
133
-
134
-
135
-
136
-
137
-
138
-
139
-
140
-
141
-
142
-
143
-
144
-
145
-
146
-
147
-
148
-
149
-
150
-
151
-
152
-
153
-
154
-
155
-
156
-
157
-
158
-
159
-
160
-
161
-
162
-
163
-
164
-
165
-
166
-
167
-
168
-
169
-
170
-
171
-
172
-
173
-
174
-
175
-
176
-
177
-
178
-
179
-
180
-
181
-
182
-
183
-
184
-
185
-
186
-
187
-
188
-
189
-
190
-
191
-
192
-
193
-
194
-
195
-
196
-
197
-
198
-
199
-
200
-
201
-
202
-
203
-
204
-
205
-
206
-
207
-
208
-
209
-
210
-
211
-
212
-
213
-
214
-
215
-
216
-
217
-
218
-
219
-
220
-
221
-
222
-
223
-
224
-
225
-
226
-
227
-
228
-
229
-
230
-
231
-
232
-
233
-
234
-
235
-
236
-
237
-
238
-
239
-
240
-
241
-
242
-
243
-
244
-
245
-
246
-
247
-
248
-
249
-
250
-
251
-
252
-
253
-
254
-
255
-
256
-
257
-
258
-
259
-
260
-
261
-
262
-
263
-
264
-
265
-
266
-
267
-
268
-
269
-
270
-
271
-
272
-
273
-
274
 |
 |