Brother International PEDESIGN 5.0 Users Manual - English - Page 79
Using the Stage 4 Tool Box, Region Setting Mode, Applying the sewing attributes to a region
 |
View all Brother International PEDESIGN 5.0 manuals
Add to My Manuals
Save this manual to your list of manuals |
Page 79 highlights
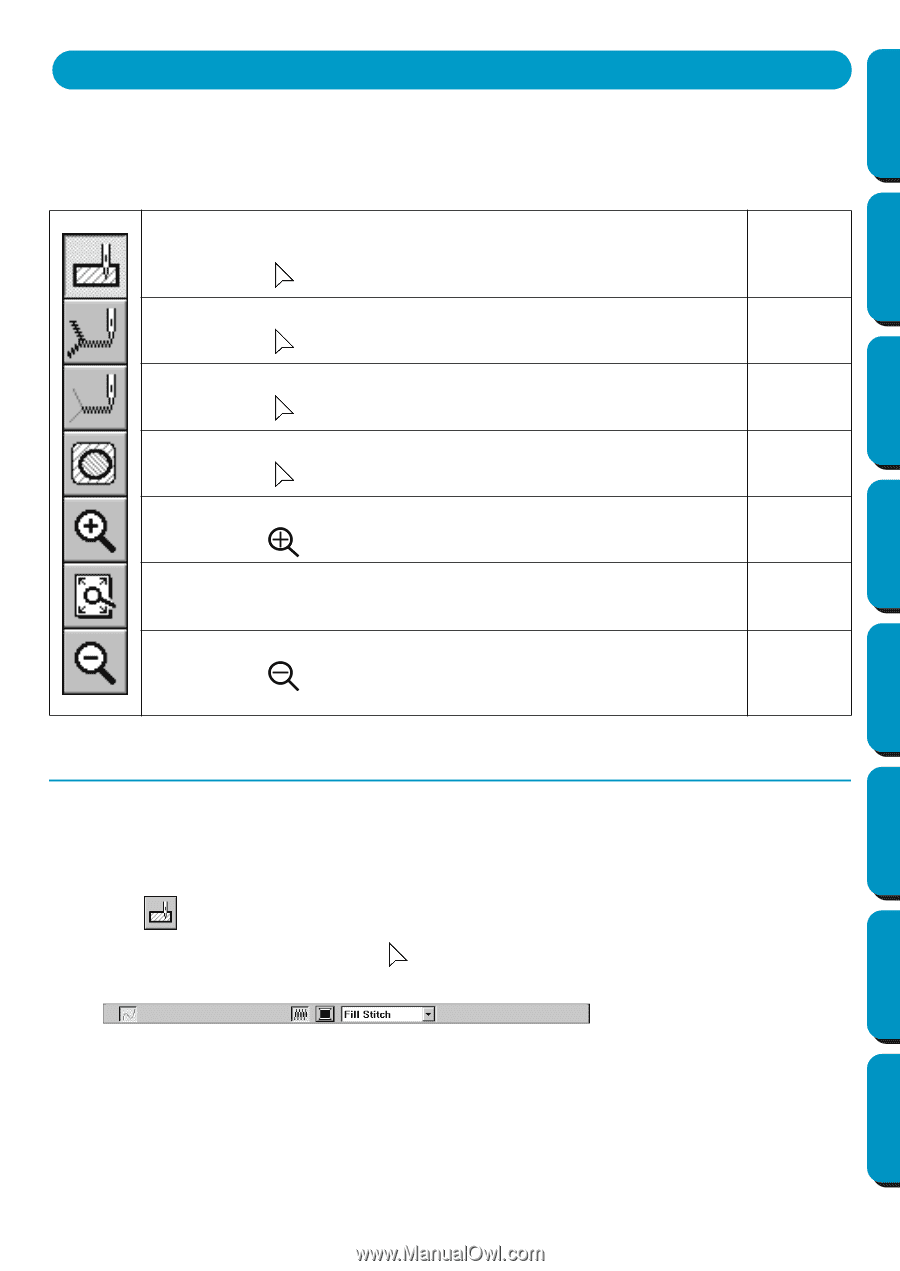
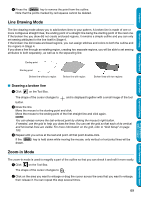
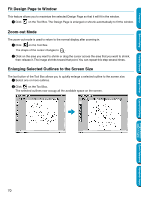
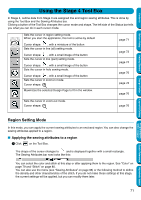
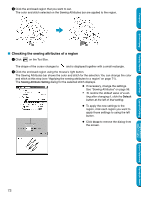
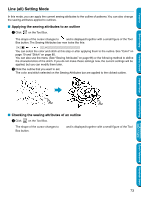
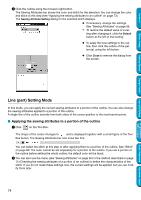
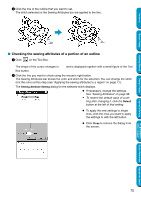
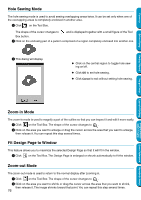
Contents Before Using Getting Started Using the Stage 4 Tool Box In Stage 4, outline data from Stage 3 are assigned line and region sewing attributes. This is done by using the Tool Box and the Sewing Attributes bar. Clicking a button of the Tool Box changes the cursor mode and shape. The left side of the Status bar tells you what you can do in each cursor mode. Sets the cursor in region setting mode. When you start the application, this tool is active by default Cursor shape: , with a miniature of the button Sets the cursor in line (all) setting mode. Cursor shape: , with a small image of the button Sets the cursor in line (part) setting mode. Cursor shape: , with a small image of the button Sets the cursor in hole sewing mode. Cursor shape: , with a small image of the button Sets the cursor in zoom-in mode. Cursor shape: Maximizes the selected Design Page to fit in the window. page 71 page 73 page 74 page 76 page 76 page 76 Sets the cursor in zoom-out mode. Cursor shape: page 76 Design Center Layout & Editing Programmable Stitch Creator Quick Reference Alphabetic Index Region Setting Mode In this mode, you can apply the current sewing attributes to an enclosed region. You can also change the sewing attributes applied to a region. I Applying the sewing attributes to a region 1 Click on the Tool Box. The shape of the cursor changes to and is displayed together with a small rectangle. The Sewing Attributes bar now looks like this: You can select the color and stitch at this step or after applying them to the region. See "Color" on page 79 and "Stitch" on page 80. You can also use the menu (see "Sewing Attributes" on page 96) or the following method to define the density and other characteristics of the stitch. If you do not make these settings at this stage, the current settings will be applied, but you can modify them later. 71
-
 1
1 -
2
-
3
-
4
-
5
-
6
-
7
-
8
-
9
-
10
-
11
-
12
-
13
-
14
-
15
-
16
-
17
-
18
-
19
-
20
-
21
-
22
-
23
-
24
-
25
-
26
-
27
-
28
-
29
-
30
-
31
-
32
-
33
-
34
-
35
-
36
-
37
-
38
-
39
-
40
-
41
-
42
-
43
-
44
-
45
-
46
-
47
-
48
-
49
-
50
-
51
-
52
-
53
-
54
-
55
-
56
-
57
-
58
-
59
-
60
-
61
-
62
-
63
-
64
-
65
-
66
-
67
-
68
-
69
-
70
-
71
-
72
-
73
-
 74
74 -
 75
75 -
 76
76 -
 77
77 -
 78
78 -
 79
79 -
 80
80 -
 81
81 -
 82
82 -
 83
83 -
 84
84 -
85
-
86
-
87
-
88
-
89
-
90
-
91
-
92
-
93
-
94
-
95
-
96
-
97
-
98
-
99
-
100
-
101
-
102
-
103
-
104
-
105
-
106
-
107
-
108
-
109
-
110
-
111
-
112
-
113
-
114
-
115
-
116
-
117
-
118
-
119
-
120
-
121
-
122
-
123
-
124
-
125
-
126
-
127
-
128
-
129
-
130
-
131
-
132
-
133
-
134
-
135
-
136
-
137
-
138
-
139
-
140
-
141
-
142
-
143
-
144
-
145
-
146
-
147
-
148
-
149
-
150
-
151
-
152
-
153
-
154
-
155
-
156
-
157
-
158
-
159
-
160
-
161
-
162
-
163
-
164
-
165
-
166
-
167
-
168
-
169
-
170
-
171
-
172
-
173
-
174
-
175
-
176
-
177
-
178
-
179
-
180
-
181
-
182
-
183
-
184
-
185
-
186
-
187
-
188
-
189
-
190
-
191
-
192
-
193
-
194
-
195
-
196
-
197
-
198
-
199
-
200
-
201
-
202
-
203
-
204
-
205
-
206
-
207
-
208
-
209
-
210
-
211
-
212
-
213
-
214
-
215
-
216
-
217
-
218
-
219
-
220
-
221
-
222
-
223
-
224
-
225
-
226
-
227
-
228
-
229
-
230
-
231
-
232
-
233
-
234
-
235
-
236
-
237
-
238
-
239
-
240
-
241
-
242
-
243
-
244
-
245
-
246
-
247
-
248
-
249
-
250
-
251
-
252
-
253
-
254
-
255
-
256
-
257
-
258
-
259
-
260
-
261
-
262
-
263
-
264
-
265
-
266
-
267
-
268
-
269
-
270
-
271
-
272
-
273
-
274
 |
 |