Brother International PEDESIGN 5.0 Users Manual - English - Page 77
Line Drawing Mode, Drawing a broken line, Zoom-in Mode
 |
View all Brother International PEDESIGN 5.0 manuals
Add to My Manuals
Save this manual to your list of manuals |
Page 77 highlights
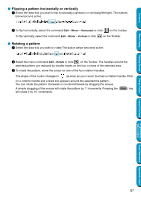
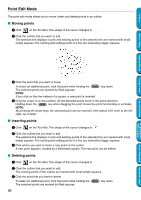
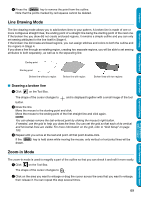
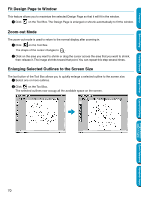
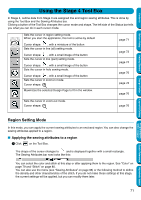
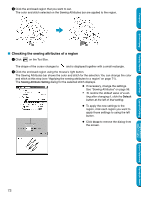
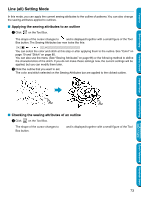
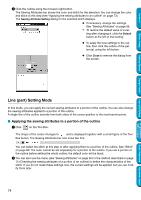
Contents Before Using Getting Started Design Center 4 Press the Delete key to remove the point from the outline. Note that the points marked by red squares cannot be deleted. Line Drawing Mode The line drawing mode allows you to add broken lines to your pattern. A broken line is made of one or more contiguous straight lines, the ending point of a straight line being the starting point of the next one. If the broken line you drew did not create enclosed regions, it remains a simple outline and you can only set sewing attributes for the line itself in Stage 4. If the broken line did create enclosed regions, you can assign stitches and colors to both the outline and the regions in Stage 4. If you draw a line through an existing region, creating two separate regions, you will be able to set sewing attributes to both separately, as well as to the separating line. Ending point Starting point Broken line without a region Broken line with region Broken lines with two regions I Drawing a broken line 1 Click on the Tool Box. The shape of the cursor changes to and is displayed together with a small image of the tool button. 2 Draw the line. Move the mouse to the starting point and click. Move the mouse to the ending point of the first straight line and click again. NOTE: You can always remove the last-entered point by clicking the mouse's right button. If needed, use the grid to help you draw the lines. You can set the grid so that each of its vertical and horizontal lines are visible. For more information on the grid, refer to "Grid Setup" on page 103. 3 Repeat until you arrive at the last end point. At that point double-click. If the Shift key is held down while moving the mouse, only vertical or horizontal lines will be drawn. Zoom-in Mode The zoom-in mode is used to magnify a part of the outline so that you can check it and edit it more easily. 1 Click on the Tool Box. The shape of the cursor changes to . 2 Click on the area you want to enlarge or drag the cursor across the area that you want to enlarge, then release it. You can repeat this step several times. Layout & Editing Programmable Stitch Creator Quick Reference Alphabetic Index 69
-
 1
1 -
2
-
3
-
4
-
5
-
6
-
7
-
8
-
9
-
10
-
11
-
12
-
13
-
14
-
15
-
16
-
17
-
18
-
19
-
20
-
21
-
22
-
23
-
24
-
25
-
26
-
27
-
28
-
29
-
30
-
31
-
32
-
33
-
34
-
35
-
36
-
37
-
38
-
39
-
40
-
41
-
42
-
43
-
44
-
45
-
46
-
47
-
48
-
49
-
50
-
51
-
52
-
53
-
54
-
55
-
56
-
57
-
58
-
59
-
60
-
61
-
62
-
63
-
64
-
65
-
66
-
67
-
68
-
69
-
70
-
71
-
 72
72 -
 73
73 -
 74
74 -
 75
75 -
 76
76 -
 77
77 -
 78
78 -
 79
79 -
 80
80 -
 81
81 -
 82
82 -
83
-
84
-
85
-
86
-
87
-
88
-
89
-
90
-
91
-
92
-
93
-
94
-
95
-
96
-
97
-
98
-
99
-
100
-
101
-
102
-
103
-
104
-
105
-
106
-
107
-
108
-
109
-
110
-
111
-
112
-
113
-
114
-
115
-
116
-
117
-
118
-
119
-
120
-
121
-
122
-
123
-
124
-
125
-
126
-
127
-
128
-
129
-
130
-
131
-
132
-
133
-
134
-
135
-
136
-
137
-
138
-
139
-
140
-
141
-
142
-
143
-
144
-
145
-
146
-
147
-
148
-
149
-
150
-
151
-
152
-
153
-
154
-
155
-
156
-
157
-
158
-
159
-
160
-
161
-
162
-
163
-
164
-
165
-
166
-
167
-
168
-
169
-
170
-
171
-
172
-
173
-
174
-
175
-
176
-
177
-
178
-
179
-
180
-
181
-
182
-
183
-
184
-
185
-
186
-
187
-
188
-
189
-
190
-
191
-
192
-
193
-
194
-
195
-
196
-
197
-
198
-
199
-
200
-
201
-
202
-
203
-
204
-
205
-
206
-
207
-
208
-
209
-
210
-
211
-
212
-
213
-
214
-
215
-
216
-
217
-
218
-
219
-
220
-
221
-
222
-
223
-
224
-
225
-
226
-
227
-
228
-
229
-
230
-
231
-
232
-
233
-
234
-
235
-
236
-
237
-
238
-
239
-
240
-
241
-
242
-
243
-
244
-
245
-
246
-
247
-
248
-
249
-
250
-
251
-
252
-
253
-
254
-
255
-
256
-
257
-
258
-
259
-
260
-
261
-
262
-
263
-
264
-
265
-
266
-
267
-
268
-
269
-
270
-
271
-
272
-
273
-
274
 |
 |