Brother International PEDESIGN 5.0 Users Manual - English - Page 180
Numerical Setting-Rotate, Center, Rotate, degree, Preview, Cancel
 |
View all Brother International PEDESIGN 5.0 manuals
Add to My Manuals
Save this manual to your list of manuals |
Page 180 highlights
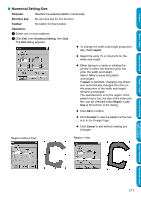
Contents Before Using Getting Started Design Center NOTE: The maximum value that can be entered is the largest value that will not allow the pattern to exceed the size of the Design Page. The minimum value is 1 mm (0.04 inch). See also: "Select System Unit" on page 229 I Numerical Setting-Rotate Purpose: Rotates the selected pattern numerically. Shortcut key: No shortcut key for this function Toolbar: No button for this function Operation: 1 Select one or more patterns. 2 Click Edit, then Numerical Setting, then Rotate. The Rotate dialog appears. N The desired rotation angle can be entered by either typing in a value or clicking the arrows to select the desired value. Select 0 degree to leave the pattern unchanged. N Click OK to confirm. N Click Preview to view the pattern rotated the specified angle in the Design Page. N Click Cancel to exit without making any changes. NOTE: The range of values that can be entered is between 0 and 359 degrees, in 1degree increments. I Center Purpose: Moves the selected object to the center of Design Page. Shortcut key: Ctrl + M Toolbar: No button for this function Operation: 1 Select one or more objects. 2 Click Edit, then Center. The entire selected object moves to the center of Design Page. NOTE: For Letters Fit to a Path If you select either the letters or the path only, the selected object will be moved to the center of Design page, but the unselected object will not be moved with it. For Objects set for Hole Sewing When selecting an object set as part of a hole sewing pattern, the selected object will be moved to the center of Design Page, but the unselected objects will not be moved with it. Layout & Editing Programmable Stitch Creator Quick Reference Alphabetic Index 172
-
 1
1 -
2
-
3
-
4
-
5
-
6
-
7
-
8
-
9
-
10
-
11
-
12
-
13
-
14
-
15
-
16
-
17
-
18
-
19
-
20
-
21
-
22
-
23
-
24
-
25
-
26
-
27
-
28
-
29
-
30
-
31
-
32
-
33
-
34
-
35
-
36
-
37
-
38
-
39
-
40
-
41
-
42
-
43
-
44
-
45
-
46
-
47
-
48
-
49
-
50
-
51
-
52
-
53
-
54
-
55
-
56
-
57
-
58
-
59
-
60
-
61
-
62
-
63
-
64
-
65
-
66
-
67
-
68
-
69
-
70
-
71
-
72
-
73
-
74
-
75
-
76
-
77
-
78
-
79
-
80
-
81
-
82
-
83
-
84
-
85
-
86
-
87
-
88
-
89
-
90
-
91
-
92
-
93
-
94
-
95
-
96
-
97
-
98
-
99
-
100
-
101
-
102
-
103
-
104
-
105
-
106
-
107
-
108
-
109
-
110
-
111
-
112
-
113
-
114
-
115
-
116
-
117
-
118
-
119
-
120
-
121
-
122
-
123
-
124
-
125
-
126
-
127
-
128
-
129
-
130
-
131
-
132
-
133
-
134
-
135
-
136
-
137
-
138
-
139
-
140
-
141
-
142
-
143
-
144
-
145
-
146
-
147
-
148
-
149
-
150
-
151
-
152
-
153
-
154
-
155
-
156
-
157
-
158
-
159
-
160
-
161
-
162
-
163
-
164
-
165
-
166
-
167
-
168
-
169
-
170
-
171
-
172
-
173
-
174
-
 175
175 -
 176
176 -
 177
177 -
 178
178 -
 179
179 -
 180
180 -
 181
181 -
 182
182 -
 183
183 -
 184
184 -
 185
185 -
186
-
187
-
188
-
189
-
190
-
191
-
192
-
193
-
194
-
195
-
196
-
197
-
198
-
199
-
200
-
201
-
202
-
203
-
204
-
205
-
206
-
207
-
208
-
209
-
210
-
211
-
212
-
213
-
214
-
215
-
216
-
217
-
218
-
219
-
220
-
221
-
222
-
223
-
224
-
225
-
226
-
227
-
228
-
229
-
230
-
231
-
232
-
233
-
234
-
235
-
236
-
237
-
238
-
239
-
240
-
241
-
242
-
243
-
244
-
245
-
246
-
247
-
248
-
249
-
250
-
251
-
252
-
253
-
254
-
255
-
256
-
257
-
258
-
259
-
260
-
261
-
262
-
263
-
264
-
265
-
266
-
267
-
268
-
269
-
270
-
271
-
272
-
273
-
274
 |
 |
