Canon EOS Rebel T1i Digital Photo Professional 3.9 for Macintosh Instruction M - Page 119
List of Edit Image Window Functions
 |
View all Canon EOS Rebel T1i manuals
Add to My Manuals
Save this manual to your list of manuals |
Page 119 highlights
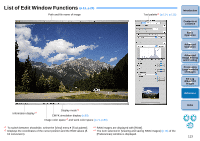
List of Edit Image Window Functions (p.34, p.36) Shows/hides tool palette Shows/hides thumbnail display area Switches to main window (p.110) Image information (p.23) Shows/hides grid*4 Enlargement ratio of displayed image Displays the copy stamp window (p.67 to p.71, p.101 to p.105, p.122) Toolbar Thumbnail display area*3 Displays the trimming/ angle adjustment window (p.38, p.98, p.120) Image path and file name Batch conversion/ saving (p.86, p.87, p.123) Image rotation (90 degree units) Switches between displayed images Tool palette (p.114) Introduction Contents at a Glance 1Basic Operation 2Advanced Operation 3Advanced Image Editing and Printing 4 Processing Large Numbers of Images 5Editing JPEG/TIFF Images Reference Information display*2 Image color space*1 and work color space CMYK simulation display (p.80) Display mode*5 (p.71, p.80) *1 RAW images are displayed with [RAW]. *4 You can set the grid spacing with [Grid pitch] in the [Preferences] (p.78). *2 Displays the coordinates of the cursor position and the RGB values *5 The item selected in [Viewing and saving RAW images] (p.76) of the (8-bit conversion). [Preferences] window is displayed. *3 Displays images selected in the main window. The image selected here is enlarged and displayed on the right. Index 118
-
 1
1 -
2
-
3
-
4
-
5
-
6
-
7
-
8
-
9
-
10
-
11
-
12
-
13
-
14
-
15
-
16
-
17
-
18
-
19
-
20
-
21
-
22
-
23
-
24
-
25
-
26
-
27
-
28
-
29
-
30
-
31
-
32
-
33
-
34
-
35
-
36
-
37
-
38
-
39
-
40
-
41
-
42
-
43
-
44
-
45
-
46
-
47
-
48
-
49
-
50
-
51
-
52
-
53
-
54
-
55
-
56
-
57
-
58
-
59
-
60
-
61
-
62
-
63
-
64
-
65
-
66
-
67
-
68
-
69
-
70
-
71
-
72
-
73
-
74
-
75
-
76
-
77
-
78
-
79
-
80
-
81
-
82
-
83
-
84
-
85
-
86
-
87
-
88
-
89
-
90
-
91
-
92
-
93
-
94
-
95
-
96
-
97
-
98
-
99
-
100
-
101
-
102
-
103
-
104
-
105
-
106
-
107
-
108
-
109
-
110
-
111
-
112
-
113
-
 114
114 -
 115
115 -
 116
116 -
 117
117 -
 118
118 -
 119
119 -
 120
120 -
 121
121 -
 122
122 -
 123
123 -
 124
124 -
125
-
126
-
127
-
128
-
129
-
130
-
131
-
132
 |
 |
