Canon EOS Rebel T1i Digital Photo Professional 3.9 for Macintosh Instruction M - Page 121
List of Trimming/Angle Adjustment Window Functions
 |
View all Canon EOS Rebel T1i manuals
Add to My Manuals
Save this manual to your list of manuals |
Page 121 highlights
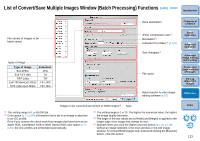
List of Trimming/Angle Adjustment Window Functions (p.38, p.98) Cancels all the trimming (aspect ratio) information Full screen display/returns to normal screen Reverts to the condition when the image was shot Ratio of trimming range (you can also enter numerical values if you have selected [Custom])*1 Upper left coordinates of trimmed range (you can also enter numerical values) Size of trimmed range (you can also enter numerical values) Angle of image adjusted (Drag bar, use the mouse to click / or enter numerical values to set angle) Copies the trimmed range and applies (pastes) it to another image*2 Applies the copied trimming range to all other images*2 Switches between displayed images*2 Level of opacity outside a trimmed range Shows/hides grid lines (Drag bar to set distance between grid lines) Displays the trimming range in the center of the window Introduction Contents at a Glance 1Basic Operation 2Advanced Operation 3Advanced Image Editing and Printing 4 Processing Large Numbers of Images 5Editing JPEG/TIFF Images Reference Trimming range Displays borders around a trimmed range Image rotation (90-degree increments) *1 If [Free] has been selected in the [Aspect ratio] list box, you can also drag the borders of the trimmed range to change its range. *2 Operates when you have selected multiple images and the trimming/ angle adjustment window is displayed. Index 120
-
 1
1 -
2
-
3
-
4
-
5
-
6
-
7
-
8
-
9
-
10
-
11
-
12
-
13
-
14
-
15
-
16
-
17
-
18
-
19
-
20
-
21
-
22
-
23
-
24
-
25
-
26
-
27
-
28
-
29
-
30
-
31
-
32
-
33
-
34
-
35
-
36
-
37
-
38
-
39
-
40
-
41
-
42
-
43
-
44
-
45
-
46
-
47
-
48
-
49
-
50
-
51
-
52
-
53
-
54
-
55
-
56
-
57
-
58
-
59
-
60
-
61
-
62
-
63
-
64
-
65
-
66
-
67
-
68
-
69
-
70
-
71
-
72
-
73
-
74
-
75
-
76
-
77
-
78
-
79
-
80
-
81
-
82
-
83
-
84
-
85
-
86
-
87
-
88
-
89
-
90
-
91
-
92
-
93
-
94
-
95
-
96
-
97
-
98
-
99
-
100
-
101
-
102
-
103
-
104
-
105
-
106
-
107
-
108
-
109
-
110
-
111
-
112
-
113
-
114
-
115
-
 116
116 -
 117
117 -
 118
118 -
 119
119 -
 120
120 -
 121
121 -
 122
122 -
 123
123 -
 124
124 -
 125
125 -
 126
126 -
127
-
128
-
129
-
130
-
131
-
132
 |
 |
