Canon PIXMA SELPHY DS700 DS700 Photo Print Guide - Page 33
Printing a Photo List-Print Index
 |
View all Canon PIXMA SELPHY DS700 manuals
Add to My Manuals
Save this manual to your list of manuals |
Page 33 highlights
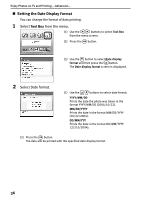
Enjoy Photos on TV and Printing -Advanced- 3 Install the memory card on the printer. See "Inserting a Memory Card" on page 16. 4 Press the Print all button on the printer. See "Operation Panel" on page 7. Printing is started in order of the recent shooting date. * Press the Print All button on the printer if you want to cancel the printing. „ Printing a Photo List-Print Index You can print a list of all photos saved in the memory card known as an index print. note When many photos are stored in a memory card, it is convenient to search for photos to display or print using the shooting date as the search key. See "Searching for Photos with the Shooting Date-Search" on page 35. 1 Select Print index. (1) Use the buttons to select Print Studio from the menu screen. (2) Press the button. The menu of Print Studio is displayed. (3) Use the buttons to select Print index and then press the button. The print confirmation screen is displayed. 2 Start Printing. (1) Confirm the Page size and Media type. To change any of the settings, press the (Settings button). See "Specifying the Paper and Other Settings" on page 33. (2) Press the (Copies +/Copies - buttons) to specify the number of copies to print. (3) Press the (Print button). A list of all photos saved on the memory card will be printed. note For index printing, numbers of images printed on one sheet are as follows according to the paper size. 4"×6"/101.6×152.4 mm : 24 images credit card : 6 images 31
-
 1
1 -
2
-
3
-
4
-
5
-
6
-
7
-
8
-
9
-
10
-
11
-
12
-
13
-
14
-
15
-
16
-
17
-
18
-
19
-
20
-
21
-
22
-
23
-
24
-
25
-
26
-
27
-
 28
28 -
 29
29 -
 30
30 -
 31
31 -
 32
32 -
 33
33 -
 34
34 -
 35
35 -
 36
36 -
 37
37 -
 38
38 -
39
-
40
-
41
-
42
-
43
-
44
-
45
-
46
-
47
-
48
-
49
-
50
-
51
-
52
-
53
-
54
-
55
-
56
-
57
-
58
-
59
-
60
-
61
-
62
-
63
-
64
-
65
-
66
-
67
-
68
-
69
-
70
-
71
-
72
-
73
-
74
-
75
-
76
-
77
-
78
-
79
-
80
-
81
-
82
-
83
-
84
-
85
-
86
-
87
 |
 |
